Way to have a zoom trigger combined with slide layers?
Jan 24, 2013
By
Molly Vidas
Hello all!
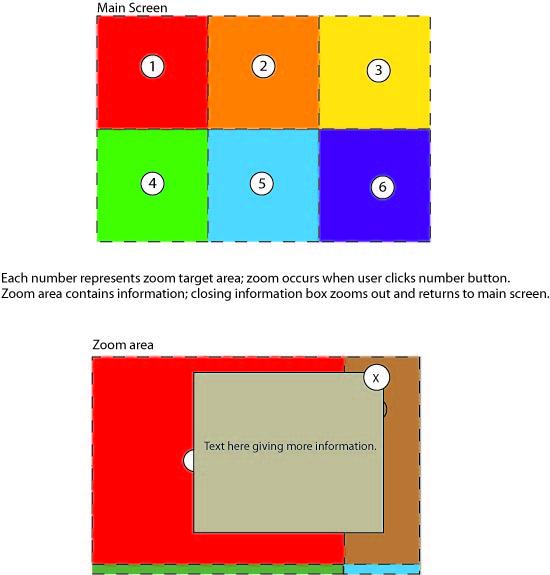
I am trying to figure out a way to have zoom areas be triggered only when the user clicks a certain area of the screen. See below, but is it possible to have the user click a number, then zoom into the area clicked to tell them more information, and have the zoom out happen when they close the zoom area information?
31 Replies
Hi Molly,
As far as I know, you cannot trigger zoom regions. However, you can create the illusion of one by using layers and triggers.
I put together a very (very) quick example, if you'd like to take a look. I'm attaching it to the thread.
Keep in mind, I didn't have time to add the effect to all of the buttons, but "1" and "2" should work.
I'm sure there's some fancier examples out there, just wanted to give you some quick information that may help with your project.
First off, this is a pretty cool workaround Christine.
Molly,
Another trick to have that zoom effect.. is to set animations on the objects on the layer to "Grow". I find that this effect best mimic that zoom action.
See attached.
Christine and Donna -
Thank you both so much for your time and response! I really appreciate the effort put into making the demos.
I will have to add triggering zoom regions onto my Storyline wishlist
I did have the project initially set up using the layering/triggering method, but was hoping someone out there with a higher knowledge of Storyline's capabilities (as I am barely intermediate). This specific project would have been highly complimented by a zoom trigger, but I will happily stick with the layers.
Thank you again - I would be lost without this community!!
Cheers,
Does it have to be a "click"?
Could you use a Hover State with a zoomed image - like the attached?
Bruce
Bruce -
This just might do it!! With a little tweaking, I think I will be able to get close to what I wanted.
There are going to multiple sections of the screen that the learner has to visit before given the option to advance. The hover wouldnt work for the "change state of button" so I added the down state, and a grow animation to the images. The next button appears after all have been visited.
Only downfall is not having associated audio to the "zoom" sections, but I can work around that!
Thank you!
Hi,
Think you can just add audio as part of a Hover, (or any other state).
Bruce
Very elegant, all.
I recently tried to do something similar (on a much simpler scale) but gave up on it because I couldn't control the graphics in the different states.
Here's what I was trying to do:
I'm showing a horizontal row of tabs, and want to enlarge each one as the user clicks on it, then have it return to normal when the user clicks on a different one.
Guess I could layer a graphic for each tab, but seems like there should be a way to do it with states.
Any ideas on how this can work?
Hi Judith,
I think I understood what you meant here, but I'm not positive. So I'm uploading a very raw story with 3 tabs.
- Double clicking to edit the selected state
- Dragging it so it looked like it was positioned properly; using the Ctrl key while dragging helps with finer positioning
Hi Becky,
Thanks, yes, this is what I was getting, except I was just using graphics instead of a button set.
Although I don't always like the button sets, I decided to try with those.
Had to mess around with dragging multiple times, but finally have them lined up the way I want. So I'm satisfied with that. The only thing I don't like is how messy the button text looks (one of the reasons I don't like button sets).
Yours look much neater -- is there a way to make the text on the buttons cleaner-looking?
Hi Bruce and Molly,
Enjoying the Q and A. I just modified Bruce's hover story so the gumdrop photo actually fades in and out. LOVED this Phil Mayor tip and I use it a LOT. Perhaps you don't really want it, but I like when objects come in with a bit of a fade rather than as starkly as they do "by default."
Phil's trick was: after inserting the object in the desired state, edit the state, cut the object (in this case gumdrop photo), and paste it back in. Then add the animation. I did a fade in and out.
Hi Judith,
Wish I could tell you I have a secret sauce for the typeface, but I didn't do anything special. It's just the default Articulate 12 point font.
As I mentioned, I did make sure when I enlarged each shape that I changed the default to lock the aspect ratio (although I type ration - oops).
Not sure if that might have something to do with it.
Oh, and one other thing that seems to happen randomly, at least for me, with shapes. Sometimes text shadowing is turned on - all on its own. IMHO, the shadowing typically makes type very "uncrisp." The way to turn it off is to select the text and click the text shadowing button (Home tab >Font group).
Yes, it was the text shadowing causing most of the problem -- I hadn't noticed it in the font settings.
I then redid the colors a bit to make the buttons fit better in the screen (originally tried to match them to the application).
Thanks for your help!
Glad it worked. I'd run into that quite some time back and, my years of experience trying to get Microsoft Word to listen to what I want (and WordPerfect back in the day), I think led to that discovery. Later on, I also saw it (problem/solution) posted here, so I guess it happens to a lot of us.
Glad it's working now.
Thanks for the zoom responses. My work around was to put my graphic into photoshop, crop the different sections I wanted to zoom, and make each of them a separate jpeg file. Then made a layer for each of the cropped files using a button with a hover state to show the "zoomed" area. It worked, but was a lot of work.
Ok, so how does this work then if you want to do this with a video? I want a mouseover to make the video enlarge, but since zoom regions can't have triggers and videos don't have states, I am at a loss.
Hi Stijn -
You can try using a hotspot or a shape with a transparent fill to overlay the area of your video that you'd like to be "hot". Unfortunately, you can't trigger a zoom region. They are base timeline only.
Hi Stijn and welcome to E-Learning Heroes! Looks like Steve is assisting you here, so just let us know if you need anything further.
I guess this just confirms what I thought: It cannot be done. I circumvented it with a Magnifying Glass Icon (to a new slide in a different scene).
Thanks anyways.
Thanks for the update Stijn.
Hi bruce, how did you do this?
The Hover state of the circle shape with the number one has a larger image. Open Bruce's .story file, select the green number one circle shape, and then click on the states tab in the timeline panel. You'll see the image inserted in the hover state of that shape.
So...the neat thing is Storyline's built-in hover state automagically shows whatever is in that state. In this case a larger image of the same thing on the main slide.
Thanks Kevin for assisting Leng here. "Automagically" is a nice new word too.
I hope this helps to everyone, i been using articulate for a few months and its amazing how you can every time get to what you're trying to accomplish, this may work for a few, its a little too much work but, hey at least there is a way to get it done.
Oscar I love your workaround solution and I think this is exactly what is going to work for us. We have an organisation chart of Partners in our firm, and when we click over each one, I want it to zoom in and then display details of that person. I think this is the approach we are going to use. Thank you for this.
Glad this thread is still helping folks, thanks for letting us know Sachin!
This discussion is closed. You can start a new discussion or contact Articulate Support.