Engage 360: Adding and Editing Content
It’s super easy to add and edit content in Engage 360 interactions. Just use the form-based interface to enter text and add media to each step in your interaction. Then use the text formatting options, built-in audio editor, and media properties to edit your content until it’s just right.
Watch the videos below and use the practice activities to follow along.
- Add and Format Text
- Add and Edit Audio
- Add a Picture and Adjust Its Properties
- Add a Video and Adjust Its Properties
Practice Activity: Add and Format Text
Adding text to an interaction couldn’t be easier. Just type in the title field and the text panel for each step in your interaction.
- Open Comstar Real Estate.intr from your practice files. We’ve already added text to the interaction for you. (If you’d like to recreate this project from scratch before continuing, see Creating Your First Interaction.)
- Use the Format Text tab on the Engage ribbon to format the interaction text as you’d like.

- Preview your interaction to see how it looks.
To learn more about text formatting, see this user guide.
Practice Activity: Add and Edit Audio
You can import audio files into your interactions or record narration right in Engage.
Let’s record narration some narration. Make sure you have a microphone available for this activity.
- Open Comstar Real Estate.intr from your practice files.
- Select the introduction in the steps panel on the left side of the screen, then click the Narration Script button in the audio panel on the right side. You’ll read this script when you record narration.
- When you’re ready, click the red Record button and read the narration script out loud. Feel free to add an unnecessary pause or something you can edit out in the following steps.

- When you’re done, click the Stop button.
- Now let’s open the audio editor. Click the Edit Audio icon (look like audio waveform).
- Use the play/pause and stop buttons in the lower left corner of the audio editor to listen to your recording.
- Delete or silence part of the audio waveform.
- Click Save & Close.
To learn more about adding audio to your interactions, see this user guide.
Practice Activity: Add a Picture and Adjust Its Properties
You can add one media file to each step in your interaction—picture, character, or video.
- Open Comstar Real Estate.intr from your practice files and select the introduction in the steps panel.
- Let’s replace the existing picture. Click the red X below the image thumbnail in the media panel to delete the image.
- Click the Picture icon in the media panel, then import the house.jpg file from your practice files.

- Change the Position of the image to the Left side of the interaction.
- Change the Size to Custom and set the Width to 200 px. (The height will automatically adjust to maintain the image’s aspect ratio.)
- Finally, mark the box to Zoom Image so learners can see a larger version of your picture.
- Preview your interaction to see how it looks.
To learn more about adding images, see this user guide.
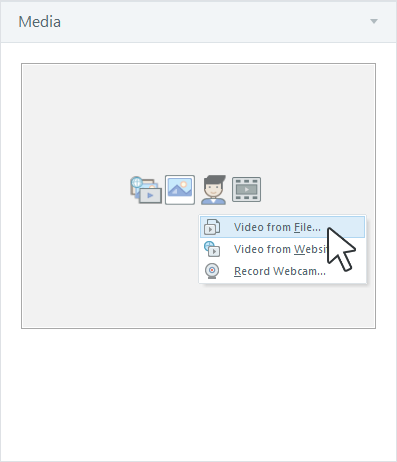
Practice Activity: Add a Video and Adjust Its Properties
You can add videos to your interaction from a variety sources, including video files, video-hosting websites, and your webcam.
- Open Comstar Real Estate.intr from your practice files and select the last step (Pride) in the steps panel.
- Let’s replace the existing video. Click the red X below the video thumbnail in the media panel to delete the video.
- Click the Video icon in the media panel and choose Video from File.
- Import the video.mp4 file from your practice files.
- Change the Position of the video to the Left side of the interaction.
- Change the Size to Custom, then set the Width to 800 px.
- Since we used such a large value for the width, Engage should tell you that it’s too large, and it should tell you what the maximum size is. Click OK to accept the maximum size values.
- Mark the box to Include Playbar, then uncheck the box to Auto Start the video.
- Preview your interaction to see how it looks.
To learn more about adding videos to your interactions, see this user guide. To learn all about the built-in video editor where you can trim, crop, insert a logo, and more, see this user guide.
Summary
In this tutorial, you learned how to populate an interaction with text, audio, images, and videos using Engage’s intuitive form-based interface. Good work!
Learn more about working with media in Engage 360.
In the next tutorial, we’ll explore the interaction properties window.