How to Create a Panning Effect Using Slide Transitions
In a previous post, I shared a couple creative uses of slide transitions from Nancy Duarte’s book, Slideology. Now I’d like to show you how you can create this type of panning effect in your Articulate Presenter presentations.
In video, a panning effect is when the camera moves from one part of a scene to another, changing your field of view. Since PowerPoint does not have a movable camera, we have to create the illusion of a moving camera by moving the content of our slides, which serves as our field of view. Basically, instead of moving our field of view across a scene, we are moving a scene across our field of view.

Click here to view the published demo
In the example above, watch as a sequence of push transitions pans through the presentation, giving the impression of navigating through a larger scene instead of snapping from slide to slide. Also note how some slide elements continue off-screen, across slides, to tie it all together and enhance the effect.
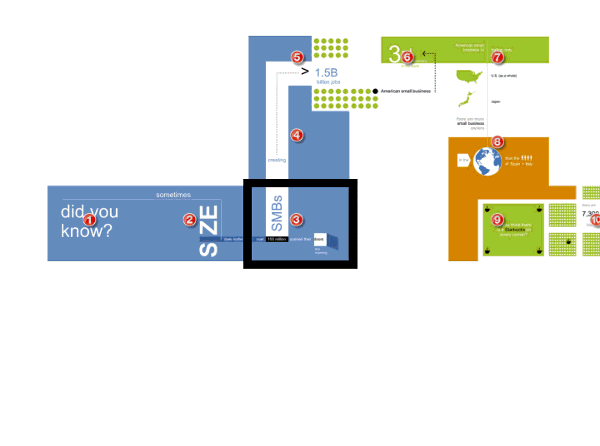
This is what the scene from our example looks like. (Each slide is numbered to illustrate the path taken through the scene.)
Creating a panning effect
The tutorial below shows you how to create the illusion of a moving camera by applying a few simple push transitions to emulate that nice panning effect.
The transition setting controls how a slide enters and how the preceding slide exits. For example, if you add a transition to slide 3, it dictates how slide 2 leaves and slide 3 enters.
Articulate Presenter supports many, but not all, PowerPoint slide transitions. This table of supported slide transitions will be helpful as you consider using them in your presentations.
Applying slide transitions
Just add any of the supported transitions to your slides in PowerPoint, and they'll work perfectly when you publish your Presenter course. Use the links below to see specific steps for applying slide transitions in your version of PowerPoint:
Customizing transition properties
Many, but not all, of the transitions in PowerPoint have customizable properties that you can set.
On the Slides tab in Normal view, click the thumbnail of the slide with the transition that you want to modify.
On the Transitions tab, in the Transition to This Slide group, click Effect Options and select the option that you want.
To set the duration of the transition to the current slide, enter the number of seconds you want the transition to last into the Duration text box in the Timing group.

When applied thoughtfully, transitions can help make your content more professional-looking, easier to understand, and more engaging. They can also help you explain a process or tell a story because you can use them to convey change or draw attention to specific information. Ultimately, it comes down to being intentional about your design and choosing slide transitions that work for you and your content.
post written by Mike Taylor
If you want to try this yourself but don’t have Studio ’13, no problem. Just sign up for a fully functional, free 30-day trial. And don’t forget to post your questions and comments in the forums. We’re here to help! For more e-learning tips, examples, and downloads, follow us on Twitter.
5 Comments