Customizing the Quiz
Now we're ready to make some modifications that will add the finishing touches to our quiz.
First, we'll modify the Quiz Properties and disable answer shuffling and default feedback. Next, we'll make some changes to our Player Templates by modifying the Layout and Color Scheme options. And finally, we'll customize the radio button colors so they better align with the choice box colors.
You can always view the Final version and download the source files if you're following along.
Quiz Properties
- In the Menu Bar, click Quiz Properties

- Under the Quiz Info tab, update the Quiz Title to RSI-Quizmaker.
- In the next tab, Question Defaults, deselect Shuffle answers and Provide feedback by default.

NOTE: You might recall making the same changes earlier when we created the question slide. Disabling the options in the Quiz Properties ensures the options won't apply to new question slides.
Player Templates
- Click Player Templates to bring open the current, default template. Next, click Edit... to modify the template.

- In the Layout tab, deselect Display question list navigation panel and Display timer.

- In the Colors and Effects tab, select Black from the Color Scheme menu. The Black scheme will be our starting point for additional customizations.
- Select Edit... to make some more changes
- In the Color Scheme Editor, select Text > Text 2 to modify the Quiz Title colors

- Select the Color Fill icon and select a medium gray
- Click OK
- Rename the new Color Scheme: RSI Quizmaker Colors
- Click Close
- In Fonts and Effects > Sound effects, choose Disable from the menu

- In the Other tab, change the Background Color to Black

Customizing the Radio Buttons
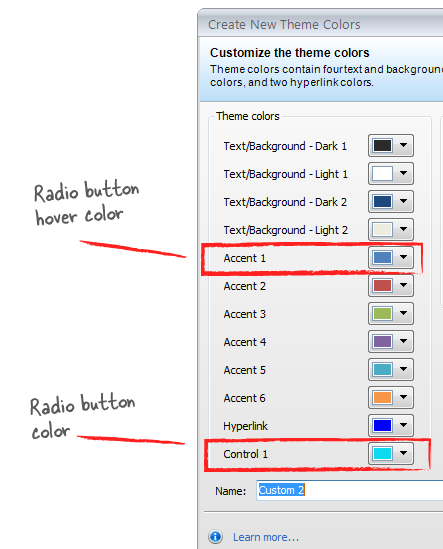
All right, our last step is to customize the radio buttons. Currently the radio button is a bright teal with a light blue background.
- Open the question slide by double-clicking it in the Question List
- Click Slide View > Design > Colors > Create New Theme Colors...

- Change Accent 1 to white. This controls the radio button's hover color so the white will blend with the choice boxes.
- Change Control 1 to the dark red (R:194 G:72 B:55)
- Rename your new Theme Color to RSI Colors. It's a best practice to rename your themes as you create them, otherwise, you'll see a bunch of themes in your list named Custom1, Custom2, and so on.
- Click Save

What's next?
All right, in the next lesson I'll show you how you can work with the framework we just created. We spent some time up front putting this together, but the hard work is about to pay off. I'll show you how in the next lesson!
Be the first to comment