4 New Accessibility Features to Better Serve Your Learners

As course creators, our main focus is on helping people learn effectively. We do this by curating content that aligns with our learning objectives and presenting it in a way that makes it easy to understand. But if we want to design effective training then that isn’t enough—we also have to make sure all learners can access it. At Articulate, we want to make it easier for you to create training that’s accessible to everyone. That’s why we’re excited to introduce these four new Storyline 360 and Rise 360 features. Let’s check them out!
Storyline 360
Accessible Feedback Layers
Quizzing is an important part of the learning experience. And thanks to accessible feedback layers, you can make sure that experience is a positive one for all your learners. The accessible feedback master meets color, contrast, and focus guidelines by default. This means that now you can rest assured that your Correct, Incorrect, Try Again, and Thank You feedback layers work for everyone—automatically.
For new projects, simply add the accessible master at the start of course creation. To insert it, go to the View tab on the Storyline ribbon, click Feedback Master, then select Insert Accessible Master.

It’s that simple! Any quiz questions you add will use accessible feedback layers.
And if you already have a quiz in your project, it’s just as easy. To apply the accessible feedback master to your quiz slide(s) go to your Story or Slide View, hold down the Shift or Control key as you select the question slides you want to update. Then, go to the Question Tools—Design tab on the ribbon and use the Feedback Master drop-down arrow to select the accessible feedback master.

This updates all the corresponding feedback layers at the same time.
Want to learn more about accessible feedback layers in Storyline 360? Check out this article to help you get started.
Video Transcripts
Another way to ensure all your learners have the best possible experience with your training is by giving them more customization options. That’s why in addition to adding closed captions to your projects, you can now easily include video transcripts—for learners who rely on screen readers, use braille displays, or prefer to read the audio content at their own pace.
And now you can give learners both options without adding more work to your plate. Simply add closed captions to a video and turn on accessible video controls.

When learners take your course, they can view the video transcript by selecting the Transcripts button.

To learn more about video transcripts and how they work, check out this article.
Rise 360
Theme Contrast Control
Contrast plays a significant role in the learning experience. If your text doesn’t stand out enough from the background, your learners will struggle to absorb your content. And that’s not what you want!
But now thanks to Theme Contrast Control in Rise 360 you can make sure that when text or icons appear on top of the theme color they meet contrast guidelines automatically. This includes things like:
- Course titles
- Navigation buttons
- Progress indicators
- Dividers
- Checkboxes, numbers, and bullets in list blocks
- Etc.
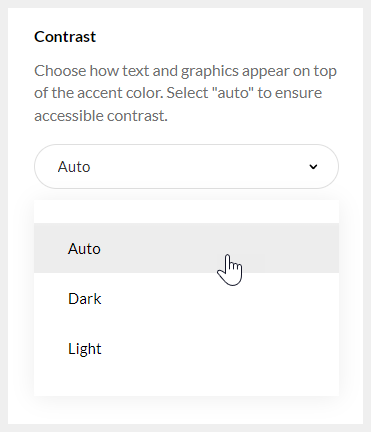
To use this new feature, simply go to the Themes tab, select Colors and choose one of the following options:
- Auto: Turns text and meaningful graphics to black or white automatically depending on your theme color to meet the minimum accessibility contrast requirements (4.5:1). We recommend using this option when possible to ensure everyone has a good experience with your course.
- Dark: Turns text and meaningful graphics to black.
- Light: Turns text and meaningful graphics to white.
Once you’ve made your selection, it’s automatically applied to text and icons that appear on top of your theme color throughout your course all at once, saving you a ton of time and ensuring everyone can easily read your content.
For more details on theme contrast control, head over to this article.
Block Contrast Controls (Coming Soon!)
With the contrast options for themes taken care of, you might be wondering about the rest of your content. That’s where this feature comes in! We’re adding more formatting and background options for all Rise 360 blocks. As you build your course, you’ll get to decide how text and graphics appear—light or dark.
You’ll be able to customize the background color—or better yet—let Rise 360 auto-calculate contrast for you to ensure it’s accessible to all learners.

Stay tuned for more details on how it'll work!
The Bottom Line
With all these powerful new and upcoming features, you can easily create training that’s accessible and enjoyable for everyone. And because we’re committed to accessibility, we’ll continue to work hard to bring you more features and enhancements so all your learners can benefit.
Want to learn more about our accessibility journey and stay up-to-date on new accessibility features? Check out and bookmark these pages:
And if you want to learn more about creating accessible e-learning, head on over to these helpful resources:
You can experience these new features for yourself with a free, 30-day trial of Articulate 360. And subscribe to our newsletter to stay up-to-date on the latest product updates, e-learning examples, and expert advice sent directly to your inbox. If you have questions, please share them in the comments.
1 Comment