Globally Updating Fonts in Your Articulate Projects
There are several different reasons you might find yourself facing the need to replace one font with another in your elearning projects including:
- Merging multiple presentations
- Inheriting content from other authors
- Design changes resulting from stakeholder reviews, etc.
Instead of going through the tedious, time-consuming process of manually changing all of your existing fonts on each slide, here are a few tricks that can expedite that process and save you a ton of time.
Replace Fonts in PowerPoint
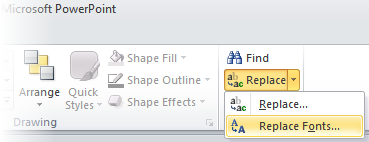
For your Articulate Presenter projects, PowerPoint has an awesome Replace Fonts... feature that lets you find and replace fonts across your entire presentation. That saves you from having to manually update your fonts on a slide-by-slide basis which is a big time saver.
In PowerPoint, you will find the Replace Fonts feature on the Home tab.
Steps for replacing a font in PowerPoint:
- Select the font you want to change.
- Select the font you want to use instead.
- Click the Replace button.

Find All Fonts In Use
You can also use this handy feature to easily find out what fonts currently exist in your project. All fonts in the presentation show up in the Replace list. You can even check for any fonts being used in the project you don’t have installed on your computer. Anything in the Replace list that starts with “?” is a font that is in the project but missing from your machine. You’ll definitely want to correct that to avoid any font wonkiness!

For a few more time-saving tips, check out Tom’s article on cleaning up your client’s PowerPoint slides.
Storyline
So that’s a great tip for changing fonts in PowerPoint but what can you do for your Storyline projects? One option is to take advantage of the the translation feature to achieve a similar result. Instead of using it to update your content from one language to another, you can repurpose it to update your fonts.
Storyline’s translation feature will export all your text to a Word document where you can easily replace one font with another. Then when you reimport the file back into Storyline any changes to the text formatting (font, size, color, style, alignment, etc), will be reflected in your project back in Storyline.
You can learn more about Storyline's translation feature in this tutorial.
Steps for Replacing Fonts with Microsoft Word:
- Open the Replace dialog box (Edit » Replace or Ctrl + H)
- Make sure no text is specified in the Find what or Replace with boxes
- Click in the Find what box, then click Format
(If you don’t see the Format button, click More to expand the zearch options) - Select Font from the pop up list
- In the Find Font dialog box, select the text formatting options you would like to replace
- Click OK
- Click in the Replace with box
- Click Format
- Select Font from the pop up list
- In the Replace Font dialog box, select the new text formatting options you would like to apply
- Click OK
- Click Replace all
- Click OK
- Click Close
Regardless of which method you use for updating the fonts, be sure to check your updated project by browsing through your slides and looking for any unexpected changes such as:
- Text that no longer fits in the designated space.
- Text that has been incorrectly updated.
- Any unintended changes such as text within AutoShapes that you didn't mean to change.
Get more e-learning tips by following us on Twitter.
10 Comments