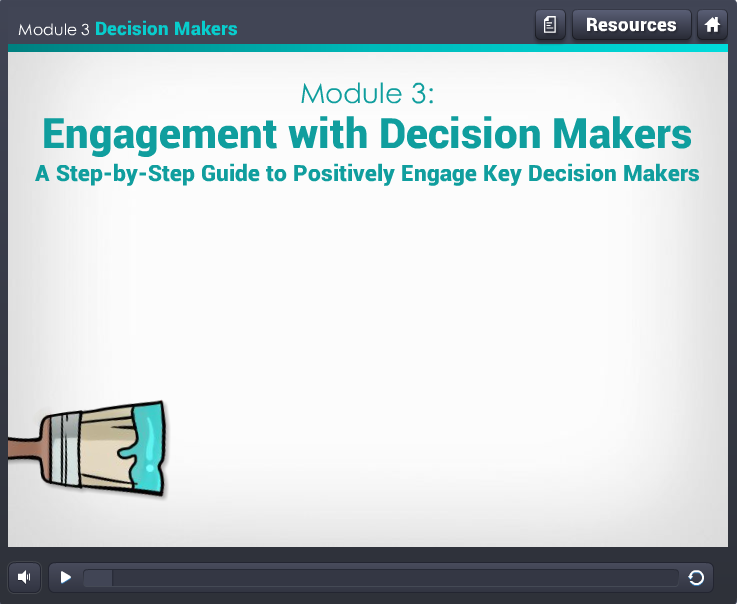
This week Tom shared some World-Changing E-Learning Examples, and in one of them the appearance of the text in the header section of the Storyline player looks customized, as seen in the image below.
It looks like the "Module 3" text is the default, but how did they get the bold, colored text that says "Decision Makers" and the bold text on the "Resources" tab?
... of course another way is to hide the default template and build a 'dummy' template in your project. Then you can include whatever buttons and labels that you want.
I think this is how it is done, the resources tab is a lightbox
Jackie, this is precisely what I did in the last three challenges. I hid the default player and set the border to transparent with a black background.
I then set the player size to (whatever) - say 1368 by 768 for a standard laptop screen. Into that I then pasted my own 'player frame'. Your personalized player can be copied into your slide master so you don't have to worry about re-copying it to each slide. One thing you need to take care is that when you have animated objects entering they will cover your player frame .. then you have to paste little bits of your player screen on a higher layer.
Nick - could you please do a small Screenr of that?
Jackie, this is precisely what I did in the last three challenges. I hid the default player and set the border to transparent with a black background.
I then set the player size to (whatever) - say 1368 by 768 for a standard laptop screen. Into that I then pasted my own 'player frame'. Your personalized player can be copied into your slide master so you don't have to worry about re-copying it to each slide. One thing you need to take care is that when you have animated objects entering they will cover your player frame .. then you have to paste little bits of your player screen on a higher layer.
Hey Nick, could you put the "player frame" on a layer in the slide master to prevent the problem with the animated objects?
Wow! I'm so glad I asked this question. Nick, I wondered how you created your genius Storyline motion-path animation demo in last week's challenge. Like Bruce, I'd love to see a Screenr of how you did it, if you get a chance.
Thank you all so much for your helpful responses. I've learned a lot!
By the way, the designer of this piece, Catherine Chen, chimed in on the original thread today:
"Hi everyone, I'm the designer from TechChange that developed these courses. Thanks for the nice words and to the community for showcasing some of our work! To answer your question about customization of the top title bar in the player... we built the top bar in the slide master. It's just a few rectangles whose colors match the player color so it appears to be part of the player. The buttons are just regular buttons with triggers."
I definitely need to explore this whole messing-with-the-player thing. Seems like entirely too much fun.
I took a quick stab at trying to replicate the player this morning. The story files are attached if anyone would like to experiment. (Great design Catherine Chen!)
Nick: I'd love to see it if you get a chance! I understand it intellectually, but there's something about the visual of the demo that's both motivating and reinforcing.
Placing your customised player components in an upper layer on the master slide is a cool tip - but....
I encountered a problem. My supposedly transparent player created an impenetrable screen and the buttons on my slides became inoperable.
Does that mean I have to transfer my custom buttons to the master slide too?
@Jackie and Becky did you want a screener on how I did my fake Motion Line animation?
Hi Nick, yes I think you would have to transfer your custom buttons to the master slide layer as well. Anything you put on the master slide layer will cover the slide's base and slide layers. So I guess if your player image is the size of the screen it will cover everything on the slide - even if it is transparent.
I've tried this will a simple example and my prev button works on the master but not the next button for some reason. (I swear this used to work). I think there are some issues putting buttons on the master layer especially if you are using them to adjust variables so I guess you would have to play with it and see what happens.
Buttons on master slide layers don't always work. Some triggers do, some don't. When building faux players in the master slide, here's what I do:
Add the overlays and buttons to a layer on the master slide.
I add a trigger to show this layer to my slide master when a variable changes (showNav).
I increment showNav (+1) when the timeline starts. I also add a trigger to my feedback master in a dummy shape. This ensures that when a new layer on the base timeline pops, it doesn't overlay or hide the Nav layer. This can produce a brief flash in some cases. Need to play with it to reduce this side effect.
On the buttons in my layer, I increment variables rather than directly try to call triggers. goNext, goBack, etc..
On my master slide base layer, I add triggers that fire when the associated variables change. I also use some of these to change the state of objects on the master slide base layer from anywhere else in the Story. Those variable listeners are handy
Rather than placing an image with an alpha channel transparency in the middle, I've dealt with this by slicing a frame into four pieces. That gets around the problem of the graphic blocking mouse events.
15 Replies
Looks like it has been built using the SDK to me, but would be very pleased to find if it were standard functionality!
I think this is how it is done, the resources tab is a lightbox
So how do you build a "dummy" template? Would you need the SDK?
No this is just a border at the top with text and three buttons, it is either on the slide master or more likely copy and pasted to every slide.
That's annoyingly simple then ....
Wow! I'm so glad I asked this question. Nick, I wondered how you created your genius Storyline motion-path animation demo in last week's challenge. Like Bruce, I'd love to see a Screenr of how you did it, if you get a chance.
Thank you all so much for your helpful responses. I've learned a lot!
Jackie, tx for asking, and tx to everyone for the replies...and...yes, please, Nick!
By the way, the designer of this piece, Catherine Chen, chimed in on the original thread today:
"Hi everyone, I'm the designer from TechChange that developed these courses. Thanks for the nice words and to the community for showcasing some of our work! To answer your question about customization of the top title bar in the player... we built the top bar in the slide master. It's just a few rectangles whose colors match the player color so it appears to be part of the player. The buttons are just regular buttons with triggers."
I definitely need to explore this whole messing-with-the-player thing. Seems like entirely too much fun.
I took a quick stab at trying to replicate the player this morning. The story files are attached if anyone would like to experiment. (Great design Catherine Chen!)
-Troy
Nick: I'd love to see it if you get a chance! I understand it intellectually, but there's something about the visual of the demo that's both motivating and reinforcing.
Hi Nick, yes I think you would have to transfer your custom buttons to the master slide layer as well. Anything you put on the master slide layer will cover the slide's base and slide layers. So I guess if your player image is the size of the screen it will cover everything on the slide - even if it is transparent.
I've tried this will a simple example and my prev button works on the master but not the next button for some reason. (I swear this used to work). I think there are some issues putting buttons on the master layer especially if you are using them to adjust variables so I guess you would have to play with it and see what happens.
Buttons on master slide layers don't always work. Some triggers do, some don't. When building faux players in the master slide, here's what I do:
@Nick -
Rather than placing an image with an alpha channel transparency in the middle, I've dealt with this by slicing a frame into four pieces. That gets around the problem of the graphic blocking mouse events.
This discussion is closed. You can start a new discussion or contact Articulate Support.