Forum Discussion

New in Labs: Interactivity in Custom Blocks
Interactivity in Custom Blocks is in active development and will receive updates as part of Labs. Functionality will change over time. Some options could be modified, while others may be removed based on feedback and feature stability. There is no guarantee that Labs experiments will become production features.
Get Started
Learner interactions, previously only available via Storyline 360 blocks or code blocks, can now be implemented directly in custom blocks! With the Interactivity in Custom Block lab enabled, you can create objects that show or hide when a learner clicks on them.
Add An Interaction
Getting started is as simple as inserting or editing an existing custom block.
You can start from a template by opening the Interactive templates category and selecting one with prebuilt click interactions.
Or create your own interactions from scratch.
- On the canvas, select the source object you want to make clickable and click the Edit interactivity icon on the toolbar directly above the object or click Interactivity in the sidebar.
- The Interactivity panel opens on the left.
- Click Add interaction.
- Choose what you’d like to happen when the learner clicks the source object:
- Show a hidden object - appears on the canvas and is initially hidden
- Hide a visible object - disappears from the canvas and is initially visible
- Toggle object visibility - switches hide-show visibility on subsequent clicks
- Select the object or objects you’d like to be the target of the action from the list or on the canvas.
- Click Save.
A source object can trigger more than one interaction and have more than one target object. Just click Add interaction again to stack another interaction on the same object. Keep in mind when adding multiple triggers to the same object, the order in which you create the interactions matters - the last interaction will take precedence.
Manage Existing Interactions
Click Interactivity in the left sidebar to manage all existing interactions.
With no objects selected, you’ll see the All interactions list, containing every interaction in the block, grouped by the object that triggers it, with a count so you can see the total at a glance.
Select an object in the canvas to:
- Add an interaction by clicking on + Add interaction button.
- Modify an existing interaction by clicking its Edit icon.
- Delete an interaction by clicking on the Delete icon.
- Change the name of object labels by clicking on the object name. Changes made here are reflected in your Objects panel.
Verify Visibility at a Glance
With the Interactivity panel open, select an object with an interaction to see its source object’s initial visibility to learners. Objects that are the targets of a Show action are marked with an open eye icon and are initially hidden to learners. Targets of a Hide action are marked with an eye with a slash and are initially visible to learners.
Preview Your Interaction
Click Preview in the upper-right to see the learner's view and click through your interactions before you publish. You can also use the main Rise 360 preview function.
FAQs
Does this experiment affect my current custom blocks?
No. Enabling the Interactivity in Custom Blocks experiment won’t affect any of your current custom blocks.
Can I create interactive elements in a responsive Custom Block?
Yes. Interactivity is compatible with the Labs Responsive feature. However, keep in mind that both are evolving features and will change as we continue to make updates while they’re in Labs. Always check your work before publishing.
Can I add animations to the interactions?
At this time, the interactivity feature doesn’t support animations. However, this is on our product roadmap! Please leave us feedback and let us know what type of animations you’d like to see.
Are there templates I can start from that already have interactivity built in?
Yes! Choose a template with click interactions already built in under the Interactive template category. If you have any ideas or current interactive blocks that you’d like to see converted to Custom Blocks, share them with us! We’d love the inspiration.
Does this feature comply with WCAG Accessibility standards?
Yes we are ensuring that the interactions are compatibility with WCAG guidelines, such as screen readers and keyboard controls.
Can I require learners to complete the interaction before moving on?
Currently interactions made in Custom Block do not gate or force learners to complete it before clicking on Continue and moving to the next lesson/block.
Provide Feedback
Both Interactivity in Custom Blocks (Labs) and Custom Blocks (Beta) are evolving features, and we need your feedback to ensure they meet the needs of all Articulate users. Please give us your feedback on the following:
- Uses: Are the directions and labels clear? Could you create all the interactions you wanted to with this feature?
- Bugs: Did any objects not trigger as you expected?
- Improvements: Are there any other types of interactions you’d like to have?
- Insights: Did this feature help make your courses more engaging for your learners?
You can enable and disable this feature from the Labs sidebar in Rise 360 or account settings page. Share your thoughts in this Labs forum or use the feedback form directly within the feature.
46 Replies
- KathrynRowe-a9bCommunity Member
Hello, I am trying to use the interaction to reveal three items when clicked, but the three items I want to reveal are still visible by default. I set up the interaction so when "Advanced" is clicked it will reveal the three items, and then when "Close Button" is clicked it will hide the three items. Is there a way to mark specific items as hidden by default?
Hi KathrynRowe-a9b,
I'm happy to help!
I tested this out, and was able to set Circle 1 as initially hidden. Only once the learner selects Rectangle 1, does Circle 1 become visible.
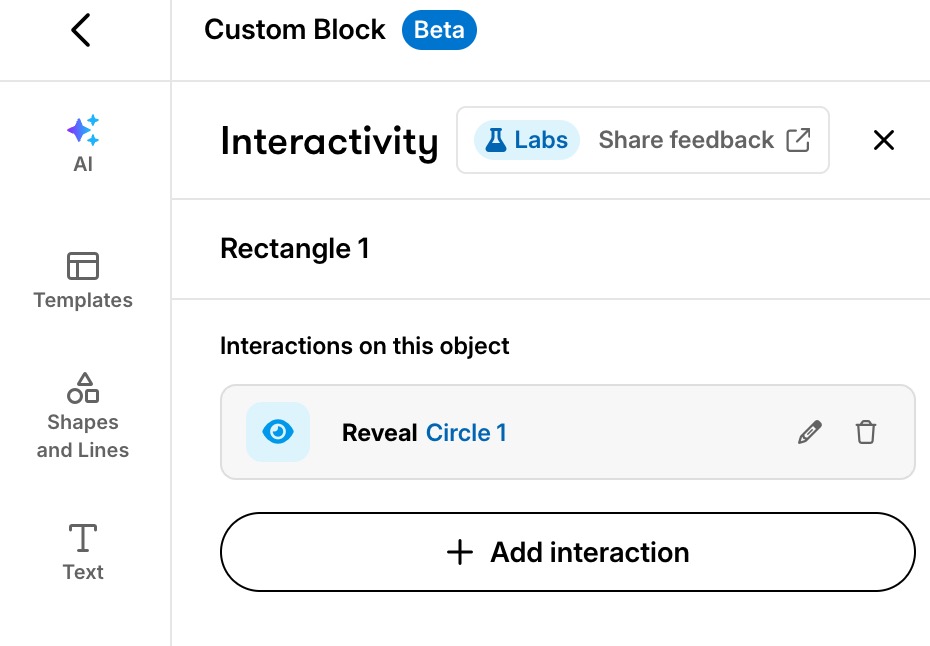
Did you use a template? You'll want to check that there's no existing interactions already set up.
- KathrynRowe-a9bCommunity Member
Hi Kelly,
I played around with it a little more. I found that when the Hide interaction is positioned above the Reveal interaction on the Interactivity Tab it works as intended.
Hi, everyone!
We’ve just added new interactive templates to Custom Blocks! Simply select Custom Block > Interactive to browse the available templates and get started.
- JohnHough-e0d67Community Member
I understand that these features are in development , but if you could work on making these blocks compatible with screen readers, that would be amazing!
Hi JohnHough-e0d67,
Thank you so much for your feedback. We value your opinion and understand the importance of screen reader compatibility!
- marymurrCommunity Member
I agree completely. Screen reader compatibility is essential for accessibility and inclusive learning. It would be fantastic to see custom blocks fully supported so that all learners can access the content effectively.
Hi marymurr,
Thank you for sharing this insight. We're working on compatibility with WCAG guidelines, and will update you when we have news!
- MarkNeder-e7886Community Member
This looks like it will be/is an amazing function. What is the impact on the Suspend Data (cmi.suspend_data) information? Is it as small as a text or image block, a tab interaction or accordion block, or knowledge check or Storyline block?
Thanks.
Hi MarkNeder-e7886,
Great question!
Rise 360 compresses suspend data to help prevent courses from exceeding LMS limits. Custom Blocks currently contribute minimally to suspend data, and interactivity in Custom Block will not affect that amount.
- NCSDojoCommunity Member
This looks useful. But I can't see the "Interactive" button under my Custom Block.
Hi, NCSDojo!
I'm happy to help!
First, let's confirm that Interactivity in Custom Blocks is enabled in Labs. To check, click the Labs icon in the upper-right corner of your screen, then make sure Interactivity in Custom Blocks is toggled on.
You may need to refresh your browser or reopen your course for the change to take effect.
Let me know if that helps!
- PennySpachtCommunity Member
I changed the icons on the Interactive Milestones to an image to match the icons used in the course. However, this reduced the selection area to only the text area. (L1, L2, L3, L4) Can I make the entire circle selectable?
- AmeliaAltstadtCommunity Member
I'd just group your image and the circle behind it and use that.
I believe your new icon / image is "blocking" the click area within the circle. Grouping and setting up the logic for when the group is clicked should be an easy solve.- PennySpachtCommunity Member
When I grouped them, it broke the interactivity; however, it was a simple fix. I just reconnected them. Thanks for the solution!