download
82 TopicsMy New “Missed Questions Only” Quiz Format for Rise 360.
One quiz. Many chances. Zero wasted time Ever wished you could skip the boring parts of a quiz and just focus on what you got wrong? Well, now you can. I’ve created a “Missed Questions Only” quiz — a smarter, faster way to learn. Instead of starting from scratch, you get a second chance only at the questions you missed. No wasted time, no repeating what you already know — just targeted practice that helps you master the tricky stuff and hit that perfect score. It’s like a quiz with a built-in comeback round — your mistakes become your roadmap to success. Ready to turn wrong answers into wins? Give it a try and see how well you know your fun facts. 🔗 Rise Link: https://360.articulate.com/review/content/7126ec89-ff0c-4595-bac3-a0fe5e2c6a26/review 🖥️ Code Block: Copy the code below. 📄 Template: See an example of my template for organizing images, questions, answers, and each JS snippet. <div id="quiz-app"> <div class="quiz-card"> <div class="quiz-header"> <div> <div class="quiz-label">Fun Facts Quiz</div> <h2 id="quiz-title">Quiz</h2> </div> <div class="quiz-status"> <span id="round-badge">Round 1</span> <span id="progress-text">Question 1 of 1</span> </div> </div> <div id="scorebar" class="scorebar"> <div>Correct: <strong id="correct-count">0</strong></div> <div>Incorrect: <strong id="incorrect-count">0</strong></div> <div>Remaining in Round: <strong id="remaining-count">0</strong></div> </div> <div id="question-container"> <img id="question-image" src="" alt="Question Image" style="max-width:100%; border-radius:12px; margin-bottom:16px; display:none;" /> <div id="question-text" class="question-text"></div> <div id="answers" class="answers"></div> <div id="feedback" class="feedback"></div> </div> <div class="quiz-actions"> <button id="next-btn" disabled>Next</button> <button id="retry-btn" style="display:none;">Retry Missed Questions</button> <button id="restart-btn" style="display:none;">Restart Full Quiz</button> </div> </div> </div> <style> /* Same styling as before */ * { box-sizing: border-box; } body { margin: 0; font-family: Arial, Helvetica, sans-serif; background: #f4f7fb; color: #1f2937; } #quiz-app { max-width: 900px; margin: 0 auto; padding: 20px; } .quiz-card { background: #ffffff; border: 1px solid #dbe4f0; border-radius: 16px; padding: 24px; box-shadow: 0 8px 24px rgba(0,0,0,0.06); } .quiz-header { display: flex; justify-content: space-between; align-items: start; gap: 16px; margin-bottom: 18px; } .quiz-label { font-size: 12px; font-weight: 700; letter-spacing: .08em; text-transform: uppercase; color: #2563eb; margin-bottom: 6px; } .quiz-header h2 { margin: 0; font-size: 28px; } .quiz-status { display: flex; flex-direction: column; gap: 8px; align-items: flex-end; font-size: 14px; } .quiz-status span { background: #eef4ff; color: #1d4ed8; padding: 8px 12px; border-radius: 999px; font-weight: 600; } .scorebar { display: flex; flex-wrap: wrap; gap: 12px; margin-bottom: 22px; padding: 12px; background: #f8fafc; border: 1px solid #e5e7eb; border-radius: 12px; font-size: 14px; } #question-image { display: block; /* ensure image is shown */ max-width: 920px; /* maximum width */ max-height: 300px; /* maximum height */ width: 100%; /* scale to container width if smaller */ height: auto; /* maintain aspect ratio */ margin: 0 auto 16px auto; /* center horizontally with bottom margin */ object-fit: contain; /* scale image without cropping */ border-radius: 12px; /* consistent border radius */ background-color: #f3f4f6; /* subtle background color for empty space */ } .question-text { font-size: 22px; font-weight: 700; line-height: 1.35; margin-bottom: 20px; } .answers { display: grid; gap: 12px; } .answer-btn { width: 100%; text-align: left; border: 2px solid #d1d5db; background: #fff; color: #111827; border-radius: 12px; padding: 14px 16px; font-size: 16px; cursor: pointer; transition: .2s ease; } .answer-btn:hover:not(:disabled) { border-color: #93c5fd; background: #f8fbff; } .answer-btn:disabled { cursor: default; opacity: 1; } .answer-btn.correct { border-color: #16a34a; background: #ecfdf3; color: #166534; font-weight: 700; } .answer-btn.incorrect { border-color: #dc2626; background: #fef2f2; color: #991b1b; font-weight: 700; } .feedback { margin-top: 18px; min-height: 28px; font-size: 16px; font-weight: 600; } .feedback.correct { color: #15803d; } .feedback.incorrect { color: #b91c1c; } .quiz-actions { display: flex; gap: 12px; margin-top: 22px; flex-wrap: wrap; } .quiz-actions button { border: none; border-radius: 10px; padding: 12px 18px; font-size: 15px; font-weight: 700; cursor: pointer; } #next-btn { background: #2563eb; color: #fff; } #next-btn:disabled { background: #9ca3af; cursor: not-allowed; } #retry-btn { background: #f59e0b; color: #fff; } #restart-btn { background: #111827; color: #fff; } .final-message { padding: 18px; border-radius: 14px; background: #effaf3; border: 1px solid #86efac; color: #166534; font-size: 18px; line-height: 1.5; } .small-note { margin-top: 10px; font-size: 14px; color: #4b5563; } MeDia (max-width: 640px) { .quiz-header { flex-direction: column; align-items: flex-start; } .quiz-status { align-items: flex-start; } .question-text { font-size: 20px; } } </style> <script> // Questions with imageUrl placeholder (replace URLs with your uploaded Rise 360 images) const fullQuiz = [ { question: "Which animal can sleep standing up?", imageUrl: "https://images.articulate.com/f:jpg,a:retain,b:fff,w:1680,q:90/rise/courses/YLUYT4CI3ckYMonl07a4CHihYXT3CnUJ/z45b6W_xMLJUUJld.jpg", options: ["Horse", "Dog", "Penguin", "Kangaroo"], answer: "Horse" }, { question: "What is the only food that essentially never spoils?", imageUrl: "https://articulateusercontent.com/rise/courses/Kg8aAYIS9RJvSNl0YFM3mOw3o8OQbz5c/MddUJBQTsySlOvqv.jpg", options: ["Rice", "Honey", "Peanut butter", "Chocolate"], answer: "Honey" }, { question: "True or False: Bananas are berries, but strawberries technically aren’t.", imageUrl: "https://articulateusercontent.com/rise/courses/Kg8aAYIS9RJvSNl0YFM3mOw3o8OQbz5c/GSei0ep7BuNe7mfL.png", options: ["True", "False"], answer: "True" }, { question: "What is a group of flamingos called?", imageUrl: "https://articulateusercontent.com/rise/courses/Kg8aAYIS9RJvSNl0YFM3mOw3o8OQbz5c/9bCYyNGee1QQRUWC.jpg", options: ["A flock", "A flamboyance", "A parade", "A bouquet"], answer: "A flamboyance" }, { question: "Which country has more pyramids than any other country in the world?", imageUrl: "https://articulateusercontent.com/rise/courses/Kg8aAYIS9RJvSNl0YFM3mOw3o8OQbz5c/srrP1z5U7J1QaYow.jpeg", options: ["Egypt", "Mexico", "Sudan", "Peru"], answer: "Sudan" }, { question: "Which animal has fingerprints so similar to humans that they can be difficult to tell apart?", imageUrl: "https://articulateusercontent.com/rise/courses/Kg8aAYIS9RJvSNl0YFM3mOw3o8OQbz5c/z32I4pCG_PvYZDUD.jpg", options: ["Chimpanzee", "Koala", "Raccoon", "Sloth"], answer: "Koala" }, { question: "How many hearts does an octopus have?", imageUrl: "https://articulateusercontent.com/rise/courses/YLUYT4CI3ckYMonl07a4CHihYXT3CnUJ/1EOT8Ml6xu2_Lmvd.png", options: ["1", "2", "3", "8"], answer: "3" }, { question: "Which fruit floats in water because about 25% of its volume is air?", imageUrl: "https://articulateusercontent.com/rise/courses/Kg8aAYIS9RJvSNl0YFM3mOw3o8OQbz5c/kRIyy568MhLPiEFd.jpg", options: ["Apple", "Orange", "Grape", "Strawberry"], answer: "Apple" }, { question: "What is the national animal of Scotland?", imageUrl: "https://images.articulate.com/f:jpg,a:retain,b:fff,w:1680,q:90/rise/courses/YLUYT4CI3ckYMonl07a4CHihYXT3CnUJ/Tl89HrMYH0AyvzF2.jpg", options: ["Highland cow", "Golden eagle", "Unicorn", "Red deer"], answer: "Unicorn" }, { question: "True or False: A day on Venus is longer than a year on Venus.", imageUrl: "https://articulateusercontent.com/rise/courses/Kg8aAYIS9RJvSNl0YFM3mOw3o8OQbz5c/WBnprMTKTGmJCPre.jpg", options: ["True", "False"], answer: "True" }, { question: "What is a group of crows called?", imageUrl: "https://articulateusercontent.com/rise/courses/Kg8aAYIS9RJvSNl0YFM3mOw3o8OQbz5c/QhTq5yGSSxZC45ZF.jpg", options: ["A mystery", "A murder", "A mob", "A shadow"], answer: "A murder" }, { question: "What is a group of owls called?", imageUrl: "https://articulateusercontent.com/rise/courses/Kg8aAYIS9RJvSNl0YFM3mOw3o8OQbz5c/d_g79Dx03aWnVP2S.jpg", options: ["A parliament", "A council", "A jury", "A congress"], answer: "A parliament" }, { question: "What is a group of giraffes called?", imageUrl: "https://articulateusercontent.com/rise/courses/YLUYT4CI3ckYMonl07a4CHihYXT3CnUJ/-jRiKJcZZX1mWlfh.jpg", options: ["A tower", "A skyscraper", "A stretch", "A column"], answer: "A tower" }, { question: "What is a group of rhinos called?", imageUrl: "https://articulateusercontent.com/rise/courses/Kg8aAYIS9RJvSNl0YFM3mOw3o8OQbz5c/jilS2EvEMWFQCHLN.jpg", options: ["A crash", "A charge", "A stampede", "A rumble"], answer: "A crash" }, { question: "What is a group of porcupines called?", imageUrl: "https://articulateusercontent.com/rise/courses/Kg8aAYIS9RJvSNl0YFM3mOw3o8OQbz5c/WwtKh0xFKUgG07x1.jpg", options: ["A pricker", "A prickle", "A pincushion", "A spike"], answer: "A prickle" }, { question: "What is a group of zebras called?", imageUrl: "https://articulateusercontent.com/rise/courses/YLUYT4CI3ckYMonl07a4CHihYXT3CnUJ/G-vljexS-nyS4lg3.jpg", options: ["A dazzle", "A stripe", "A blur", "A flash"], answer: "A dazzle" }, { question: "What is a group of hippos called?", imageUrl: "https://articulateusercontent.com/rise/courses/Kg8aAYIS9RJvSNl0YFM3mOw3o8OQbz5c/M-1LbZ5VHqL28Ez4.jpg", options: ["A splash", "A bloat", "A barrel", "A wallow"], answer: "A bloat" }, { question: "What is a group of ferrets called?", imageUrl: "https://articulateusercontent.com/rise/courses/Kg8aAYIS9RJvSNl0YFM3mOw3o8OQbz5c/ob7XOK2dtuA2btB-.jpg", options: ["A mischief", "A trouble", "A business", "A chaos"], answer: "A business" }, { question: "What is a group of ravens called?", imageUrl: "https://articulateusercontent.com/rise/courses/YLUYT4CI3ckYMonl07a4CHihYXT3CnUJ/L6_Yxla0T9t97Qx8.jpg", options: ["An unkindness", "A darkness", "A conspiracy", "A haunting"], answer: "An unkindness" }, { question: "What is a group of bears called?", imageUrl: "https://articulateusercontent.com/rise/courses/Kg8aAYIS9RJvSNl0YFM3mOw3o8OQbz5c/5fA5geB-XbftAeB6.jpg", options: ["A grumble", "A sleuth", "A lumber", "A maul"], answer: "A sleuth" } ]; let currentQuiz = []; let currentIndex = 0; let selectedAnswer = null; let totalCorrect = 0; let totalIncorrect = 0; let roundNumber = 1; let missedQuestions = []; const questionContainer = document.getElementById("question-container"); const questionImage = document.getElementById("question-image"); const questionText = document.getElementById("question-text"); const answersEl = document.getElementById("answers"); const feedbackEl = document.getElementById("feedback"); const nextBtn = document.getElementById("next-btn"); const retryBtn = document.getElementById("retry-btn"); const restartBtn = document.getElementById("restart-btn"); const correctCountEl = document.getElementById("correct-count"); const incorrectCountEl = document.getElementById("incorrect-count"); const remainingCountEl = document.getElementById("remaining-count"); const progressTextEl = document.getElementById("progress-text"); const roundBadgeEl = document.getElementById("round-badge"); function shuffle(array) { const arr = [...array]; for (let i = arr.length - 1; i > 0; i--) { const j = Math.floor(Math.random() * (i + 1)); [arr[i], arr[j]] = [arr[j], arr[i]]; } return arr; } function prepareQuiz(questions) { return shuffle(questions).map(q => ({ ...q, options: shuffle(q.options) })); } function initQuiz() { currentQuiz = prepareQuiz(fullQuiz); currentIndex = 0; selectedAnswer = null; totalCorrect = 0; totalIncorrect = 0; roundNumber = 1; missedQuestions = []; retryBtn.style.display = "none"; restartBtn.style.display = "none"; nextBtn.style.display = "inline-block"; questionContainer.style.display = "block"; renderQuestion(); updateScore(); } function startRetryRound() { currentQuiz = prepareQuiz(missedQuestions); currentIndex = 0; selectedAnswer = null; missedQuestions = []; roundNumber++; retryBtn.style.display = "none"; restartBtn.style.display = "none"; nextBtn.style.display = "inline-block"; questionContainer.style.display = "block"; renderQuestion(); updateScore(); } function renderQuestion() { const q = currentQuiz[currentIndex]; // Show or hide image depending on if imageUrl is set if (q.imageUrl) { questionImage.src = q.imageUrl; questionImage.style.display = "block"; } else { questionImage.style.display = "none"; } feedbackEl.textContent = ""; feedbackEl.className = "feedback"; nextBtn.disabled = true; selectedAnswer = null; roundBadgeEl.textContent = `Round ${roundNumber}`; progressTextEl.textContent = `Question ${currentIndex + 1} of ${currentQuiz.length}`; remainingCountEl.textContent = currentQuiz.length - currentIndex; questionText.textContent = q.question; answersEl.innerHTML = ""; q.options.forEach(option => { const btn = document.createElement("button"); btn.className = "answer-btn"; btn.type = "button"; btn.textContent = option; btn.addEventListener("click", () => handleAnswer(btn, option, q.answer)); answersEl.appendChild(btn); }); } function handleAnswer(button, chosen, correct) { if (selectedAnswer !== null) return; selectedAnswer = chosen; const buttons = document.querySelectorAll(".answer-btn"); buttons.forEach(btn => btn.disabled = true); if (chosen === correct) { button.classList.add("correct"); feedbackEl.textContent = "Correct!"; feedbackEl.className = "feedback correct"; totalCorrect++; } else { button.classList.add("incorrect"); feedbackEl.textContent = "Incorrect."; feedbackEl.className = "feedback incorrect"; totalIncorrect++; missedQuestions.push(currentQuiz[currentIndex]); } updateScore(); nextBtn.disabled = false; } function updateScore() { correctCountEl.textContent = totalCorrect; incorrectCountEl.textContent = totalIncorrect; remainingCountEl.textContent = currentQuiz.length > 0 ? Math.max(currentQuiz.length - currentIndex - (selectedAnswer ? 1 : 0), 0) : 0; } function goNext() { currentIndex++; if (currentIndex < currentQuiz.length) { renderQuestion(); updateScore(); } else { showRoundResults(); } } function showRoundResults() { questionText.textContent = ""; answersEl.innerHTML = ""; feedbackEl.textContent = ""; questionImage.style.display = "none"; nextBtn.style.display = "none"; if (missedQuestions.length > 0) { questionText.innerHTML = ` <div class="final-message" style="background:#fff7ed;border-color:#fdba74;color:#9a3412;"> <strong>Round ${roundNumber} complete.</strong><br> You have <strong>${missedQuestions.length}</strong> question(s) to retry. <div class="small-note">Click the button below to retake only the questions you missed.</div> </div> `; retryBtn.style.display = "inline-block"; restartBtn.style.display = "inline-block"; remainingCountEl.textContent = missedQuestions.length; } else { questionText.innerHTML = ` <div class="final-message"> <strong>Congratulations!</strong><br> You have answered all questions correctly. <div class="small-note"> Final score: ${totalCorrect} correct, ${totalIncorrect} incorrect attempts. </div> </div> `; retryBtn.style.display = "none"; restartBtn.style.display = "inline-block"; remainingCountEl.textContent = 0; } } nextBtn.addEventListener("click", goNext); retryBtn.addEventListener("click", startRetryRound); restartBtn.addEventListener("click", initQuiz); initQuiz(); </script>204Views1like3CommentsSpotlight using JavaScript and Alt Text
I created a spotlight feature, with some help from AI, to focus on specific areas of the screen in e-learning. I didn't create it for spotlight interactive gaming scenarios. I use it for software focal areas. You can add a shape or multiple shapes to your slide and add alt text, and JavaScript on the master slide recognizes the text. It currently works with circles, ovals, rectangles, squares, and rounded-edge shapes. However, I couldn't get triangle or star shapes to work. You can also change other features. For example, you can adjust blur and Mask color and apply them to a button to toggle them on or off. Let me know your thoughts. I provide a step-by-step guide in the downloadable storyline file. Spotlight in Storyline using JavaScript Demo Link153Views1like2Comments3 Copy-Paste Storyline JS Interactions (Confetti, Progress Bar, Timer)
Hey everyone — long-time Storyline builder here. I kept running into the same wall: I wanted confetti on quiz wins, a real progress bar, and timed questions, but every solution I found was either a forum snippet with no instructions or an expensive subscription product. So I built my own set of 10 JavaScript interactions, tested each one by hand in a real Storyline project, and wrote beginner-proof setup guides for all of them (exact variable names, literal click paths, wiring recipes, test checklists — no "figure it out yourself" steps). I'm giving away 3 of them free — confetti burst, course progress bar, and countdown timer: https://ronaldhicks.gumroad.com/l/storyline-js-sampler Each one is a single paste-ready snippet plus plain Storyline variables. No JavaScript experience needed. Works in Storyline 360 and Storyline 3, including LMS/SCORM wrappers. If you find them useful, the full pack of 10 is $19 — but the sampler is free forever, no strings attached. Hope these save somebody an afternoon.179Views1like0CommentsSliders and States
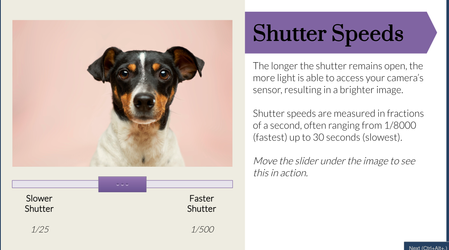
View the project here This is my first time participating in a challenge and this week's was a choose-your-own. I decided to utilize sliders and states to create an interactive short course on The Exposure Triangle. My aim was to allow the user to manipulate an image to see the effect of shutter speed, ISO levels, and aperture. I used sliders and dials to create a fun interactive process. I set triggers to change the image's states based on the slider position. For shutter speed, I made different image states with varying levels of brightness. For ISO, I added a textured rectangle over the image and changed it's transparency across different states so it added more grain over the image when the slider was moved. For aperture I created different states for the backround image with increasing blur effect (completed outside of Storyline) and added a character on top so she stayed in focus while the background blurred. The aperture slider was the most complicated! I think one way I could try to take it further is to figure out how to get multiple sliders to work together on the same image. For example, allowing the learner to have a shutter slider, ISO slider, and aperture slider on the same image to find the exact perfect settings. Thanks for reviewing! Any feedback is helpful!347Views10likes7CommentsFree: 3 Copy-Paste Storyline JS Interactions (Confetti, Progress Bar, Timer)
Hey everyone — long-time Storyline builder here. I kept running into the same wall: I wanted confetti on quiz wins, a real progress bar, and timed questions, but every solution I found was either a forum snippet with no instructions or an expensive subscription product. So I built my own set of 10 JavaScript interactions, tested each one by hand in a real Storyline project, and wrote beginner-proof setup guides for all of them (exact variable names, literal click paths, wiring recipes, test checklists — no "figure it out yourself" steps). I'm giving away 3 of them free — confetti burst, course progress bar, and countdown timer: https://ronaldhicks.gumroad.com/l/storyline-js-sampler Each one is a single paste-ready snippet plus plain Storyline variables. No JavaScript experience needed. Works in Storyline 360 and Storyline 3, including LMS/SCORM wrappers. If you find them useful, the full pack of 10 is $19 — but the sampler is free forever, no strings attached. Hope these save somebody an afternoon.39Views1like0CommentsScenario-Based Quiz: Recognizing, Preventing, & Reporting Harassment
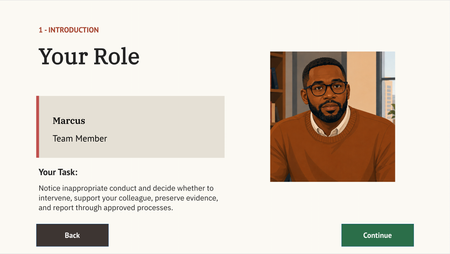
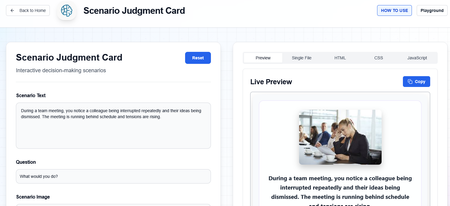
About For an instructional design & eLearning developer portfolio project, I created a fictional scenario quiz about reporting harassment using Articulate Storyline and generative AI characters. Links To learn more about this project visit my portfolio. You can also view the published Storyline project here. To see the full course that the scenario quiz was embedded into, view the course. Screens View select screens from the Articulate Storyline file below: You are welcome to let me know if you have questions or suggestions!574Views1like4CommentsMy Custom Rise Block Component Library
Hi everyone! I wanted to share a custom library of Rise-compatible interactive components I’ve been building and experimenting with for eLearning projects. The library includes custom-designed blocks and interactions intended to help make Rise courses more engaging, flexible, and visually dynamic beyond the default block set. You can explore the library here: https://cognitoblox.netlify.app/ This is an ongoing project, and I’d genuinely love feedback from the community: Which components do you find most useful? What kinds of interactions would you like to see added? Any ideas for improving usability or accessibility? Happy to connect with fellow developers who are experimenting with custom Rise code blocks as well! Thanks for checking it out1.1KViews21likes19CommentsHow About a Progress Bar?
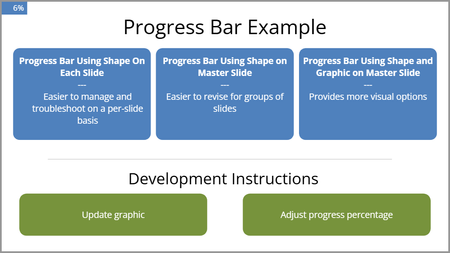
We needed a progress bar for several projects, so I created one that would be no too intrusive, easy to modify, and easy to implement. There are three versions in this file. The progress bar is thin until you hover over it. It uses Java to do the math, round up to whole numbers, and move the progress bar. It uses a true false variable toggle to keep the bar visible. You will have to add the toggle to each layer where you want the progress bar. This example is very bare bones but includes instructions. Please let me know if you might find it useful or how it might be improved. Here is the review link: https://360.articulate.com/review/content/18499632-155c-4461-b75f-fd0450ca01f5/review212Views1like2Comments3-D Spinning Wheel
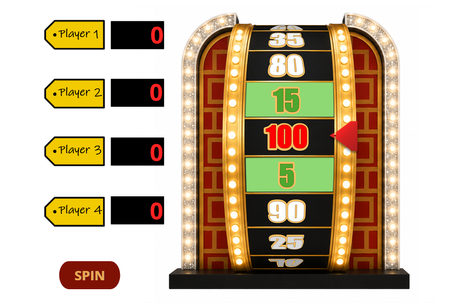
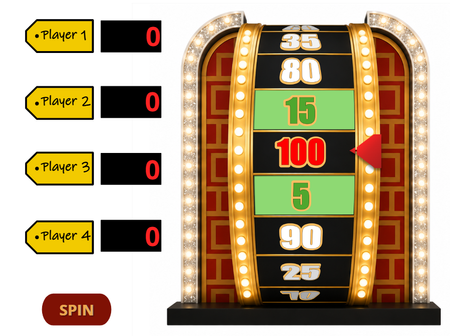
I wanted to create a game-show-style wheel in Storyline, but with a twist: instead of a flat wheel spinning in a circle, I wanted a vertical wheel that appeared to spin toward the viewer. I had trouble finding an example of this type of interaction, so I decided to create the illusion using image states, cue points, and variables. https://360.articulate.com/review/content/41bac6dd-0026-4d4d-a0b7-a67c96696c90/review Creating the Spinning Illusion The spinning effect illusion is created with a background image that has 20 different states rather than 3-D animation. In each state, the numbers move down one position on the wheel. To create the illusion of a curved wheel, the numbers in the center are larger, and the numbers toward the top and bottom are shorter, angled, and darker with text effects options. When the states are displayed quickly in sequence, the wheel appears to rotate. To be honest, I was surprised that it worked since the lines between the spaces are static, but it actually looks like it is spinning. Creating the Wheel Graphic with AI I used ChatGPT to create the base wheel image, which took a little trial and error. I started by uploading a link to a video showing a wheel similar to what I wanted and asked ChatGPT to generate sample flat images of the wheel in 12 states that I could use as a reference for the different wheel positions. The first attempt helped me visualize the concept. I liked how the sections were larger in the middle and became smaller toward the top and bottom, but several details weren't quite right. The 50 section changes colors at it rotates, the red and green sections weren't positioned correctly, the pointer was already part of the image, and the numbers where not the ones I wanted. For the next version, I decided it would be easier to add the numbers myself. I prompted ChatGPT to create a single wheel image without numbers, with 20 spaces and a red section between two green sections. This was closer, but there were still too many wheel sections visible, and it had a black section between the red and green sections. For the final iteration, I simplified the prompt. I asked ChatGPT to make all of the wheel sections black, remove the pointer, and show only eight sections of the wheel at a time. This gave me the base graphic I needed. I could then control the numbers, colors, and pointer myself instead of relying on AI to reproduce those details consistently across multiple images. Building 20 Wheel Positions I brought the final wheel graphic into PowerPoint to create the 20 images needed for the Storyline states. I added the numbers, adjusted the font shape in text effect for the top and bottom numbers, and used custom shapes to create the colored wheel sections. One helpful trick was to change the PowerPoint slide size to a square and position the wheel graphic in the exact center and middle of the slide. This helped me to make sure the image was in the same position on each slide so that the states wouldn't wobble when I import them in Storyline. I then duplicated the slide and changed the numbers to move them down one wheel position for each successive slide. Once all 20 positions were complete, I exported the PowerPoint slides as PNG files. PowerPoint automatically saved each slide as a separate image in a folder. Back in Storyline, I opened the wheel object's Edit States window and used the picture icon to insert the exported images. I added all 20 images at once, and Storyline created all of the individual states. The pointer is a separate shape that I created using Merge Shapes in Storyline. Keeping it separate from the wheel image allows the wheel to move underneath it. I also added a shadow to the pointer to help create the illusion that it sits above the wheel. Making the Wheel Spin The wheel animation uses 20 cue points, 20 image states, and state-change triggers. At each cue point, a trigger changes the wheel to the next state (at cue point 1, change to state 1; at cue point 2, change to state 2; etc.) The animation occurs on several Storyline layers. The cue points are close together on the first layer and become progressively farther apart on subsequent layers to make it look like the spinning speed slows as it stops. Stopping the Wheel Randomly Getting the wheel to stop on a random position was one of the trickier parts. I created a number variable (WheelResult) and created a trigger to adjust the variable to a random number when the user clicks on the spin button. On the final spinning layer, the wheel continues moving through its states. Each cue point has a conditional trigger that pauses the timeline when the cue point matches WheelResult. For example: Pause timeline when timeline reaches Cue Point 7 if WheelResult = 7. I then added triggers to translate the WheelResult number into a corresponding score to add to the player's score. Adding Wheel Sounds The beeping and applause sounds are free downloads from Pixabay. Initially, I added a Play Media trigger at every cue point so the pointer flapper would make a sound each time the wheel moved to the next position. This worked well on the first spin but became sporadic on subsequent spins, particularly during the fastest portion of the animation. I think Storyline had trouble with an audio playback limit with so many overlapping audio files. To make the audio more reliable, I combined the rapid beeps into one audio track for each spinning layer. The timing of the beeps in the audio file corresponds with the cue points on that layer so that each layer plays one audio track. Finishing Touches To finish the game-show effect, I added applause and confetti when the final results are displayed. The confetti effect uses JavaScript based on an example shared by Jay Chun in his YouTube tutorial.546Views1like3Comments3-D Spinning Wheel in Storyline
I wanted to create a game-show-style wheel in Storyline, but with a twist: instead of a flat wheel spinning in a circle, I wanted a vertical wheel that appeared to spin toward the viewer. I had trouble finding an example of this type of interaction, so I decided to create the illusion using image states, cue points, and variables. https://360.articulate.com/review/content/41bac6dd-0026-4d4d-a0b7-a67c96696c90/review Creating the Spinning Illusion The spinning effect illusion is created with a background image that has 20 different states rather than 3-D animation. In each state, the numbers move down one position on the wheel. To create the illusion of a curved wheel, the numbers in the center are larger, and the numbers toward the top and bottom are shorter, angled, and darker with text effects options. When the states are displayed quickly in sequence, the wheel appears to rotate. To be honest, I was surprised that it worked since the lines between the spaces are static, but it actually looks like it is spinning. Creating the Wheel Graphic with AI I used ChatGPT to create the base wheel image, which took a little trial and error. I started by uploading a link to a video showing a wheel similar to what I wanted and asked ChatGPT to generate sample flat images of the wheel in 12 states that I could use as a reference for the different wheel positions. The first attempt helped me visualize the concept. I liked how the sections were larger in the middle and became smaller toward the top and bottom, but several details weren't quite right. The 50 section changes colors at it rotates, the red and green sections weren't positioned correctly, the pointer was already part of the image, and the numbers where not the ones I wanted. For the next version, I decided it would be easier to add the numbers myself. I prompted ChatGPT to create a single wheel image without numbers, with 20 spaces and a red section between two green sections. This was closer, but there were still too many wheel sections visible, and it had a black section between the red and green sections. For the final iteration, I simplified the prompt. I asked ChatGPT to make all of the wheel sections black, remove the pointer, and show only eight sections of the wheel at a time. This gave me the base graphic I needed. I could then control the numbers, colors, and pointer myself instead of relying on AI to reproduce those details consistently across multiple images. Building 20 Wheel Positions I brought the final wheel graphic into PowerPoint to create the 20 images needed for the Storyline states. I added the numbers, adjusted the font shape in text effect for the top and bottom numbers, and used custom shapes to create the colored wheel sections. One helpful trick was to change the PowerPoint slide size to a square and position the wheel graphic in the exact center and middle of the slide. This helped me to make sure the image was in the same position on each slide so that the states wouldn't wobble when I import them in Storyline. I then duplicated the slide and changed the numbers to move them down one wheel position for each successive slide. Once all 20 positions were complete, I exported the PowerPoint slides as PNG files. PowerPoint automatically saved each slide as a separate image in a folder. Back in Storyline, I opened the wheel object's Edit States window and used the picture icon to insert the exported images. I added all 20 images at once, and Storyline created all of the individual states. The pointer is a separate shape that I created using Merge Shapes in Storyline. Keeping it separate from the wheel image allows the wheel to move underneath it. I also added a shadow to the pointer to help create the illusion that it sits above the wheel. Making the Wheel Spin The wheel animation uses 20 cue points, 20 image states, and state-change triggers. At each cue point, a trigger changes the wheel to the next state (at cue point 1, change to state 1; at cue point 2, change to state 2; etc.) The animation occurs on several Storyline layers. The cue points are close together on the first layer and become progressively farther apart on subsequent layers to make it look like the spinning speed slows as it stops. Stopping the Wheel Randomly Getting the wheel to stop on a random position was one of the trickier parts. I created a number variable (WheelResult) and created a trigger to adjust the variable to a random number when the user clicks on the spin button. On the final spinning layer, the wheel continues moving through its states. Each cue point has a conditional trigger that pauses the timeline when the cue point matches WheelResult. For example: Pause timeline when timeline reaches Cue Point 7 if WheelResult = 7. I then added triggers to translate the WheelResult number into a corresponding score to add to the player's score. Adding Wheel Sounds The beeping and applause sounds are free downloads from Pixabay. Initially, I added a Play Media trigger at every cue point so the pointer flapper would make a sound each time the wheel moved to the next position. This worked well on the first spin but became sporadic on subsequent spins, particularly during the fastest portion of the animation. I think Storyline had trouble with an audio playback limit with so many overlapping audio files. To make the audio more reliable, I combined the rapid beeps into one audio track for each spinning layer. The timing of the beeps in the audio file corresponds with the cue points on that layer so that each layer plays one audio track. Finishing Touches To finish the game-show effect, I added applause and confetti when the final results are displayed. The confetti effect uses JavaScript based on an example shared by Jay Chun in his YouTube tutorial. [https://youtu.be/vXOdJt37SpQ?si=KZlcDdr6rCep550p]203Views1like0Comments