personalization
27 TopicsProductivity Pulse
For this challenge, I designed a quick checkup that will analyze the user's daily work habits and suggest productivity hacks. Based on the user's responses, final results and productivity suggestions are grouped into Starter, Optimize, or Advanced productivity tricks and tips. Hopefully there are some hacks in there that you find helpful if you're like me and can't can't seem to find enough hours in the day to get everything done. Productivity Pulse Assessment174Views14likes5CommentsClimb the Safety Leaderboard!
Our interactive e-learning challenge turns workplace safety into a competition. Earn Bronze, Silver or Gold badges as you compete, learn, and sharpen your workplace safety skills. Who will take home the Gold? https://www.brilliantteams.com.au/designing-health-safety-elearning-challenge-using-variables/89Views4likes0CommentsInteractive E-Learning Challenge
We create interactive cybersecurity e-learning experiences with variables, enabling managers and employees to compete through personalized activities that build knowledge and skills. Click the below link to protect your organization by building stronger cybersecurity habits. https://www.swiftelearningservices.com/cybersecurity-elearning-challenges-with-variables/PILON Calculator
Hello! This demo uses a smattering of #Javascript to provide personalised financial advice for UK employees receiving Pay In Lieu of Notice. I was recently in this situation, so I built my own PILON calculator in Storyline to help me make some sense of it all. When life gives you lemons and all that. Plus, I couldn't resist the 'pylon' pun. Calculate your PILON payment here This calculator is built around a standard slider with some custom #Javascript doing the heavy lifting. Firstly, it pulls the current month from the local system, and adapts the length of the slider interaction. (So, in August the slider runs to 31 days.) Then it takes the financial information provided by the user and performs the PILON calculation. I hope no-one reading this post finds themselves in this situation. But if you are, maybe this will help, and put a smile on your face in the process. I'm currently on vacation without access to my master file or code, but I'd be happy to answer any questions you have on my return next week.
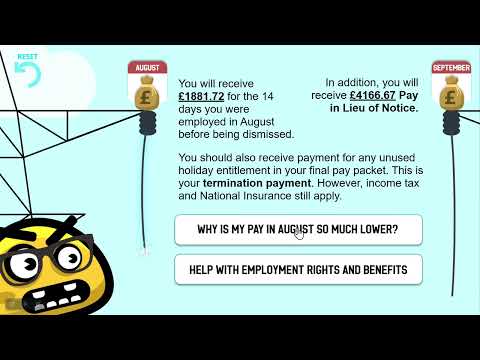
132Views3likes0CommentsPaw-sonality Test: The Perfect Pup for You
This short quiz uses Storyline 360 variables and a scoring system to give you a personalized dog breed recommendation! Answer a few questions about your lifestyle and preferences, and the variables will calculate your perfect pup match. It was a joy to create and shows how variables can make interactive content that adapts to each person's answers. Try it to find your ideal four-legged friend! Here's the demo138Views9likes0CommentsPersonality test : Way of learning
For this week challenge, I used a template of a personality test I have recently created ! Here is my work for this week challenge : Review This is part of my recent work : I am exploring ways to help the learners be more engaged in their course, and personality tests are interesting in this way ! About me : I'm a french graphic and product designer, and I have been slowly falling in love with elearning for the past year. I am still learning a lot and experiencing on the Articulate products. Ravie de vous rencontrer :)Make Over Your Rise 360 Course in 4 Easy Steps With Themes
Rise 360 has always been a fantastic tool for creating courses fast. And with the templates and other flexible options, even people without graphic design experience can feel confident that their Rise 360 projects will always look polished and professional. That’s why we’re so excited about Rise 360 themes. Themes give you even more ways to put your unique spin on the look and feel of your Rise 360 courses. And just like everything else about Rise 360, the themes feature makes creating beautifully designed courses easy—no graphic design skills needed. So let’s take a closer look at four easy steps you can follow to refresh your overall course design with a new theme, pique your learners’ interest with cover pages and lesson headers, reinforce your branding, and customize the course navigation experience. Step 1: Update the Overall Course Design With a New Theme The easiest way to give your course’s visual design a little facelift is to choose from the three prebuilt themes included in Rise 360. These themes are great for setting the overall look and feel of your project in one fell swoop. Let’s look at how to choose a theme and the available theme options, below. Choosing a Theme Start by opening any existing Rise 360 course on your Rise 360 dashboard. Select Theme in the upper right corner, and then click Change Theme. Rise 360 includes three professionally designed, ultra-stylish themes—Rise, the classic theme you’ve come to know (but with a few more customization options), plus two brand-new ones: Apex and Horizon. Following is a quick overview of each theme. Rise Our original theme, Rise, always looks modern and clean—a tried-and-true design choice that never goes out of style. Apex For a bold, contemporary, and striking design with angular finishes, choose Apex. Horizon When you want to give your course an elegant, sharp, and stylish makeover—complete with understated flourishes—Horizon is a great choice. They’re all so beautiful, right? Not sure which theme works best for your content? We’ve got you covered! Check out 3 Ways to Use Themes to Tailor Your Rise 360 Projects for some pro pointers. Once you’ve decided on a theme for your project, click to select it and you’ll see it applied to your project in the adjacent preview pane. Being able to preview your theme choice is handy because if you’re not in love with it, you can simply click another one. And if it’s love at first sight, click Save to apply it to your project. While you can use each theme as is, you also have loads of options for customizing key theme elements such as the cover page, lesson headers, and other features of the user interface, like colors, fonts, and navigation. We’ll explore some of these customization options in the next few steps. Step 2: Grab Learners’ Attention With a Custom Cover Page and Lesson Headers A cover page is your first opportunity to grab a learner’s attention, so why not customize it to fit the course topic or your company branding and really make it count? Select Cover Page from the menu and pick a stylish layout. If you’re opting to add a course image to your cover page, you can upload your own image or browse the wide selection images available in Content Library 360, which is built right into Rise 360. Pro Tip: You can also crop images directly in Rise 360. That means no hassling with a separate image editing app to tailor your course images to your project. To make your theme branded, upload your logo too. Customizing the Lesson Header option is another nice way to draw learners in and direct their attention to your content. You can choose from a variety of header designs or customize them with your own color or image. You can even adjust lesson headers to make them taller or shorter to create more or less white space, as you can see in the GIF above. Step 3: Reinforce Your Brand Identity With Custom Colors and Fonts The design choices we’ve walked through so far are quick but powerful ways to transform your course, but they’re really just the tip of the creative iceberg! You can also brand your course with custom colors and fonts to make sure it more fully aligns with your brand guidelines. Colors You can choose the Colors option to customize course accents like the menu and progress bar. Rise 360 makes picking eye-catching colors easy with curated options you can apply with a single click. But what if you need to bring in your official brand shades? No problem. Choose the Custom feature and select any color you’d like. Fonts Another easy way to brand your Rise 360 projects is to customize the fonts. Choose the Fonts option to find the perfect typeface for your project. Not sure where to start? Try the Recommended pairings—a fast way to make sure your headings and body fonts go together perfectly. For even more flexibility, click More to browse a selection of pre-installed options. And if you want to use your official brand fonts, just click Manage Custom Fonts to upload the ones you need and use them throughout your course. Step 4: Complete the Transformation With Custom Navigation and Button Styles You’ve got the cover page, lesson headers, colors and fonts fine-tuned. The final step in making over your Rise 360 course is to customize course navigation and button styles. Navigation In Rise 360, you’ve always had the option to show, hide, or disable the sidebar navigation. And now we’ve added more ways to customize course navigation so you can create the perfect experience for your learners. To start exploring your options, choose Navigation. Both Compact and Overlay navigation are great for making your content the star of the show. Choose Compact navigation to tuck your lesson menu away in a corner, where it can be quickly expanded with a click when learners need it. Another great option is Overlay navigation. When learners need to view the menu, they simply click the ☰ (hamburger) icon and the menu overlays the lesson, filling the screen. Love keeping things familiar? The always reliable Sidebar menu is a great choice with more options to choose from. Don’t want to include a navigation menu at all? No problem. You can remove it entirely—just as you’ve always been able to do in Rise 360. Buttons Want to continue customizing your course? Don’t forget about button options! Pick the button color that’s right for your course or branding. You can even refine your Previous and Next buttons by making them full width or floating—or you can remove them entirely. It’s totally up to you! Want to see how themes and custom settings can be combined for different effects? Check out the following example course. We present the same content three different ways and with minimal customizations so you can see for yourself. Explore Horizon Explore Apex Explore Rise Customizations: compact navigation, large header height Customizations: overlay navigation, small header height, custom color Customizations: sidebar navigation, medium header height, custom color Wrap-Up Not only does the themes feature give you a host of new ways to express yourself, wow your learners, and brand your Rise 360 content, it’s also streamlined the course creation process by consolidating theme settings all in one place—right at the top of the authoring environment in Rise 360. With so many options to customize your project's look and feel, you can rest assured knowing that whichever professionally designed theme you choose, your course will look fantastic on any device. And all of these thoughtful features and enhancements mean Rise 360 just keeps making it easier to create stunningly unique and stylish courses your learners will love. For more tips and inspiration on how you can start using themes in your e-learning, check out these helpful resources: Quickly Create Uniquely Stunning Courses with Rise 360 Themes 3 Ways to Use Rise 360 Themes to Tailor Your Projects How to Brand Your Rise 360 Course Want to try the new Rise 360 themes but don’t have Articulate 360? Start a free 30-day trial! And come back to E-Learning Heroes regularly for more helpful advice on everything related to e-learning. If you have any questions, please share them in the comments.779Views0likes0CommentsUsing Variables to Personalize E-Learning Courses #441
Personalizing E-Learning #441: Challenge | Recap Why Should I Learn to Use Variables? Great question. Articulate Storyline's core authoring features (states, layers, and triggers) are the building blocks that make it easy for virtually anyone to create interactive e-learning. But when you want to create more personalized learning experiences, you’ll need to know how to use variables. Using Storyline’s variables, you can present dynamic content based on your learner’s activity and other defined conditions. Variables can store learner input and use the information to present personalized content based on specific criteria. 3 Ways to Personalize E-Learning To get an idea of common ways designers personalize the e-learning experience, check out the following challenges. You're welcome to cross-post your entries this week if your demo fits in a previous challenge. Use Learner's Name in E-Learning Course #222: Challenge | Recap Choose Your Own E-Learning Characters #195: Challenge | Recap Adaptive Path Branching in E-Learning #196: Challenge | Recap 🏆 Challenge of the Week This week, your challenge is to share an example that shows how learners can personalize their learning experience. If you’re new to e-learning or working with variables, don’t sweat this one. We’re here to help. If you get stuck or want us to look at your project, post a question in the forums, and we’ll be happy to take a look. 🧰 Resources Webinar: 5 Ways to Personalize E-Learning Courses Storyline 360: Working with Variables Storyline 360: Adding Variable References ✨ Share Your E-Learning Work Comments: Use the comments section below to link your published example and blog post. Forums: Start a new thread and share a link to your published example. Personal blog: If you have a blog, please consider writing about your challenges. We'll link to your posts so your great work gets even more exposure. Social media: If you share your demos on Twitter or LinkedIn, try using #ELHChallenge so your tweeps can follow your e-learning coolness. 🙌 Last Week’s Challenge: Before you get started personalizing this week’s challenge, check out the interactive fashion advice your fellow challengers shared over the past week: Interactive Fashion Tips and How Tos RECAP 440: Challenge | Recap 👋 New to the E-Learning Challenges? The weekly e-learning challenges are ongoing opportunities to learn, share, and build your e-learning portfolios. You can jump into any or all of the previous challengesanytime you want. I’ll update the recap posts to include your demos. Learn more about the challenges in this Q&A post and why and how to participate in this helpful article. 📆 Next Week’s Challenge & Webinar Next week's challenge #441 (Nov 24, 2023): Using background audio to establish a scene or location, set the mood, and add context to your course. Upcoming webinar (Nov 21, 2023): Introduction to Variables in Storyline 360 Got an idea for a challenge? Are you interested in doing a webinar showcasing how you made one or more challenge demos? Or do you have some comments for your humble challenge host? Use this anonymous form to share your feedback: https://bit.ly/ElearningChallengeForm.648Views0likes56Comments