software simulation
17 TopicsSoftware Training
Hello! Our company is rolling out a new software to many many offices and we are tasked with creating the training for this software. We are looking for ideas that are new and innovative to help answer the question: "What is the best way to deliver software training in 2024 for online users?" Any suggestions, tools, softwares, etc. would be helpful and appreciated!346Views0likes1Comment16 Examples of Interactive 360° Images in E-Learning #467
Using 360° Images in E-Learning RECAP #467: Challenge | Recap This week’s challenge asked course designers to show how 360° images can transform static visuals into interactive, explore-type activities. Jonathan Hill Example | Download | Jonathan Hill | Website | @DevByPowerPoint Jayashree Ravi Example | Jayashree Ravi | LinkedIn Elizabeth Kuhlmann Example | Learn more | Elizabeth Kuhlmann Thierry EMMANUEL Example | Thierry EMMANUEL | Website Jodi M. Sansone Example | Jodi M. Sansone | Website | @jodimsansone Samuel Apata Example | Samuel Apata | Website | @afrostem eLearn Dev Example & learn more | eLearn Dev Mallory Frazier Example | Mallory Frazier Ron Katz Example | Ron Katz | Website Angela Thomas Example | Angela Thomas Trey McNabb Example | Trey McNabb bylittle learning Example | Download | bylittle learning | Website Sonya Crider Example | Sonya Crider Andreas Paul Example | Andreas Paul Kate Golomshtok Example | Kate Golomshtok | Website Sabrina Sgoda Example | Sabrina Sgoda Walkabout Learning Example | Walkabout Learning New to the E-Learning Challenges? The weekly challenges are ongoing opportunities to learn, share, and build your e-learning portfolios. You can jump into any or all of the previous challenges anytime you want. I'll update the recap posts to include your demos. If you have a blog, please write about your challenge example. I'll add links to your blog post so your examples get even more exposure. And for those who share your demos on Twitter or LinkedIn, please include #ELHChallenge so your network (and Articulate!) can track your e-learning coolness. Share Your 360° E-Learning Examples! The 360° image challenge is still open! If you have one or more ideas you'd like to share, please jump over to the original challenge and post your links in the comments section. I'll update this recap page to include your examples.716Views0likes0CommentsHow I Built This Dial-Driven Map Activity in Storyline 360 (With Help from ChatGPT)
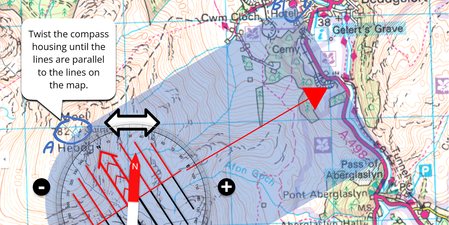
Despite our increasingly ‘touchscreen’ and ‘hands-free’ world, dials are still a big part of everyday life. If you need to emulate a dial in your e-learning experience, this feature can make your interaction more realistic, tactile, and relevant for the learner. For the Using Interactive Dials E-Learning Challenge, I created a Storyline 360 example that used dials as a sort of drag-and-drop. Along the way, I tried out some creative techniques that helped this project work in unexpected ways—including using the dial feature to animate an object and an unconventional approach to enable the dial to spin in both directions. Here’s a behind-the-scenes look at how this project works. Project Overview This demo project teaches people some simple map navigation techniques. You can try it out for yourself here and download the Storyline 360 project file here. To complete the activity, you end up interacting with three ‘picture as dial’ controls: To start the course, you need to turn the compass so its edge connects Point A and Point B Then, you have to turn the compass housing to the correct orientation to get your bearing While you’re doing this, the compass needle—which is also a dial locked in a disabled state—will oscillate slightly Creating my dial graphics I created the compass in PowerPoint and exported it as a large, hi-res PNG image. I doubled its height using Pixlr and used Storyline’s Convert to Dial feature to create a custom dial. Using the dial as a drag-and-drop This dial has four states, which are triggered by changes to the associated Compass_Base variable: Changes to the same variable also trigger events within the demo, effectively making this a drag-and-drop activity, but with a fixed axis. Unlike most drag-and-drops, though, it is accessible via the keyboard. Allowing the dial to turn in both directions In its default setting, a dial can only make one complete turn, which is limiting when you are trying to mimic a real-life object that can turn in both directions. To overcome this, the second dial in my demo has a 1440° rotation and its starting position is 687°—about halfway, just left of center—to match the appearance of the compass base. This dial can turn clockwise or counterclockwise for two rotations in each direction before coming to a stop. But that does make it quite tricky to use its position to calculate a bearing, as positions 0, 360, 720, 1080, and 1440 all point north. To compensate for this, I asked ChatGPT to write some custom JavaScript for me: // Function to calculate the heading function calculateHeading(compass) { // Calculate the heading with special handling for multiples of 360 var heading = 360 - (compass % 360); // Adjust heading for cases where it's 360 but should be 0 if (heading === 360) { heading = 0; } return heading; } // Function to adjust heading to 0 whenever it becomes 360 function adjustHeading(heading) { if (heading === 360) { heading = 0; } return heading; } // Get the value of the Storyline variable Compass and calculate Heading var Compass = player.GetVar("Compass"); // Assuming "Compass" is the name of your Storyline variable var Heading = calculateHeading(Compass); // Adjust Heading to 0 whenever it becomes 360 Heading = adjustHeading(Heading); // Set the Storyline variable "Heading" to the adjusted value player.SetVar("Heading", Heading); // Assuming "Heading" is the name of your Storyline variable And this is the result: With this code, I can tell if the compass housing is upside down even if it has been turned more than once. Pointing the compass housing south is a common mistake for novice navigators, but my demo will spot this and provide correction. Using animation to enhance the dial experience The third dial is purely for decoration. During the second part of the activity, I wanted the compass needle to move gently as you were turning the compass housing—just as it does in real life. This dial has a more limited rotation and range: I used ChatGPT again to create some custom JavaScript that makes the compass needle oscillate each time the compass housing is turned: // Function to randomly adjust Compass_Needle between 8 and 15, returning to 11 within 0.50 seconds function adjustCompassNeedle() { var randomValue = Math.floor(Math.random() * 8) + 8; // Generates a random number between 8 and 15 player.SetVar("Compass_Needle", randomValue); setTimeout(function() { player.SetVar("Compass_Needle", 11); // Return Compass_Needle to 11 after 0.50 seconds }, 500); } // Variable to store the previous value of Compass var previousCompassValue; // Function to handle changes in the Compass variable function handleCompassChange() { var currentCompassValue = player.GetVar("Compass"); // Get the current value of the Compass variable // Check if the Compass value has changed if (currentCompassValue !== previousCompassValue) { // Call the function to adjust Compass_Needle adjustCompassNeedle(); // Update the previous value of Compass previousCompassValue = currentCompassValue; } } And here’s a close-up of the result: Wrap-Up As you can see, there are lots of creative ways to use dials to produce all sorts of fascinating interactions! And I hope these insights about my project creation process give you ideas to try in your own work. As you might imagine, there’s quite a bit more going on in this demo beyond just dials—notably some Jump to Time–powered animations and an approach for controlling a Zoom panel with pause/play timeline triggers. So be sure to check out the project Storyline 360 file to see how the whole experience comes together. And please dial me up if you have any more questions! Want to try something you learned here, but don’t have Articulate 360? Start a free 30-day trial. And subscribe to our newsletter to get the latest product updates, e-learning examples, and expert advice directly in your inbox. If you have questions, please share them in the comments.945Views0likes4Comments6 Software Training Examples That Will Make Learners “Screen” With Joy
Employees often come to an organization with a wide range of technical experience. But one thing is certain—software training empowers employees to perform more efficiently and confidently. For intuitive software, a simple screencast can orient your employees to an app’s layout and features. Other times, you might need to give learners a more hands-on learning experience with a simulation that creates a risk-free practice environment. In either case, if you need some inspiration for creating software training, check out our favorite community examples. From screencasts to simulations, you’ll find creative solutions to spark your next project! Rise 360: Project Management Software Training Use labeled graphics, multimedia, and interactive blocks to give learners both an introduction and inspiration for how to use new software like Madison McCartney does in this Rise 360 course. Storyline: E-Learning Heroes 101 Guide learners through the step-by-step process to create an E-Learning Heroes community profile with this helpful simulation from Allison LaMotte. Storyline: Audio Editing Simulation Get learners comfortable using audio editing tools before even downloading any software, thanks to this simulation by Josh Petermann that includes both a view and try mode. Storyline: Learn Triggers Software Simulation Safely introduce new software to learners and let them practice risk-free, like in this handy simulation by Richard Watson. Storyline: Review 360 Software Simulation Replicate the experience of using new software by taking inspiration from this helpful Review 360 software simulation created by the Community Team. Storyline: Video Editing Controls Simulation Give learners a realistic opportunity to practice interacting with video editing software just as Dan Sweigert does in this guided simulation. Wrap-Up Hopefully, these examples spark ideas for how you’ll empower learners with your next software training. Our generous community members share their projects in weekly challenges, downloads, and examples, so check back regularly for new inspiration. What type of software training do you plan on tackling next? Let us know in the comments! To learn more about creating software training, check out these articles: The Difference Between Screencasts and Software Simulations 4 Tips on Creating Software Tutorials in Rise 360 2 Reasons to Use Storyline 360 for Software Simulations Everything You Need to Know About Creating Software Simulations with Storyline How to Decide Which Articulate 360 App to Use for Screen Recording Follow This Process to Create Software Simulations and Systems Training Like a Pro Follow us on Twitter and come back to E-Learning Heroes regularly for more helpful advice on everything related to e-learning. If you have any questions, please share them in the comments.3.6KViews0likes4Comments6 Things Video Games Can Teach You About Writing Engaging Scenarios
Scenarios have always been one of my favorite things to write as an instructional designer. I love coming up with different characters, deciding what makes them tick, and figuring out how that should impact what they say or do in the story. And while books, movies, and TV shows have taught me much of what I know about designing scenarios, at the end of the day video games have been an even better teacher. Sure, not every game has fully developed characters or a gripping plot—but the ones that do can be a great source of inspiration for e-learning scenarios. From the way you interact with the experience to the approaches used to write interesting and immersive stories, there’s so much shared DNA between games and learning scenarios. And it makes sense because they both have a similar goal: to find interesting ways to challenge their audience and help them improve their skills. This means I’ve now become that nerd who can’t play a video game without also being inspired to create future e-learning projects. Here are a few of the most helpful scenario-writing insights I’ve pulled from inadvertently turning my hobby into instructional design research. 1. A compelling plot trumps high-end graphics When you think about creating exciting scenarios, you might worry about not having the skills or resources to make cutting-edge visuals. Will it fall flat if the characters and setting don’t look photorealistic? Do you need to have a huge budget to make top-notch, custom graphics? Thankfully, video games have a resounding answer for you: no! When it comes to scenario-based games, it’s been proven time and time again that the story you tell often matters more to players than your graphics. One fantastic example of this is the game Lifeline. It’s a gripping, sometimes stressful, experience told entirely through text messages between the player and an astronaut lost in space. And as it plays out, the fact that you can’t see anything but text actually adds tension to the story. Another example of compelling storytelling paired with basic graphics is Reigns—a royalty simulator that uses simple cards to give you choices on how you want to rule. It’s incredible how quickly you can get immersed in the game even when there aren’t many visuals. Now, this isn’t to say your scenario’s aesthetics are meaningless. It’s more that if you have a limited amount of time and resources, it’s best to focus on crafting the story and keep the look and feel simple. 2. It's less fun when the right decision is obvious A common mistake I see in many learning scenarios is that it’s incredibly easy to guess what the best conversation or decision option is. Maybe it’s longer than the other choices, or the wording is strangely formal. Or perhaps the weaker options are so terrible that anyone would know they were a bad idea. When it doesn’t take much thinking to identify the correct choice, it quickly becomes boring. Instead, it’s better to give your audience challenging yet realistic decisions to ponder. Things that make them think hard about what the best option could be. And games have been doing this incredibly well for years. Take The Walking Dead series from Telltale Games. Set in a grim zombie apocalypse, this series excels at forcing players to make tough decisions where nearly every option has both strengths and drawbacks. And that difficulty gives those choices weight, drawing players into the story to evaluate their options and see what happens as a result. By using this approach in your scenarios, you can take full advantage of a significant strength of this format: making people think deeply about challenging situations. 3. Make sure your learners have enough information to succeed On the other side of the pendulum, you don’t want to make a scenario frustratingly hard either. I’ve seen training scenarios where learners aren’t given enough information to make informed decisions. For instance, sometimes they’re expected to act on content or character details that haven’t been shared with them. And when the only way to get the right answer is a lucky guess, learners tend to feel annoyed or tune out. This also happens quite frequently in video games. I can’t tell you how often I’ve had to make my game character stumble around every inch of a room to try and figure out what I might be able to interact with. Or how many times I’ve gotten so stuck in a game that I broke down and looked up a walkthrough to get spoilers on what to do next. These issues often result from learning professionals or game developers not realizing that what’s obvious for them as creators isn’t nearly as apparent to a player entering this world for the first time. This is why you’ll want to keep track of what information you’ve shared with learners (and when) as you plan out your scenario. Another good way to catch these issues is to have people who didn’t create the scenario test it out, as they can point out where things might still be unclear. 4. Think about the subtle ways you can give learners feedback Most people are familiar with the basic methods older games used to communicate how well (or terribly) you were doing: points and lives. And while these approaches are still used in many games today, story-based games often use more subtle and realistic signals instead. And think about it, what feels more woven into a scenario: an on-screen notification that you just gained 100 points or the character you’re talking to smiling at what you just said? One of the best video game genres to see this kind of story-based feedback is one you might not think of initially: dating simulations. Since the gameplay revolves around interpersonal communication, they’re a wealth of ideas for subtly signaling progress. Take the dating sim parody Hatoful Boyfriend. You can tell so much about how your conversation is going based on the written tone of the characters’ responses. And in Scarlet Hollow, a hybrid horror game and dating sim, characters often use body language to signal how they feel about your conversation choices. And that game also gives you access to different conversation options depending on whether you’re connecting with a character or irritating them. Subtle feedback like this is more similar to real-life situations, making for a more realistic experience for your learners. 5. Make dialogue sound conversational One thing that can quickly take conversations in a scenario from useful to unintentionally hilarious is awkward wording. When it’s noticeably different from how people actually talk, it can easily pull people out of a story. And when those speech patterns are also stilted and formal—a common issue in training scenarios—that further removes the experience from the real world. Video games have fantastic examples of just how bad this can get. Many older games are infamous for clunky writing, whether due to bad translations or too little thought put into the dialogue. For instance, I spent a good portion of my teenage years snickering every time someone opened their mouth in the Resident Evil series. But over the years, improvements in game writing (and voice acting) have shown how getting these things right can elevate the experience. Take this comparison of the original Resident Evil game dialogue versus a more recent remake. Sure, the updated writing still isn’t perfect, but it’s substantially better than the original and doesn’t inadvertently turn a horror game into a joke. So what’s the best way to avoid clunky 90’s video game dialogue in your scenarios? Read your script out loud as you’re drafting it. If it sounds weird as you say it, that’s a good sign that it could use reworking. 6. Don’t make it more fun to make bad choices than good ones One of my early gaming memories is playing SimCity on the computers at my middle school. While the official goal in the game was to create an ever-expanding metropolis, I instead took delight in taking that city and inflicting every disaster I could on it. What can I say—when a game gives you a monster attack option, how can you not use it?! Absurd destruction wasn’t remotely the point of the game, but I can’t deny it was fun. Sometimes even more fun than the actual game. This is important to keep in mind as you consider the different paths in your scenarios. It can be amusing as you’re writing to make the less desirable choices funny or over the top. Maybe your worst dialogue options are the snarky things people always wish they could say to rude customers. Or perhaps you hide Easter eggs in the experience that unlock silly bonus endings. Now, these choices aren’t in and of themselves wrong. But if you end up making it more enjoyable to do all the wrong things rather than use your scenario for practice, you can’t be surprised if your learners choose amusement over work. Fun is a crucial part of what makes game-like experiences like scenarios so engaging. Just make sure that the majority of the fun serves to reinforce the project’s learning goals. Wrap-Up So there you have it. Hidden in an admittedly frightful number of hours spent on solving puzzles to escape from a sinking cruise liner, exploring haunted islands, and being a horrible goose was also a goldmine of ideas for writing learning scenarios. From the most effective places to focus limited resources, how much information to give learners to keep things enjoyable but challenging, and where you should focus the fun factor to reinforce learning, video games are full of all sorts of insights we can apply to creating our own learning scenarios. So you know what that means: you now have solid justification to splurge on a few games in the name of work research! Have you picked up your own scenario-writing insights from gaming? Be sure to add them to the comments. And if you want to know even more about making compelling e-learning scenarios, check out these articles: 7 Tips for Writing Effective E-Learning Scenarios Build 3-Step Scenarios Like a Pro with Storyline 360 How to Easily Create Branching Scenarios in Rise 360 Follow us on Twitter and come back to E-Learning Heroes regularly for more helpful advice on everything related to e-learning.821Views0likes2CommentsThe Difference between Screencasts and Software Simulations
If you’re new to creating software training—and even if you’re not!—you might use the terms screencast and software simulation interchangeably. But did you know they’re actually two different things? It can be easy to get these terms confused, so let’s walk through the nuances that differentiate these two methods and explore the use cases for each. Screencasts Screencasts are videos that show a recording of your computer screen. They’re often used to demonstrate the use of an application or software. They include all of your mouse movements and typically have audio narration that gives learners more contextual information about the process they’re seeing—such as the names of various software features or steps. Because screencasts are simply videos, they’re not interactive. When to use a screencast Screencasts are great for creating simple “how-to” videos. This kind of visual walkthrough is beneficial when you’re trying to explain a process that’s too complicated to explain with written text alone. And if the process isn’t something learners will be doing frequently, screencasts can be a helpful performance support resource that learners can easily reference in the future. How to create a screencast If you have Articulate 360, you already have access to not just one but TWO apps that are specifically designed for screencasts: Peek 360 and Replay 360. Learn more about when to use each app in this article: How to Decide Which Articulate 360 App to Use for Screen Recording. Want to see an example? Watch the “How to Add Comments in Review 360” screencast I created with Peek 360 below. This screencast provides a short overview of how to provide feedback on courses in the Review 360 web application. It’s perfect for an audience who may be comfortable with web-based technology and already have familiarity with Review 360. The screencast focuses on a simple process. It’s clear, concise, and to the point. So, how does a software simulation differ? Well, I’m glad you asked. Software Simulations While you also have to record your screen to create a software simulation, the major difference is that instead of simply showing the learners what to do, you give them the opportunity to try it out for themselves. They’re called simulations because you simulate the software’s interface by recording it and turning that recording into an interactive practice environment for learners. They can go through and click on all the buttons—like you did when you recorded it. It’s almost as if they’re using the software themselves. The advantage of doing it this way—versus simply having them use the actual software—is that you can build in on-screen explanations and feedback to guide them as they practice. Software simulations are usually the go-to for creating software training because they provide learners with a risk-free environment to help them learn a new app or process. Another thing that sets simulations apart from screencasts is that you can test your learners’ understanding by creating a simulation that’s graded. For every click in the right spot, learners can earn points. And for clicks in the wrong spots, points can be taken away. It’s a great way to ensure learners have understood how to complete specific processes within an app or software. When to use a software simulation Interactive software simulations are ideal when you want learners to physically practice using the software themselves—including entering data, interacting with drop-down menus, and identifying multiple steps in a more complex process. Software simulations give learners an opportunity to practice using the proper click-path of a specific process or software without fear of impacting the actual production environment or ruining any real-life data. With software simulations, you can put your learners in the driver’s seat so they can deepen their knowledge of a process, gain experience, and build confidence in using an app or piece of software. How to create a software simulation Articulate 360 subscribers can use Storyline 360 to create software simulations quickly and easily. Want to learn how? Here’s a tutorial that’ll help you get started: Creating Software Simulations in Storyline 360. Want to see an example? Explore the software simulation created with Storyline 360 below. In this example, users learn how to get started using the Review 360 web application. This simulation walks through four basic steps that you need to know how to do if you’ll be using Review 360. You’ll notice that because learners actually click through the software themselves, they must pay closer attention to each step in the process. This simulation is perfect for an audience who might not be as familiar with web-based technology or for users who are brand new to navigating Review 360. With simulations, learners can confidently navigate a new application because they’re practicing in the safety of a learning environment. View example More Resources Now you’re well on your way to identifying the nuances between screencasts and software simulations and you should be able to use these terms confidently when tackling your next project! To help you keep everything straight, I’ve outlined the differences in the handy table below. Screencasts Software Simulations Use case Demonstrate a simple, straightforward process. Train learners on a complex process through interactive practice and/or assessment opportunities. Interactive No Yes On-Screen Hints & Feedback No Yes Looking for more best practices around creating screencasts and software simulations? Check out these resources! And let us know in the comments what screencasts and software simulations you’ll be creating next. Follow This Process to Create Software Simulations and Systems Training Like a Pro 3 Methods for Recording Screencasts 4 Tips on Creating Software Tutorials in Rise 360 Tips for Using the Storyline 360 Screen Recorder Like a Pro Follow us on Twitter and come back to E-Learning Heroes regularly for more helpful advice on everything related to e-learning. If you have any questions, please share them in the comments.1.4KViews0likes6CommentsHow to Decide Which Articulate 360 App to Use for Screen Recording
We're ending support for Studio 360, Replay 360, and Peek 360 on December 31, 2026. Learn more. Since software training is one of the most common types of e-learning, it’s no surprise that Articulate 360 includes not one, not two, but three apps with screen recording features. Each of these apps has a unique feature set and is specifically designed for a different purpose. If you’re wondering which app to use for your project, you’re in the right place! Keep reading to learn more about how screen recording differs in Peek 360, Replay 360, and Storyline 360 and the types of projects best suited for each. Peek 360 Peek 360 is a lightweight app that works natively on both Macs and PCs and lives in your menu bar or system tray, so it’s always just a click away. Once you’ve recorded your screen, it automatically uploads to Review 360, generating a shareable link. You can also download the .MP4 file and insert the video into your Rise 360 or Storyline 360 courses or export it for LMS to use it as a stand-alone asset. Since Peek 360 doesn’t have editing capabilities, it’s best for recording short screencasts to share with team members on the fly or to insert into your courses as is. Check out our tutorials and user guide for more details on how to create and distribute screencasts with Peek 360. Replay 360 If you’re looking to create a longer screencast that could require some editing, Replay 360 might be a better choice. In addition to some lightweight editing options, this Windows-compatible desktop app allows you to record your screen and your webcam simultaneously, creating a cool picture-in-picture effect. You can also insert images, video clips, and lower thirds, making it easy to create a polished tutorial video that you can use on its own or insert into your Rise 360 or Storyline 360 course. For more information on Replay 360, check out our tutorials and user guide. Storyline 360 Storyline 360 also allows you to record your screen, but unlike Peek 360 and Replay 360, that’s not its sole purpose. Storyline 360 is a full-fledged authoring app that not only lets you record screencasts and build software simulations but also lets you add custom interactions, quizzes, and much more. This makes Storyline 360 the ideal choice when you want your software training to be interactive. It’s also a great option if you want to overlay text or objects—like arrows or highlight zones—on top of your video. Storyline 360 has some editing capabilities, allowing you to make adjustments to your recording after the fact. You can also easily add subtitles to your screencast—and your entire course—directly in Storyline 360, which is great for accessibility. When you’re done, you can publish to video, web, or LMS. If you want to take a closer look at the screen recording feature in Storyline 360, check out this tutorial or head on over to the user guide. The Bottom Line Peek 360, Replay 360, and Storyline 360 are all great options for recording your screen. Which app you use depends on your project requirements. If you need to record a screencast super-fast, Peek 360 is the way to go. When you want to edit your screencast or record your webcam along with it, go with Replay 360. And when you want to create an interactive software simulation, overlay additional content, or add subtitles to your screen recording, opt for Storyline 360. To make it super-easy to compare the feature-sets of the different apps, I pulled together this quick-reference guide: Peek 360 Replay 360 Storyline 360 Work natively on Macs X Work natively on PCs X X X Record screen X X X Record mic audio X X X Record webcam X X* Edit recording X X Add interactivity X Add closed captions X Publish to video (.MP4) X X X Publish for LMS X** X** X Publish to Review 360 X X X Once you’ve decided which app to use, you might be wondering how to start building your software training. Here’s an article that’ll help you get off on the right foot: Follow This Process to Create Software Simulations and Systems Training Like a Pro. Want to try out these apps, but don’t have Articulate 360? Start a free 30-day trial. And subscribe to our newsletter to get the latest product updates, e-learning examples, and expert advice directly in your inbox. *Webcam recording must be done separately from screen recording **Publish FoR LMS via Review 3601.6KViews0likes2CommentsDesigning More Engaging Software Simulations in E-Learning #194
Software Screen Recordings and Simulations #194: Challenge | Recap Modern authoring tools like Storyline make it super easy for course designers to record screencasts that can be inserted as demonstration videos and screen simulations to give learners the opportunity to practice a series of steps. That’s the easy part. The challenge for most course designers is finding creative ways to make screen simulations more engaging for learners. And that’s what this week’s challenge is all about! Software Simulations for Process Interactions I like the way Jeffrey Riley resized his simulation slide to provide a performance support style interaction. The prototype is a good example of how screen simulations can be used for process interactions. View demo | Download Keep in mind that both examples are only concepts and not polished demos ... but that’s okay because this week’s challenge is all about finding new ways to present software simulations. Challenge of the Week This week, your challenge is to share an out-of-the box idea for working with software simulations. Your examples can be based on real-world projects or sandbox concepts to show what’s possible. NOTE: New entries only this week! Last Week’s Challenge: Before you jump into this week’s challenge, take a peek at the creative ways course designers are working with Storyline blocks in Rise: Using Storyline Blocks in Rise RECAP #193: Challenge | Recap Wishing you a simul-tastic week, E-Learning Heroes! New to the E-Learning Challenges? The weekly e-learning challenges are ongoing opportunities to learn, share, and build your e-learning portfolios. You can jump into any or all of the previous challenges anytime you want. I’ll update the recap posts to include your demos.2.1KViews0likes42CommentsStoryline 360: How-To Video-Inspired Project
Love those nifty little how-to videos in your social media feed, like the ones from Tip Hero or Tasty? Me too! That's why I decided to create my own how-to video-inspired project using Articulate Storyline 360. Storyline 360 features like Content Library saved me loads of time sourcing free stock videos, and then I combined those videos with an auto-advance trigger and some snazzy push transitions to make it all feel more cinematic. View this Storyline 360 project in action Grab the .story file by clicking the download button above, or you can snag it from here. Curious about how I built this project? Read more about it here.1.2KViews0likes4CommentsCreating Software Sims in Storyline 360: Setting Your Recording Size & Area
Do you ever have to train learners on how to use an application or website? If so, you may want to consider using the screen recording tool in Storyline 360 to create some software simulations. Software sims are a great way to teach learners how to use an application, system, or website without affecting the real environment or live data. In this first part of a multi-part series all about software simulations, we’re going to take a closer look at the optimal size to set your recording area, and how you can keep it looking as neat and professional as possible. Set Proper Recording Size Setting your recording size to the proper size will ensure your software simulation looks crisp and clean and appears as high resolution, avoiding fuzziness and distortion of your background. By default, Storyline 360 slides are sized at 720x540 (that’s 720 pixels wide by 540 pixels high), which has an aspect ratio of 4:3. When you launch the screen recording tool in Storyline 360, the default recording size is 720x540, (or whatever size you've set your story to be) as indicated in the image below. The default recording size in Storyline 360 is 720x540, or the same size as your slides. However, to make sure your recording stays crisp and high resolution no matter what screen size you view your course on, it’s best to record at a larger resolution than 720x540—1200x900 or 1400x1050, for example—while maintaining the 4:3 aspect ratio. In fact, as a best practice, it’s a good idea to record your software simulation with as big a recording area as your monitor will allow, while still keeping the same aspect ratio as the slides in your .STORY project. The reason it’s important to make sure your recording area is set to the same aspect ratio as your slide size is because if it’s not, you’ll have empty space on each side of your recording, which looks messy and unprofessional. Notice the white bars along the top and bottom of the recording; this is caused by setting the recording area to a different aspect ratio than the slide size. Another good reason to record at a larger resolution than 720x540 is that you might find it difficult to fit an entire software application or website into an area that small. In fact, certain applications can’t even be resized that small. The key takeaway? Set your recording area to be as big as your monitor will allow, while always maintaining the same aspect ratio as your slides. Keep It Clean When you set up your recording area, try to get everything to look as neat and tidy as possible. This includes closing any personal bookmarks and tabs, closing any expanding menus, and hiding personal or irrelevant information. Before: Notice how messy it looks with all the tabs open and personal bookmarks displayed. After: The recording area looks much tidier with all the tabs and bookmarks hidden from view. You’ll also want to close any systems with pop-ups or alerts to prevent something from appearing during your recording that you’ll have to edit out afterward. In my example above, I’m logged into the system using my own account, and my name and avatar are displayed. Depending on the topic at hand, I might go so far as to create another account with a generic avatar and name to make the content less personalized. It all depends on the specific requirements of your project. Crop Out Unneeded Areas When you set your recording area, you should also do your best to crop out any parts of the screen that the learners don’t need to see. For example, let’s say you’re creating a software simulation that shows how to use an application that runs inside a web browser. Do your learners need to see the URL bar and the scrollbar along the right-hand side? Consider cropping them out of your recording altogether to give your recording a sharper look; doing so also lets the learner focus solely on the parts of the screen that are relevant. After: Look how neat and tidy this recording area looks with the URL bar and scrollbar cropped out of the recording. These are my three top tips for setting a recording size and area that will help you create a high-quality, professional-looking software simulation. To read more articles, tips, and tricks related to creating software sims, check out this series: Everything You Need to Know About Creating Software Simulations with Storyline. Do you have any other tips of your own for setting the recording area and size? Let me know in the comments! Want to try something you learned here, but don’t have Articulate 360? Start a free 30-day trial, and come back to E-Learning Heroes regularly for more helpful advice on everything related to e-learning. If you have any questions, please share them in the comments.1.2KViews0likes11Comments