storyboarding
26 TopicsID Toolbox
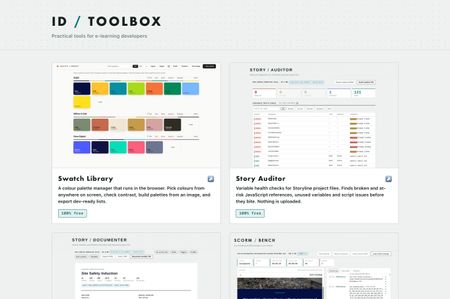
Practical tools for e-learning developers… Over the past several months I've built a set of browser tools for the bits of Storyline and Rise that used to cost me hours. Eleven of them, all completely free, no signup, no accounts, nothing to install. They run entirely in your browser. Nothing is uploaded anywhere, which for me was the whole point, I wasn't keen on posting client content to a website just to check something… ID Toolbox251Views10likes3CommentsMake Working with SMEs a Breeze with These 3 Downloads
One of my favorite things about being an e-learning designer is creating courses on a wide variety of topics. I’ve learned so much over the years! When I look back on it, it’s almost like I had to become an expert in every subject in order to create the most effective learning experience. And while some of my knowledge came from my own research, more often than not it was gleaned from the content provided by my project’s Subject Matter Experts (SMEs). Subject Matter Experts play a critical role in course design. They have the knowledge, experience, and insight to help you create the most impactful training. Despite their importance to your projects, working with SMEs can also be challenging. From different perspectives around how content should be presented to old-fashioned beliefs around how people learn, many e-learning pros find themselves in a battle of wills with their SMEs when all they really want is a productive partnership. This problem can be especially vexing when creating custom e-learning in a powerful app like Storyline 360. With so many creative possibilities, there are countless ways to present content. So how do you help your SMEs visualize different treatments and bridge gaps in understanding, all while building positive relationships with your SMEs? Here are three documents I’ve found essential for communicating clearly and aligning expectations from the start. Document 1: Project Kickoff Questions Before meeting with your project’s SMEs, it pays to do a little prep work. If you already have some source content pulled together, study it to get a basic understanding of the material. And if you don’t have content, research the topic or the company to make the most of your time with your SMEs. As you study, prepare a list of questions to help guide the conversation and show the SME how much you value their time. Need to kick-start your thinking? Download and customize this Project Kickoff Questionnaire for your needs. Download With all of your prep work done, you’re ready to set up a meeting with your SME to discuss the project. Make sure to bring your list of questions, and then listen actively and take notes. This is your time to build trust with your SMEs and identify knowledge and performance gaps to determine the right solution. Document 2: Project Plan After you determine the right solution, it’s time to put the details in writing so you’re all on the same page. A project plan can be a great way to align expectations. In the project plan, you can include the project background, course information, deliverables, timelines, and any other important details. Once you’re done preparing the project plan, have the SME review it and confirm its accuracy before moving forward with design. Need help creating a project plan? I’ve got you covered! Download this free project plan template. Download Document 3: Storyboard Now that you and the SME are on the same page, it’s time to start designing the project. If you’re using a slide-based authoring app like Storyline 360, the best way to make sure you have a solid foundation for development is to create a storyboard. A storyboard is the blueprint for a course that outlines the content screen by screen. Storyboards help your SMEs visualize how the content will flow and allows them to make edits before you start development in your authoring app. Note: If you’re using a web-based authoring app like Rise 360, you can skip the storyboarding phase and go straight to development since it’s easy to use and quick to make changes. Need help getting started? Then download and customize this storyboard template with your content. Download What Next? After the storyboard is finalized, you can feel confident knowing you have a solid foundation to start building your course. Taking the time to develop project kickoff questions, create a clear project plan, and storyboard the content before you start developing it in your authoring app will set you, the SME, and the learners up for success. For more ideas on working with SMEs, check out this series on Everything You Need to Know About Working with SMEs. Follow us on Twitter and come back to E-Learning Heroes regularly for more helpful advice on everything related to e-learning. If you have any questions, please share them in the comments.7KViews4likes2CommentsWhat tools do you use?
What are your go to tools you use everyday and wouldn't be without in your authoring process? Here's mine. There's one thing they all have in common, and for me it's the important bit, nothing gets uploaded. They're plain HTML and JavaScript running in your browser. When you drop a .story file, an image or a SCORM zip on one of these, it gets read in memory on your own machine and that's the end of it. No server, no account, no sign up. Most of what I work on is client material and I'd rather not be posting it to a third party site. I suspect I'm not alone in that. They're all completely free, no trial, no limits, no nonsense! Story Auditor Variable health checks Storyline project files. Finds broken and at risk JavaScript references, unused variables and script issues before you ship. Story Documenter A complete written specification from a .story file. Every slide, every trigger in plain English, every quiz answer etc, ready to print or share with clients. Great for creating storyboards. Image Press Resize, compress and convert images in the browser. E-learning size presets, a target file size, batch zip download, and image metadata stripped on output. Great free tool for managing images for projects. SCORM Bench Run a SCORM package against a logging LMS runtime, without uploading it. Every API call visible, live data model, the manifest checked. Works with SCORM 1.2 and 2004. And a quick question; what's the thing in your workflow that still doesn't have a tool? These only existed because I moaned about something enough and then got annoyed enough to fix it!154Views2likes1CommentDo You Storyboard Before Building in Rise?
When I'm starting a new Rise course, I often sketch out a quick outline first. Other times, I build right in Rise (especially now with AI!) and organize as I go. Lately, I've been wondering how others approach it—especially when it comes to storyboarding or outlining content ahead of time. If you build Rise courses, I'd love to hear: Do you typically create a storyboard or outline before jumping into Rise? 📝 (And if you do, what does it usually look like—simple notes, a spreadsheet, something more detailed?) I'm gathering some insights for an upcoming community project and would love to learn from your processes! 🙌🏼2.6KViews2likes30CommentsCreating a Prompt Library
We have about 20 or so folks across the organization using Articulate 360. I want to start a prompt library that we can all contribute to for code block prompts, AI images, etc. For those of you who have done something similar, what has worked best for you?143Views1like4CommentsFast AI Moodboards in Visily.ai
In this short tutorial, I walk through how I use Visily.ai to create a polished 12-slide AI moodboard for training and instructional design projects. The workflow is simple: gather your inspo, align with brand assets, write a clear prompt in Grok 4.1, and let Visily.ai generate high-fidelity layouts that guide the entire visual direction of the course. This approach helps you explore concepts quickly and present a strong visual foundation before moving into development. You can watch the full breakdown here: https://youtu.be/AcndXNYe7DM?si=kCcFqOon9vyBZuf1162Views1like0CommentsBest way to get feedback/workshop content with SMEs
I'm starting a project that involves a lot of SMEs contributing content, and I know there will be plenty of back and forth to get the language just right. What’s the best way to handle this? In the past, we’ve used Word storyboards with track changes, but it’s hard for SMEs to visualise, and it takes ages to format. I’ve also used Review 360 in Rise, but the feedback screenshots often end up in the wrong spot, making it confusing to know what the SME is referring to. A colleague suggested Storyline might be better for reviews. Is that true? Or should I just export as a PDF and get feedback that way?523Views1like2CommentsBasic Elements of an E-Learning Course
When something’s new, it can feel complex and difficult. And when you’re first getting into e-learning and you view a finalized course, it’s hard to imagine what all the moving pieces are. However, when you pull back the curtain and look at the most basic elements of an e-learning course, you’ll realize that most courses are made up of the same fundamental components. If you’ve taken or designed at least one online course, you should recognize most of these course building blocks. While there’s no rule saying you must include these components in every course, it’s helpful for new e-learning designers to be familiar with the basic elements and where they fit into the overall course structure. Course Welcome or Opening This is the first thing your learners see when they open your course. In addition to welcoming learners visually, it usually provides options for navigating the different sections of the course. Remember that the welcome content sets the tone for your course, so it’s important to start off strong! Here’s an example of a welcome screen created in Rise: Here’s an example of a Content Library welcome template you can insert into your Storyline 360 project: Instructions Depending on the type of course you’re creating, you may want to include instructions to help learners understand how to navigate through the course. If you’ve built your own custom navigation using a slide-based authoring app, you could use arrows, callouts, and text to point out the important features of the course player. Noteworthy features include navigation buttons, resource tabs, a transcript menu, and help buttons. If you’re using the built-in course player that comes with your authoring app, you may not need to go into that level of detail. But even if you’re using standard navigation, it’s still helpful to let your learners know if they need to turn on their speakers, whether there’ll be a quiz at the end, and how much time they should set aside to complete the course. If you’re using a web-based app, like Rise, it might look something like this: If you’re using a slide-based app like Storyline, a simple instructions slide could look more like this, for example: Learning Objectives Objectives give learners an overview of the course goals. Usually presented in bullet point format, the list shows actionable tasks the learner should be able to do after completing the course. However, objectives don’t have to be listed in bullet point format. Often, it’s the client, business partner, or organizational style guide that requires objectives to be presented that way. There’s a trend in the e-learning industry to find creative alternatives to the bulleted format. For example, you could create an accordion interaction in Rise so your learners can explore the different objectives at their own pace, like in the screenshot below: Or, if you’re using a slide-based tool like Storyline, you can create a stylized objectives layout to catch your learner’s eye: Here are some additional resources and discussions on making bullet points more engaging: Convert Your Bullet Points to Interactive E-Learning with Video Five Surefire Ways to Get Rid of Bullet Points Ideas on Getting Rid of Bullet Points to State Course Objectives Reducing Bullet Points and On-Screen Text Animating Bullet Points — Is It Possible to Animate More Than One? Content This section is the meat of your course, where all the learning happens. Here you can include text, images, charts, tabs or timeline interactions, scenarios, screencasts, videos, and much more. There are many different ways to present your content, but here are a couple of ideas to get you started. Text and Images Example created in Rise Content Library template available in Storyline 360 Scenarios Example created in Rise Content Library template available in Storyline 360 Timeline Interactions Example created in Rise Content Library template available in Storyline 360 Depending on your content and course objectives, your course could include just one or two of these elements, or all of the above and much more! Let your objectives guide you through the creation process and help you decide how to best present your content to help your learners reach their target. Practice Activities The purpose of practice activities is to help learners strengthen their skills and knowledge. As such, they should include content presented earlier in the module so learners can apply what they just learned. Here’s an example of a practice activity you can create in Rise: And here’s another example created in Storyline 360: Knowledge Checks & Assessments Knowledge checks and assessments are quizzes at the end of each topic, module, or course, where learners can test their progress during a module. The main difference between the two types of quizzes is that knowledge checks do not generally count toward the final score, while assessments do. They might look like typical quizzes (i.e., true/false, multiple choice, etc.), or take on a more casual format, such as a scenario in which learners must make decisions about what to do in a real-life situation. Check out this example of a quiz question created in Rise: And this one created in Storyline 360 : Summary At the end of each topic, module, and course you’ll often find a summary of the key points from that section. They can include links to additional resources to help highly motivated learners take their knowledge to the next level. In Rise, that could look something like this, for example: Or if you’re working in Storyline or another slide-based app, you could create a slide like this one: Contact Info & Resources At the end of each course you’ll usually find contact information for the trainer or subject matter expert (SME) as well as some additional resources to help support learners as they apply the skills they’ve learned in the course to their jobs. Typically they include one or more of the following: Contact information: People to contact for help or questions about the course Continued learning: Additional resources beyond what was in the course Job aids: Handouts from the course that can be used as performance support In Rise, you could create something that looks like this, for example: Or you could build a slide like this in Storyline or another slide-based app: Final Thoughts As a course designer, you have unlimited options for combining e-learning elements in your courses. Your experience level, combined with expectations for your course and learners, will influence many of your choices. If you’re a new e-learning designer, try covering these common elements to start. Good luck! Leave a comment or post in the forums if you have any other questions about these e-learning elements or want to share ideas for combining them in unique ways. Follow us on Twitter and come back to E-Learning Heroes regularly for more helpful advice on everything related to e-learning.5KViews1like26Comments4 Easy Ways to Organize Content For E-Learning
Picture this: you’re designing an e-learning course and you’ve gathered content from your Subject Matter Experts and completed your own research on the course topic. You’ve sifted through all your materials and sorted the “nice to know” from the “need to know.” Now you’re ready to go! You can start laying out the content in your course … except, you’re feeling a bit stuck. You know order and organization are key to a successful learning experience. And as an e-learning designer, you want to set your learners up for success and present content in a way that helps them focus on what they need to know. But how do you decide what to present first and what to present last? And how do you make sure not to overwhelm your learners with too much information at once? Let’s walk through four tried-and-true methods for organizing course content in a way that makes sense. Alphabetically This is a straightforward and logical way of organizing content. And since we all learn the alphabet at a very young age, it’s an intuitive and traditional system for organization. This method lets learners easily find specific information without needing to provide much direction or instruction. This works particularly well for presenting textual content such as terminology or keywords. For example, if you work in an industry with a lot of technical jargon or acronyms, it makes perfect sense to present those industry terms to your learners—along with their definitions—in alphabetical order. Order of Importance Another effective approach for organizing content is to place items in order of importance or priority. Learners are likely more focused at the start of your course and they may lose steam (and potentially interest and attention span) as the content progresses. That’s why it’s a good idea to share your most important content early on in your course, while also communicating what concepts or information take priority over others. For example, if you’re developing a product course for your sales team, would you present the $500 rust-proofing kit as your first product? Or would you start by showing them the $30,000 car? Probably the car, as it’s more important and leads to more revenue overall—a key consideration for a sales team. Sequentially When it comes to explaining a process or a task, it’s best to share the information sequentially. It makes much more sense for learners to view steps 1-2-3 in the proper order, rather than viewing them backwards or even out of order. By organizing your content sequentially, it’s easier for learners to retain the process so they can carry out the steps on their own. For example, say you created an e-learning course that trains salespeople on how to close a sale. It would make sense to share that process in chronological order, starting with how to approach and greet the customer, how to handle objections, and, finally, how to close. Going about this process in another order could confuse your learners and be detrimental to the learning experience. Categorically Sometimes the best way to share content is to cluster it into shared themes. By grouping similar content together in logical categories, you’ll help learners identify related subjects or patterns. This is a particularly useful method when all the information you’re presenting shares equal importance and nothing needs to be shared in any particular order. Breaking content up into shared categories also reduces cognitive load and helps learners digest related information. For example, say you’re creating an e-learning course that helps onboard your sales team and teaches them about all the products available in your organization. Instead of presenting all the products at once—which could be intimidating for a learner—you can break them up into categories (Electronics, Outdoor Living, Furniture, etc.) and let learners explore smaller and more manageable sections one at a time. Wrap-Up As you evaluate your own content, let your subject matter guide you. Sometimes your content will naturally lean toward one particular organization method over another. Other times, you may find multiple methods could work and it’s up to you to make the call. The most important thing to consider is what your learners will need to do with the content you share. Do they need to replicate the steps in a process from memory? If so, sequential organization is the way to go! Or, maybe they need to quickly and intuitively reference the material while they interact with customers. In that case, alphabetical or categorical organization might work best. Do you use other content organization methods in your e-learning courses? Let us know in the comments below! And as you continue collecting and organizing content for your e-learning course, be sure to check out these helpful articles: 5 Steps for Collecting Content for Your E-Learning Project What to Do When Your Course Has Too Much Content Why & How to Tailor Content to Different Audiences Follow us on Twitter and come back to E-Learning Heroes regularly for more helpful advice on everything related to e-learning. If you have any questions, please share them in the comments.3.4KViews1like22Comments