Forum Discussion
How I Built this Water Faucet Interaction - ELC 398
This weeks challenge was to share a simple demo or interaction to show how something works.
I selected a water faucet after doing some research on "How Stuff Works - How to Repair a Faucet".
Here is my demo:
https://360.articulate.com/review/content/7e8d6817-7414-485f-b37e-6a3d4a061665/review
Collecting Assets
I liked the faucet image located here (https://home.howstuffworks.com/home-improvement/plumbing/how-to-repair-a-faucet1.htm ) so I copied it with the Snipping Tool and imported it to my standby picture editing tool, PowerPoint.
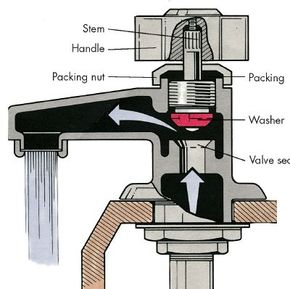
Using the "remove background" tool I got rid of everything except the housing.
The Interaction
With a goal to have the stem and the washer move into the valve to close or open the flow of water, I used the "remove background tool again and got rid of everything except those items. I turned the picture sideways and added a handle using a rounded rectangle shape with a shadow. Why did I turn it sideways? I am going to use this picture as the "thumb fill" image for a slider which will be repositioned from left-right to up-down.
The Slider
Next I went ahead and inserted a slider and changed the thumb fill image as described above.
I then formatted the slider as follows.
As you can see it has a range of 1-100 and an intial value of 0. The width is 200 which is a little larger than the image so that it can move up and down a little bit. Why width instead of height? Because we have changed the orientation 90 degrees when we saved the picture for the sideways slider. We will talk more about the variable it controls in a moment.
Dialing it in
Next I created a dial for the water faucet knob with the following properties.
You might notice that the variable for the knob (the dial) and the variable for the slider are the same. Also the range and initial value are the same. Why? This will allow us to control the slider by changing the value of the knob (by rotating it. Under formatting, I also changed the dial face to be a picture of a faucet knob (cold).
Animating the water
Once the knob could control the slider I could associate triggers with the knob value to create the illusion of water filling and pouring out of the faucet. I drew custom shapes using the freeform tool. Since I would be animating those shapes using the "wipe" animation, I created several shapes so that the water "flowed" between them. Each time an animation completed, it triggered the next animation.
water_inside animation - wipe up
water_small animation - wipe left
water_down_small animation - wipe down
This first set of triggers controls the state of the three "waters" making the first one visible when the value of cold_faucet>2. And making all three of them invisible when the value of cold_faucet<2.
This second set of triggers controls the appearance of 'water_small' and 'water_down_small' after the prior animation (water_inside or water_small) completes.
Adding Instruction
Finally I created three states for the message box which change based on the value of 'cold_faucet'
This allows us to give instructions to move the learner along so that they don't just interact with the dial/slider once.
Throwing in some surprise
If you haven't already done it, try not following the instructions as provided but being contrary instead.
Want to learn more?
You can download the Storyline file by clicking below or in the resources tab of the interaction.
3 Replies
- SarahHodgeFormer Staff
I love seeing new ways people use dials and animation effects. So cool, Ron! 👏Thanks so much for sharing the file and how you made this!
- RobynMillard-49Community Member
Great stuff Ron - I love how you've connected the use of dials and sliders and applied it to a real-world application! Now I know what the washer does!
- SouveekPalCommunity Member
Thanks a lot for creating this discussion thread. Today I learnt a simple yet very effective way to animate stuff.