tutorial
662 TopicsArticulate Localization: Create Multi-Language Rise 360 Courses
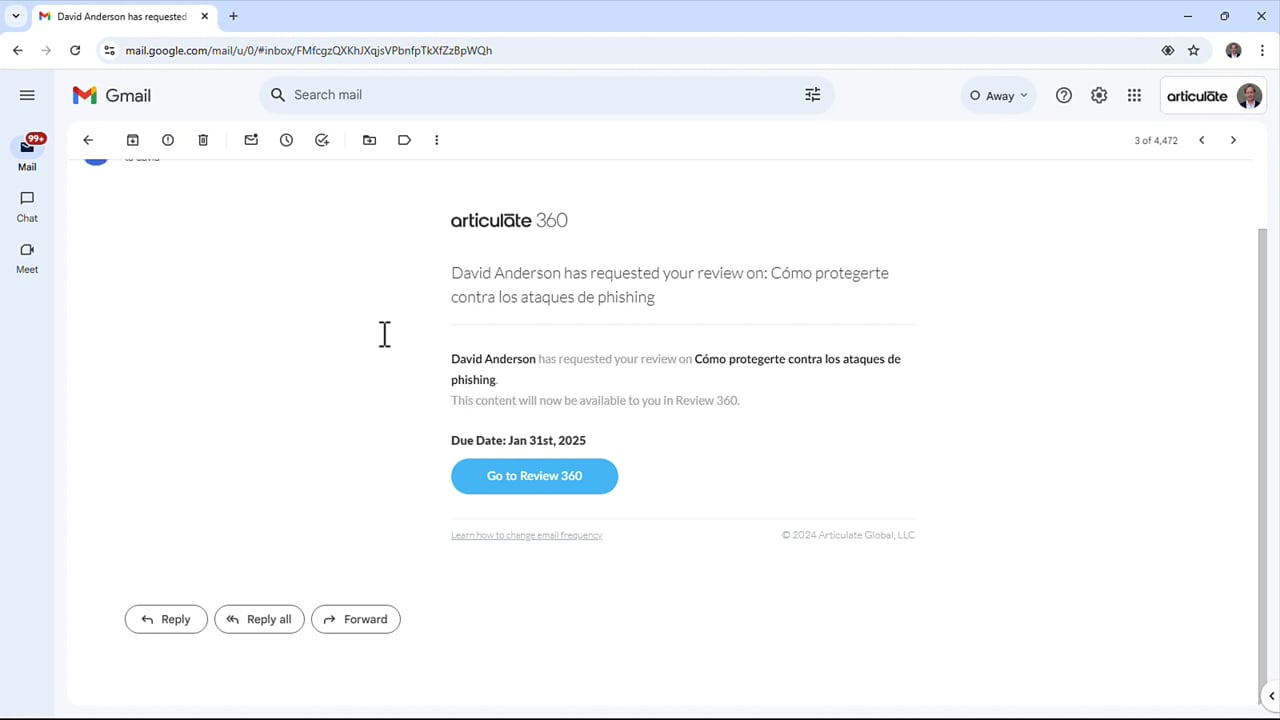
With Articulate Localization, you can translate course and microlearning content into 80+ languages and manage all the language versions as a single project, right from the Rise 360 dashboard. Watch the video to learn how to translate and share the translations with validators. Then read on for more details on managing multi-language courses. Translate a Course Early-Access Course Stacks Translate Text Updates Manage Languages Add or Replace a Language Remove a Language Capture Course Stack Versions with Snapshots Save a Copy of a Language Localize Media Assets Localize Video Assets With Closed Captions Localize Audio Assets With Transcripts Generate Translated AI Text-to-Speech Tips Add Collaborators Localize Video and Audio Assets Understand Question Banks Include Right-to-Left Languages Translate Storyline Blocks for Use in Rise 360 Courses Translate a Course Before translating your course, run through this checklist to avoid common issues. Prepare your course for AI translation with the following best practices: Avoid using all caps to emphasize certain words. AI translation often interprets this as an acronym and won’t translate it. Avoid splitting a sentence into multiple text blocks, as this removes necessary context for effective translation. Avoid using emojis. Their meanings can vary across cultures, and machine translation tools may not interpret them accurately. Use proper grammar. Simplify formatting. Complex formatting can create challenges for all forms of AI translation. Here are some best practices: Don’t format spaces. Let Rise 360 handle text wrapping. Using shift+enter to manually insert line breaks will impact other languages, where it won’t always be appropriate. Scan through your content one more time for terms that might need to be added to the AI translation glossary. The glossary specifies how terms are translated—or not translated. For example, you might have a specific term for “service” in a particular language. Or you may want to make sure your brand name does not get translated. Include closed captions with video assets, and add transcripts to blocks with audio so they can be translated automatically. You can also add AI-generated captions with AI Assistant. If you have AI Assistant and the target language is supported, add your narration with AI-generated text-to-speech to automatically generate translated versions. Once you’ve double-checked your course, follow these steps to get started with Localization: In your dashboard, hover over the content tile for the course you want to localize, click the more (...) icon, and select Translate. A translation dialog will appear. You can confirm the source language, select one or more target languages, and adjust the formality if the languages support that option. Choose a glossary for the translation run. This glossary will be used for all succeeding translations for this course, including updates. Click Translate. Rise 360 will create a multi-language course with all the language versions presented as a single course “stack”. The course stack tile on the dashboard indicates how many languages are in the stack, as shown below. Multi-language courses share the same theme and structure. If you add, move, or delete a block, lesson, or section in one language, those changes will apply to all other languages in the course. Other factors to note: Clicking the tile opens an overview page that lists all the current languages in a sidebar and allows you to preview each language. Click EDIT COURSE to make changes to any language version. The language dropdown on the top left lets you switch between languages while authoring, as shown below. Here are some guidelines to keep in mind when choosing a language from the dropdown: Stay in the source language if you want to make changes in all languages, such as updating course content, adding new blocks, lessons, or sections, and changing themes. Switch to a target language if you want to make language-specific changes, such as replacing media assets, editing existing text, and changing course labels. Custom label sets are not translated, but translated courses will automatically have default label sets for each target language. If you prefer to use custom label sets, you can assign them to individual language versions after translation. Similarly, code blocks will be the same across all languages after translation. You can have language-specific code blocks by modifying the code for each language after translation. If you accidentally choose the wrong glossary, translate the course again and select the current languages to enable the Glossary field. Custom blocks are not currently supported for Localization. Early-Access Course Stacks Multi-language courses created during our early-access program will have an [Early Access] tag on the course tile and course stack. This older version has the following differences: When you add languages to a Rise course, each translated language becomes a separate copy of the original course, so changes you make to one language version will not affect other languages. To edit an individual language, switch to it in the sidebar and click the Edit button in the top navigation bar. Any changes you make affect only the language you are currently editing. There’s no option to translate updates to the source language and publish a single-package, multi-language output. Learn more about the early-access version of multi-language Rise 360 courses. Refer to this user guide when working on this version. Translate Text Updates Rise 360 detects text changes made to your source language after the last translation run. It allows you to translate these changes without affecting other portions of the course. If the unchanged portions have imported validation suggestions, these will be preserved. Here's how it works. Update existing text or add blocks to your source language. A blue notification dot appears on the language dropdown on the top left. Click the language dropdown and select Back to Stack. From the course stack, click Update Translation to translate only the text updates you made for all existing target languages. When the translation run completes, the Update Translation option disappears. Additional information: Text updates are determined by translation units called text segments. A text segment breaks down the source text into smaller parts while retaining its meaning in context. Segments can vary in length and structure—from single words to complex sentences or even short paragraphs, depending on context. In Rise 360, a segment is typically the text in a block. Any text change in a segment will retranslate the whole segment. You can see how your course is broken down into segments when you publish to Review 360 and view the translation table. If your course has already been validated, follow the tips in this article to request validation for only the updated content in Review 360. Importing validation suggestions or updating text in the target languages will not enable the Update Translation option. Adding blocks, lessons, or sections to any target language will also apply to other languages, but they won't get translated. If you accidentally added them to the target language, simply delete them and recreate them in the source language. You can’t duplicate or send a copy of the multi-language course until all pending translations are updated. Translating updates within the same Articulate 360 subscription contract term does not affect your total purchased translation. Manage Languages You can add or remove languages from a multi-language project and create snapshots at any time. You can also save a copy of a language as a separate course. Add or Replace a Language To add or replace (retranslate) a language, re-run the translation tool by selecting Translate from the stack tile option in the dashboard or clicking Translate at the bottom left of the stack overview. If the language exists in the course stack or the Archived Translations folder, click Translate again to overwrite existing versions. Note: Retranslating or using AI translation for existing languages in a multi-language course within the same Articulate 360 subscription contract term does not affect your total purchased translation count. However, if you duplicate the multi-language course or send a copy to someone else, any new translations on the copy—including translating text updates—will be counted. Remove a Language To remove a language, click the ellipses (...) beside the language from the stack overview, and choose Archive. The language moves to the Archived Translation folder at the bottom left. You can restore or permanently delete the language from the Archived Translation folder. Retranslating archived languages will also permanently delete the versions in the Archived Translations folder. Capture Course Stack Versions with Snapshots Create and manage snapshots of your multi-language courses by selecting the Snapshots menu next to the course title in the course stack overview page. Similar to single-language snapshots, versions are automatically generated whenever you publish a multi-language course. You can also save different versions and restore them as needed. Key points to remember: Snapshots are not available in early-access versions. Snapshots created before you translated the course are still included. While you can't revert to these pre-translation versions, you can save them as a new course or microlearning. Restoring an earlier version won't impact your translation count. If any languages are removed during a restore, retranslating them is free, as long as you do this within the same billing period. Save a Copy of a Language To save a language as a separate course or microlearning, click the ellipses (...) beside the language from the stack overview, and choose Save as. Give the copy a name and click Save. The copy is saved in the same folder as the multi-language project and includes the default label set for the corresponding language. The label set is also added to the list of built-in label sets under Course Settings. Localize Media Assets Images, audio, and video assets will be the same across all languages after translation. Any changes you make to the media—such as alt text or image alignment—in the source language will be applied to all target languages. You can have language-specific media by modifying the media asset in the target language. Remember that editing a target language disconnects the asset from the source language, so any changes made to the source won’t be applied moving forward. For audio assets, you can reset the target language audio by clicking the Options (...) icon on the right of the audio player and selecting Revert to source audio. Localize Video Assets With Closed Captions Localize video assets automatically by adding closed captions before translation. Captions translate along with other course text when you add new languages. They’re also included in the validation process when you publish to Review 360 for validation. Validators can play the video and click the CC button to display the captions. Learn how to add closed captions to videos or add AI-generated captions with AI Assistant. Localize Audio Assets With Transcripts For blocks with audio, you can add transcripts after recording or uploading your narration. These transcripts will be translated automatically. To include a transcript: Enable the Transcribe audio file toggle when you upload or record audio. Or, generate text-to-speech with AI Assistant, which automatically includes transcripts. Read on for instructions on using AI Assistant to generate audio and transcripts. Generate Translated AI Text-to-Speech If you have AI Assistant and the target language is supported, you can generate translated, AI-generated text-to-speech when translating your course. Here’s how: Generate text-to-speech narration with AI Assistant. Translate your course or microlearning to generate text-to-speech narration for supported target languages. If you need to modify the narration, recreate it in the source language. Then, click the language dropdown and select Back to Stack. From the course stack, click Update Translation to generate narrations for the target languages. When you publish your course to Review 360 for validation, validators will be able to see the text-to-speech scripts as they review the whole course. If there are edit suggestions for the script, importing suggestions generates a new text-to-speech audio file with the suggested text. Note: Text-to-speech translation is currently in beta. Functionality may change over time. Based on feedback and feature stability, some options could be modified and others removed. Tips Add Collaborators You can add collaborators to your multi-language course in three ways: Click Share > View collaborators from the course stack or while editing the course to add them via course settings. From your Rise dashboard, hover over the content tile for the course, click the More (...) icon, and select Share to add them via share settings. If the course already has collaborators, a Share Settings option displays instead. Hover over the content tile for the course from your Rise dashboard, click the More (...) icon, and select Move to move the course to a team folder. Everyone who has collaborator access to the team folder you choose will have the same access to the course. You can add anyone with an Articulate 360 Teams subscription, but they must be on a subscription with Articulate Localization to access course stacks. Note that course managers and editors can view and edit multi-language courses. However, only course managers can manage languages. Course managers can also initiate course translations or add new languages if they have translation access within the same subscription. Collaborators without access to Articulate Localization can’t access the course stacks, but course managers can save separate copies of each language to their account when they try to launch the course stack. Understand Question Banks Questions drawn from question banks are translated together with the course. When publishing to Review 360 for validation, we recommend including all the questions from the question bank so validators can review them. Learn more about using question banks in knowledge checks and quizzes. Include Right-to-Left Languages Rise 360 supports multi-language courses with both left-to-right and right-to-left language versions. In edit mode, right-to-left language versions are in a left-to-right layout, but they will automatically adjust to right-to-left layouts when the course is previewed, reviewed, or published. Translate Storyline Blocks for Use in Rise 360 Courses Storyline blocks must be translated and validated through Storyline 360 before the translated versions can be embedded in Rise 360 content. Here’s one approach we suggest: Finalize your Rise 360 course and Storyline blocks in your source language. Translate, validate, and import suggestions for the Rise 360 course in Rise 360. Translate, validate, and import suggestions for the Storyline blocks in Storyline 360. After completing the Localization workflow in Storyline 360, publish the final version of the multi-language Storyline course to Review 360. Embed each Storyline language version to the corresponding language in the Rise 360 course. Follow these steps: Launch the Rise 360 course and click Edit Course. Click the language dropdown on the top left and select one of the target languages. Navigate to the Storyline block and click the pencil icon to edit. When the sidebar opens, click Change and select the Storyline course for this language. Each language version will have the title suffixed with the language code, such as “Onboarding Course - FR” or “Onboarding Course - DE.” If you use a single Storyline file for multiple Storyline blocks, you can publish the whole project to Review 360 for validation. Consider these options to ensure your validators are aware of the different slides/scenes: Instruct them to use the course overview navigation dropdown in the Translation tab in Review 360. (Note: The Translation tab isn’t available in the source language.) Enable the Storyline 360 player menu during the validation process. After validation, hide the player menu and republish the final version for embedding these scenes/slides as Storyline blocks. To publish slides or scenes as separate Review 360 items, save each language as a separate file—including the source language—to turn them into single-language project files. The Review 360 items can then be inserted as separate Storyline blocks. However, localization features like course updates, language validation, and multi-language workflow management won't be available for these copies.14KViews19likes0CommentsRise 360: Export to LMS, PDF, and the Web
Ready to distribute your Rise 360 content to learners? You’ve got options! In addition to using Quick Share and Reach 360, you can export your content for LMS distribution, host it on your own web server, or download it as a PDF file. Here’s how. Publish an LMS Package Publish a PDF File Publish Web-Only Output Publish an LMS Package If you use a third-party LMS, you can export your Rise 360 content in a variety of compatible formats. Rise 360 supports xAPI-, SCORM-, AICC, and cmi5-compliant LMSs. Note: When using xAPI in a custom LMS, you may need to make modifications to the output file. Open the content you want to publish from your Rise 360 dashboard. Then, click Publish in the upper right corner of the screen, and select LMS. Choose an LMS standard: xAPI (Tin Can API), SCORM 2004, SCORM 1.2, AICC, or cmi5. Note: For xAPI and cmi5, if you alter the pre-generated identifier, don't use special characters. Select a Tracking option. All content can be tracked by completion percentage or Storyline block. Courses can also be tracked by quiz result. If you're tracking by course completion or quiz result, you can choose a reporting option. Note: Not all complete/incomplete options are available for reporting on microlearning content. Tracking completion through multiple options is available only when publishing to Reach 360. Choose whether to display an Exit Course Link for learners and/or toggle the Hide Cover Page option. Selecting these options may help resolve third-party LMS issues. Note that you can't hide the cover page for training created from Next Big Idea Club content templates. Toggle off Allow Usage Data Collection to disable sending non-identifiable usage data to Articulate servers for product improvement. Less-frequent LMS issues may be solved by options in the More settings menu: If you delete a lesson in your course, then update the course in your LMS, some learners might see a blank page. If this happens, toggle Reset Learner Progress and click Continue to confirm. When learners launch the newly updated course in your LMS, their progress will be reset. Their quiz data will be retained. This option isn't available for xAPI exports. If your LMS supports hiding the Suspend, Continue, and Close buttons at the top of your training, you might see duplicate buttons in training exported using SCORM 2004. Toggle Hide LMS Interface to hide these extra buttons. To allow for additional windows to be opened outside of your training environment, toggle Only Load in LMS. Note that quiz and completion tracking won't be supported in additional windows. Click Publish in the upper right corner again to generate the package. (If there are any errors, such as a blank lesson, Rise 360 will ask if you want to edit the content or continue.) Click Back to... in the upper right corner to continue working while Rise 360 generates your zip file. When it’s ready, you’ll receive an email notification with a download link. (For small deliverables, you may immediately be prompted to download the zip file before you have a chance to go back to the editor. Just choose a location on your computer and click Save.) Click the download link in the notification email, then click Download Content on the web page that opens. Choose a location on your computer and click Save. Upload the zip package to your LMS. If your LMS requires you to identify the launch file, point to indexapi.html. Publish a PDF File Need to print content or download it for compliance documentation? Good news! You can export your Rise 360 content as a PDF file. Open the content you want to export from your Rise 360 dashboard. Then, click Publish in the upper right corner of the screen, and select PDF. The PDF file auto-generates. If there are any errors, such as a blank lesson, Rise 360 first asks if you want to edit the content or continue with the export. Click Back to... in the upper right corner to keep working while Rise 360 generates your PDF file. When it’s ready, you’ll receive an email notification with a download link. (For small deliverables, you may immediately be prompted to download the PDF before you have a chance to go back to the course editor. Just choose a location on your computer and click Save.) Click the download link in the notification email, then click Download Content on the web page that opens. Choose a location on your computer and click Save. That’s it! You can read the PDF file offline, print it, distribute it to others, or even attach it to your Rise 360 content as an optional download using an attachment block. Interactive elements of your Rise 360 training may display differently in your PDF file. Here's how interactive blocks are displayed in PDFs. Hyperlinks work as expected and launch in your default web browser. Audio clips, videos, web objects, and custom blocks become static placeholder images. Interactions such as labeled graphics and tabs become a series of screenshots, one for each item in the interaction. (Each flashcard becomes two screenshots, one for the front and another for the back.) A Storyline block becomes a screenshot of the first slide in the project. Quiz lessons and knowledge check blocks display questions and answer choices. They don’t show correct/incorrect responses or feedback statements. Code blocks display a compatibility error message. Publish Web-Only Output You can also export Rise 360 content as web-only output and host it on your own web server. Here’s how. Open the content you want to export from your Rise 360 dashboard. Then, click Publish in the upper-right corner of the screen, and select Web. Toggle the Hide Cover Page option as needed and click Publish. The zip file auto-generates. If there are any errors, such as a blank lesson, Rise 360 first asks if you want to edit the content or continue with the export. Click Back to... in the upper right corner to continue working while Rise 360 generates your zip file. When it’s ready, you’ll receive an email notification with a download link. (For small deliverables, you may immediately be prompted to download the zip file before you have a chance to go back to the course editor. Just choose a location on your computer and click Save.) Click the download link in the notification email, then click Download Content on the web page that opens. Choose a location on your computer and click Save. Extract the zip package and upload the contents to your web server. If you don't have access to a web server, here are some free options: Amazon S3 offers free hosting with generous usage limits. If you go over your limit, you'll be charged a small fee. See this video tutorial by Tom Kuhlmann to learn more about Amazon S3. Google Cloud also has a free hosting service. You'll be charged a small fee if you go over the free limit. See this video tutorial by Tom Kuhlmann to learn more about Google Cloud. Once the files are uploaded, provide learners with a link to the index.html file.54KViews0likes0CommentsArticulate Localization: Publish Multi-Language Rise 360 Courses
Articulate Localization makes publishing multi-language Rise 360 courses easy. Publish all language versions as a single package for your LMS or web server, and let learners choose which language to view when they launch the course. Or publish each language separately as its own package for LMS export if that’s what your LMS supports. For the best experience, publish your multi-language training to Reach 360 so your learners automatically see content in their preferred language. To start, click Publish on the top right of the course stack or while authoring a multi-language course. Choose from the following output types: Quick Share, Reach 360, LMS, Web, and PDF. Find more details for each type below. Quick Share Use Quick Share to easily distribute multilingual training directly from Rise 360 via a URL. QuickShare includes a per-course dashboard that tracks training views and, when the guestbook function is enabled, collects the names and emails of learners. Here’s more information about publishing courses to Quick Share. Learners select their preferred language from those available when they launch the URL. However, you can choose a default language by navigating to that language version first, then clicking Publish > Quick Share. Reach 360 Publishing to Reach 360 lets learners see the course in their preferred language (if available) and allows them to switch to other languages without disrupting their training progress. You can use the Language dropdown in the publishing options page to choose whether to publish all or a subset of your course languages. Then, select the same settings as you would when publishing Rise 360 content to Reach 360. Click Publish at the bottom to send all language versions directly to your Reach account packaged as a single training, as shown below. Learn more about how multi-language training works in Reach 360. LMS Publishing to LMS gives you the same LMS settings as when publishing Rise 360 content to the LMS. You also get the option to choose which languages to include and whether you’ll have a single package or separate LMS packages for each selected language. Click the Language dropdown to deselect any language you want to exclude. All languages are selected by default. Choose between publishing a single LMS package with all the languages you selected or publishing separate packages for each language. Each option is explained below. The Publish selected languages as a single LMS package option lets you upload one zip file to your LMS. Learners can choose their preferred language when they launch the course, as shown below. The Publish separate LMS packages for each selected language option lets you download one zip file containing several other zip files, one for each language. You’ll need to unzip the main zip file, then upload each language zip file to your LMS. Click Publish at the top right to proceed with your chosen option. Rise 360 reports the language the learner chooses to the LMS when the course is published for AICC, SCORM 1.2, and SCORM 2004. For both single and separate package output, the learner’s language code is reported in the following fields: AICC: cmi.learner_preference.language SCORM 1.2: cmi.student_preference.language SCORM 2004: cmi.learner_preference.language If you need this information, check with your LMS admin to see if your LMS supports these fields. Cmi.student_preference.language, for example, is not a mandatory element in SCORM 1.2, so some LMSs might not support it. xAPI and CMI5 statements include language tags to indicate the source language (the parent element) and the language the learner selected when the data was sent, as shown below. Note: Does your multi-language course have an [Early Access] tag? That means it was created in the early-access version of Articulate Localization and can’t be published as a single package with all the selected languages. Refer to this user guide for help using the early-access version. This article explains more about the new features available in the updated Rise 360 version of Articulate Localization, including how to convert your courses to the newer version. Web-Only The web-only output gives you a single course with all the available languages. Learners can choose their preferred language when they launch the course. Simply unzip the zip file provided and upload the contents to your web server. When the files are uploaded, give learners a link to the index.html file. PDF The PDF output gives you one zip file containing one PDF file for each language available in the multi-language course.2.6KViews1like0CommentsStoryline 360: Adding Videos
Enhance your Storyline 360 courses with videos from files and websites, and learn how to make your media accessible to all learners. To learn how to add videos from Content Library 360, read this resource. Add a Video from a File Add a Video from a Website Make Videos Accessible Add a Video from a File Note: Videos are automatically synchronized with the slide and controlled by the timeline. Here’s how to add a video from a file: First, do either of the following: In Slide View, go to the Insert tab on the ribbon, click the Video drop-down arrow, and choose Video from File. Or, drag a video file from your computer and drop it on your course slide. In Form View, go to the Home tab on the ribbon, click the Media drop-down arrow, and choose Video from File. Browse to the video you want to use and click Open. Storyline 360 supports both MP4 and WebM videos. The following video formats are automatically converted to MP4 when added to your project: 3G2 3GP ASF AVI DV M1V M2V M4V MOV MPE MPEG MPG QT WMV Tips: If your video placeholder is difficult to see because it appears as a white, black, or transparent rectangle in Storyline 360, right-click it and choose Set Poster Frame. Then, browse for an image file to use as the video placeholder. If you add a video without captions, AI Assistant prompts you to generate them automatically. Click Generate Captions to create captions for your video. To generate captions automatically next time, check the box to Remember my choice for future imports. You can adjust this preference anytime from the Features tab on the Storyline Options window. Add a Video from a Website Note: Website videos play independently of the slide and aren’t controlled by the timeline. Here's how to embed videos hosted on websites such as YouTube and Vimeo. In Slide View, go to the Insert tab on the ribbon, click the Video drop-down arrow, and select Video from Website. Copy the video embed code from the hosting website and paste it into the Insert Video from Website box. Click Insert. Make Videos Accessible Video accessibility fosters inclusivity and boosts comprehension for all learners. Here are a few tips to make videos accessible: Turn off autoplay. Video content that autoplays can disrupt learning and interfere with assistive technologies. Adjust video properties to prevent autoplay and enable playback speed control. (1.4.2 Audio Control). Enable accessible video controls. Turn on the accessible video controls in Storyline 360's modern player for a more inclusive and flexible learning environment. (2.2.2 Pause, Stop, Hide). Use closed captions. Closed captions help all learners fully engage with and comprehend your content. You can import captions, create your own, or let AI Assistant generate them for you automatically—all right in Storyline 360. Position captions at the top or bottom of your slides and customize the foreground and background colors to maximize readability. (1.2.2 Captions [Prerecorded]). Provide synchronized video transcripts. Synchronized video transcripts can be automatically generated from closed captions. Transcripts should include descriptions of narration, sound effects, and other audiovisual elements. (1.2.3 Audio Description or Media Alternative [Prerecorded]). Use audio descriptions where necessary. Include audio descriptions that narrate important visual details not conveyed through dialogue. This practice gives learners with visual disabilities access to all the necessary information and allows them to understand the content thoroughly. (1.2.5 Audio Description [Prerecorded]). Keep your language simple. Use plain language in your video content and descriptions. Straightforward and clear language helps your audience easily read and understand the information. Avoid distracting videos. Stick with non-flashing videos. Content that flashes, blinks, or flickers more than three times per second is distracting and can trigger seizures in learners with photosensitive epilepsy. (2.3.1 Three Flashes or Below Threshold). You Might Also Want to Explore: Adding Content Library 360 Videos Editing Videos Adjusting Video Properties6.6KViews1like0CommentsArticulate Localization: Get Started with Language Validation in Review 360
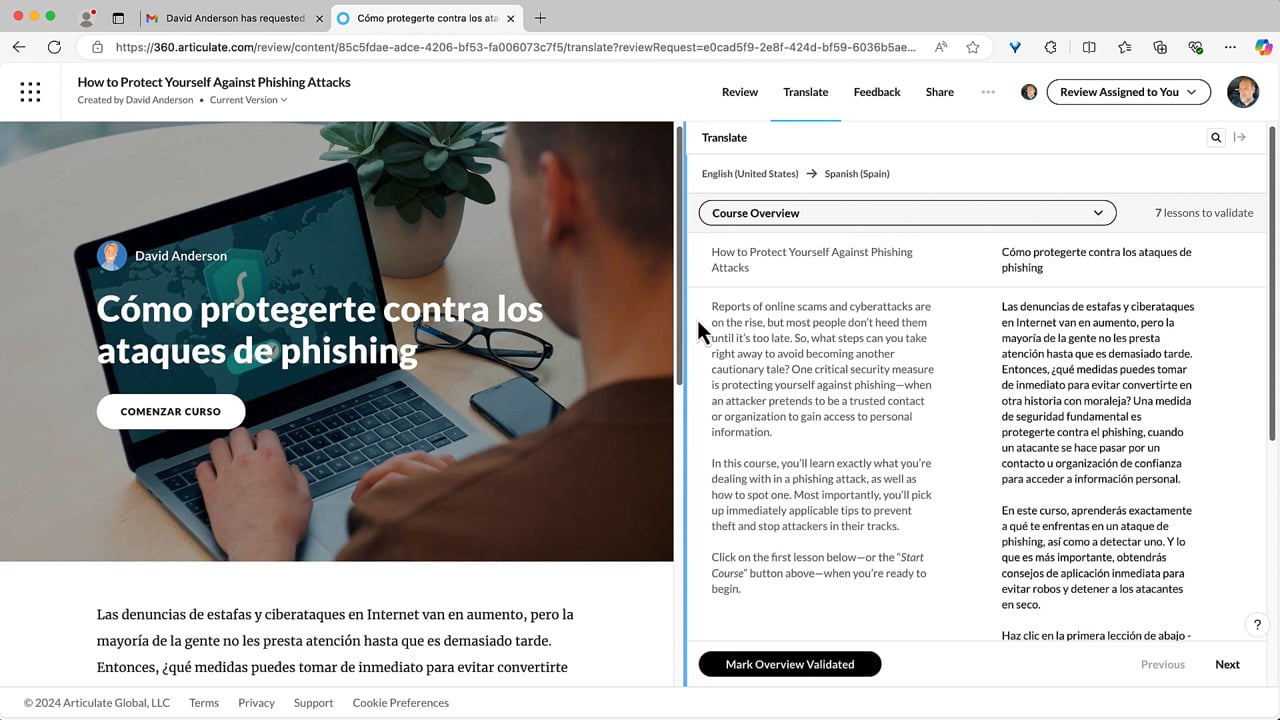
Prefer to read this in a different language? Explore the language options available in this course. Articulate Localization language validation results in higher-quality translations with fewer rounds of feedback, streamlining and speeding up the localization process for Rise 360 and Storyline 360 courses. Validators use Review 360 to review AI translations in the context of the course, and they can preview their changes in real time. Course authors send a link to access the translated course via email and ask a validator to review it. Validators can suggest changes to any of the text in a course, see a preview of their changes as they’re made, mark lessons or slides as validated to avoid duplicating work, and indicate to the course author when validation is complete. Watch the video for a quick demo of the process. Validators can follow the steps below to get started. Course authors may also want to read on to learn how the process works for validators. Signing In Validating Courses and Tracking Progress Adding Comments Completing Your Validation Validating Updates Tool Tips Search Function and Find and Replace Tool Translation Table Filter Advanced Tag Format Editing Signing In Once you receive a validation request email from a course author, use your email address to sign in. You need to provide at least an email address to comment or suggest changes to the translations. Depending on the permissions set on the course, you may also need to sign up for a free Articulate ID using your email address before you can validate. Validating Courses and Tracking Progress When you open a translated course in Review 360, you'll see a Translation tab in the comments sidebar. This tab contains the validation table with all the text in the course in both the source and target language. The numbered areas in the image below are the different features you’ll use in validating. Refer to the table that follows to learn more about each feature. # Feature Description 1 Course Preview See the translation as it appears in the course. 2 Course Overview Navigation Dropdown Jump to a specific course or access an overview of the validation progress. 3 Validation Progress Overview See which lessons or slides have been validated and which still need to be reviewed. 4 Progress Tracking Mark a lesson or slide as validated to avoid duplicating work. 5 Quick Navigation Navigate quickly between lessons or slides. 6 Adjusted Styling for Legibility Text segments with low visibility on a standard white background, such as white or other very light fonts, are displayed with background fill in the validation table to improve legibility. 7 Search Function and Find and Replace Tool Find words in the source or target language or replace words in the target language. Learn more about the search feature. 8 Translation Table Filter Filter the translation table for edited text segments in the target language. Learn more about filtering. 9 Advanced Tag Format Editing Use tags to adjust existing text formatting. Learn more about tag format editing. Ready to start validating? You can navigate the course translation in one of three ways: Use the course preview on the left. Click the course navigation dropdown above the validation table and jump to a specific lesson or slide. Select the previous or next arrow below the table on the right. When you’re ready to make a suggestion, follow these steps: Click the text segment you want to change in the target language column on the right. The course preview on the left will scroll to the relevant part of the course. Edit the target language text with the preferred translation. The course preview automatically reflects how the course will look after your suggestions have been applied. Click outside of the segment to save your suggestion. A blue pencil icon appears on the right to indicate the suggestion was saved. The author will be able to see any changes that you make, as you make them. A green checkmark icon here means the author has imported your suggestion. (You can hover the mouse over the icon to see who made the last update and when.) If the updated segment is repeated elsewhere in the course's source language as an exact match, select Save to all [#] places in the window that displays to apply the change to every instance. To validate audio scripts, transcripts, and closed captions, click the Validate audio elements button. When you’re done, click X on the top right or Back to course on the lower right to go back to the main course page. To validate closed captions for Storyline video assets, click the Validate video elements button. When you’re done, click X on the top right or Back to course on the lower right to go back to the main course page. Note: Validating audio and video elements in Review 360 is currently in beta. Functionality may change over time. Based on feedback and feature stability, some options might be adjusted or removed. To restore the original AI translation, click the edited segment. Then click the reset icon at the bottom right and choose Reset from the prompt that appears. When you finish validating a lesson or slide, click the Mark [lesson/slide] Validated button to track your work and avoid conflicts when collaborating with others. Click the course navigation dropdown above the validation table to get an overview of the course structure and the validation status of each lesson or slide. Note: Closed captions are included in the validation table, but you might not see them automatically. To show captions: Rise 360: Play the video, click the CC button in the lower right corner, and select the language. Storyline 360: Click the CC button at the bottom of the player. Closed caption suggestions don’t display automatically in the Rise 360 course preview. In Storyline 360, closed caption suggestions display in the course preview beginning with the December 2, 2025 update. Adding Comments If you have feedback on the course that does not relate directly to specific text or want to add context to your suggestions, you can use the Comment tab to share more general feedback. Comments are attached to the slide in Storyline 360 projects or lessons in Rise 360 content. Learn more about using Review 360. Completing Your Validation Once you finish making suggestions, email the course author or post a comment and tag them so they know you've completed your review. If you're an assigned reviewer, you can expand the Review Assigned To You drop-down and click Finish Review. This doesn't prevent further edits—it simply signals to others that you have completed your validation. Once validation is complete, the author will need to open the course in Storyline 360 or Rise 360 and import the suggestions into the course. Course authors can consult this user guide for the next steps: Import Suggestions from Language Validators. Validating Updates If an author updates a course you’ve already validated, they may ask you to review the updates. When that happens, here’s what you’ll see: A Validate Update button appears at the top right of the translation table, along with a badge indicating the number of segments that have been updated. In the course navigation dropdown, a yellow information icon appears for lessons or slides with updated segments. You’ll have the option to filter the translation table by “Updates only.” The Validate Update button starts the course update validation workflow. This guides you through each updated segment, letting you mark them as validated one at a time. The button is visible whenever there are pending updates. Once all updates are marked as validated, the button disappears. Here’s how to use it: Click Validate Updates to start update validation. Each updated segment counts as one update. To navigate between updates in this mode, choose one of these three methods: Use the overview navigation dropdown above the translation table. Press the left and right arrow keys on your keyboard. Click the Previous/Next buttons below the table. Edit the segment directly when you have a suggestion. This also automatically marks the segment as a validated update. Click the Mark Update [#] Validated button below the table to validate without any changes. Once an update is marked as validated, the button changes to a Re-open Validation option. If needed, you can use this option to revert the status to unvalidated. Click the Save and exit updates validation at the bottom when you’re done or when you want to go back to the translation table. Note: If all updates are validated, clicking Save and exit updates validation also removes the Validate Updates button and the yellow info icon. You can still use the translation table filter option to filter only updated segments. Tool Tips Search Function and Find and Replace Tool Quickly find specific words throughout the course in either the source language, the target language, or both. Here’s how: Click the magnifying glass icon from the toolbar above the validation table. From the Search tab, type in the keyword you want to find in the Search field and press Enter. If you want to filter the results by source or target language, click the Source and target dropdown above the search field to choose Target or Source. By default, results are filtered by the current lesson/slide. To remove the filter, use the Current Lesson/Slide dropdown and select All Lessons/Slides. Use the Find and Replace tab to locate and change all instances of a specific term in the target language. Follow these steps: Click the magnifying glass icon from the toolbar above the validation table. Click the Find and Replace button, type in the word you want to change in the Find in target field, and press Enter. Results are filtered by the current lesson/slide by default. You can use the Current Lesson/Slide dropdown and select All Lessons/Slides to remove the filter. Type the new term in the Replace with field. Choose from these two options: Replace all: Click this button to update all instances of the word currently displayed, for example, in the current lesson/slide or in all lessons/slides. Replace: Click this button to update the currently selected instance of the word. Translation Table Filter Filter the rows of the translation table based on the status of the target language text segment. To use, click the filter icon from the toolbar above the validation table and choose one of the following: Filter by Description Imported edits only Shows all the rows with edited text segments that were accepted by the author. These rows have a green checkmark on the right. Unimported edits only Shows all the rows with edited text segments that the author hasn’t accepted yet. These rows have a blue pencil icon on the right. All edits Shows all the rows with edited text segments. This filter combines both options above. Update only Only available when there are updated segments, this shows all the rows that differ from the previous version. A blue dot appears on the filter icon to let you know when a filter is currently in use. Advanced Tag Format Editing (Experimental) Formatted text—text that is bolded, italicized, or in a different size or color—shows up differently in the validation table for Rise 360 and Storyline 360 users. In Rise 360, the formatted text and plain text appear in one segment, with the formatting visible, as shown in the image below. In Storyline 360, formatted text is indicated by a separation from plain text, which divides the segment into multiple fields or spans. The formatting itself is not visible, as the image below illustrates. You can use advanced tag format editing to easily see formatted text and adjust which text gets formatted. Follow these steps to make an adjustment: Click the <>Off icon from the toolbar above the validation table to switch tag format editing on. Select the text segment you want to change in the target language column. When enabled, the text in the segment is standardized. The formatted text turns purple and is enclosed with square brackets [...] called “tags.” (Click the images below to see examples in Rise and Storyline.) Click and drag the square brackets to add or remove texts in these tags. Click the <>On icon to disable tag format editing.6.9KViews1like0CommentsArticulate Localization: Streamline Language Validation With Review 360
Articulate Localization leverages the collaborative workflows in Review 360 to speed up the process of human validation for AI translations. Once you publish your multi-language course to Review 360, you can assign validators to review the AI translation and keep track of their progress. Watch this video to learn about the validation experience for authors and validators using a multi-language Rise 360 course. Then read on for more detailed steps. Publish to Review 360 Request Validation Request Validation for Updates Publish to Review 360 To get started, publish your multi-language project to Review 360. Refer to these user guides for specific details on the publishing process: Rise 360: Publish Content to Review 360 Storyline 360: Publishing a Course to Review 360 As shown below, you can choose to include all project languages or just a subset when you publish after translating with Articulate Localization. When publishing is complete, launch your Review 360 dashboard. The source and target languages are presented as a single "stack" tile. Clicking the tile opens an overview page that lists all the current languages in a sidebar and allows you to preview each language. Note: Multi-language courses can only have one corresponding stack in Review 360. Republishing to Review 360 creates new versions of the languages in the stack. Duplicating content in Rise 360 creates a new course, resulting in a new stack in Review 360 when published. However, Storyline 360 preserves the link between the project file and the Review stack when you create copies of the file—for example, using Save As or sharing the file with other authors. If you need a new stack in Review 360, use Save Translation As to create a copy of the source language, translate or add the languages you need, and then publish. Request Validation To request a language validation, click the Request Review button on the top right for each target language you want validated. Then, follow the standard Request Review workflow. Note that: Language validators do not need to be Articulate 360 creators. As with any other Review 360 item, reviewers only need an email address. For a validator, each language in the stack functions like its own Review item. They will not see the stack or be able to access other target languages unless they are also an Articulate 360 creator with appropriate permissions. The request review status is displayed on the sidebar and on the top right button for the corresponding target language. The status can be: Request Review: You haven’t assigned any reviewers. In Review: You have assigned reviewers who haven’t completed the review. Review Complete: All assigned reviewers have completed their review. If you share the item in team folders, editors will see the overview page and can assign reviewers for target languages. Here's a comparison of how an author and a validator see a Review 360 item for validation. Validators can suggest text changes and preview those changes in real time. To learn more about the validation experience from the perspective of a validator, check out this guide for language validators. You can also share it with your validators for their reference or share the course version to provide it in their preferred language. Once a validator has finished their review, you can import their suggestions. Instructions for importing validator suggestions can be found in this user guide: Articulate Localization: Import Suggestions from Language Validators. Note: Pending validation suggestions will be lost if you publish a new version to Review 360 without importing them. Request Validation for Updates If you need to make changes after validators have completed their review, follow these steps to ensure your updates are properly translated and validated: Follow the steps to translate the updates in Rise 360 or Storyline 360. Publish a new version to Review 360. If there are pending validation suggestions, import them first to avoid losing them. Let your validators know. You can restart the request review process to notify the same validators about the update and reset their review status or start a new request for different validators. Here’s additional information about how this works: Validation status rolls forward with each new version published. Review 360 identifies updates for validation by comparing the current version with the previous version of the Review 360 item. If you need to edit the course after publishing the updates to Review 360, restore the Review 360 item to the previous version first before republishing to Review 360. This ensures all the updates are correctly identified for validation. Keep in mind that restoring previous versions will permanently delete newer versions, their comments, validation, and any unimported suggestions. Avoid republishing another version before pending updates are validated. The new version becomes the reference for comparison, so Review 360 may not detect earlier updates. When validators view the content, they can click the Validate Updates button to start the course update validation workflow and go through each updated segment. Learn more about validating updates.3.9KViews0likes0CommentsRise 360: Deploy Content Rapidly with Quick Share
Sharing Rise 360 training with a quick share link is easy. Quick Share is a lightweight distribution tool for rapidly sharing everyday training. It also offers a per-course dashboard that collects training views and, when the guestbook function is enabled, the names and emails of learners. Anyone can access content with a quick share link by simply copying and pasting the URL into a browser. Learners are taken directly to the content and can either start the training immediately or access the training after providing a password, guestbook information, or both. If your course is offered in multiple languages via Articulate Localization, users will be able to select an available language. Keep reading to learn more. Publish with Quick Share Access Engagement Metrics FAQs Publish with Quick Share Publishing a quick share link is available to course owners and managers only. Open the content to share from the Rise 360 dashboard. From the course outline or microlearning, click Publish in the upper right corner of the screen. Select Quick Share. At a glance, you'll see what settings are enabled. Skip to the final step if you don't wish to modify the defaults. To require a password to access the training, select the password status, enter a password, and then click Save. Learners won't have access to the training unless they enter the password whenever they use the quick share link. To disable the guestbook, click the guestbook status, toggle the guestbook Off, and click Save. This requires learners to enter their name and email address each time they access the training. To have quick share content update automatically as creators make changes, select the Live Updates status, toggle on Enable live updates, and click Save. Click Copy link to share the URL with your learners. Tip: Articulate Localization users, set the default language by navigating to that language in the stack and publishing to Quick Share from there. Learners will still be able to choose their preferred language. Update Quick Share Content When live updates are disabled, learners don't see content changes until they're published. When a creator makes changes to training shared via Quick Share, a blue dot appears next to the Publish menu. Another blue dot appears next to Quick Share. To make changes visible to anyone with the quick share link, select Quick Share and click Publish updates. Access Engagement Metrics Course owners and managers can view the number of learners who have viewed content by opening the Publish menu. The view count and number of guestbook entries are listed on the Quick Share option. Select Quick Share and click View engagement to see your Guestbook. Guestbook entries are sorted by view date, with the most recent views at the top. If a learner visits your training more than once, only their most recent visit is noted in the guestbook. Click Export to download a CSV file that includes learner names, email addresses, and the date they last viewed the training. Note: The view count includes repeat views by the same learner. You may need to refresh your training view to see the latest engagement information. FAQs How is Quick Share different from Reach 360? Quick Share is a lightweight distribution tool to rapidly share everyday training when robust reporting and learner management isn't required. Reach 360 is a full-featured learner and content management distribution platform with deep analytics. It supports advanced publishing options such as completion criteria and certificates, and it tracks learner progress. What if I already have Preview links for my content? If you've previously shared your content via a Preview link (also known as share links), those links will still work. However, they won't gather engagement information until you publish an update and distribute that new link as a quick share link. Please note that Preview links viewed prior to the Quick Share feature aren't included in the view count. I have a trial account—can I use Quick Share? Quick Share is available to anyone with an Articulate 360 account. However, during your Articulate 360 trial, external links and code blocks are disabled in content shared via Quick Share. How is Quick Share different from an LMS? Quick Share doesn't require a third-party platform to distribute content. Anyone can see a shared training without having to log in or create an account. However, advanced LMS features such as certification and centralized reporting aren't available when distributing via Quick Share. Can I embed content on my webpage using quick share links? No. If you embed a quick share link on your webpage (usually done by inserting the quick share URL into iframe code), the content won't display. We recommend publishing a web package if you need to host the content on your own server. Can I share quick share links outside of my organization? Will non-Articulate customers have to sign up for an account? Quick share links can be shared with any learner, not just members of your organization. These links take learners directly to the content without needing to sign in. Is there a way to log who views my quick share links? The guestbook is enabled by default for quick share links. When enabled, learners must enter their email, first name, and last name to access shared training. View learner information by selecting View engagement on the Quick Share screen for your training. Is there a limit to how many learners can view training via Quick Share? At this time, there are no limits on the number of learners who can view training accessed via Quick Share. Do quick share links expire? Quick share links expire only when the associated training is permanently deleted or when the subscription is deactivated.10KViews8likes0CommentsArticulate Localization: Overview
Develop high-quality localized courses seamlessly with Articulate Localization, a localization solution integrated right into Articulate’s unparalleled authoring platform. This overview covers the basics of Articulate Localization and explains how to access it. What Articulate Localization Does What Languages Are Available What Gets Translated How to Access Localization What Articulate Localization Does Articulate Localization helps you upskill your global learners more quickly and efficiently with three primary processes: One-Click AI Translation Instantly translate Rise 360 and Storyline 360 courses into 80+ languages with fully integrated AI translation. Upload custom glossaries to maintain consistency and incorporate specialized terminology. In-Context Language Validation Verify the accuracy of localized content with a new language validation experience in Review 360. Validators can preview their changes in context, and authors can import them directly back into the source project. Multi-language Workflow Management Streamline end-to-end localization for your Rise 360 and Storyline 360 courses. Manage all your languages in a single project, keep track of the validation process in Review 360, and publish all languages at once to Reach 360 or your LMS. What Languages Are Available Translate your content into over 80 languages, including certain regional variations such as Canadian French and Brazilian Portuguese. Afrikaans Finnish Lithuanian Sinhaha Albanian French (Canada) Luxembourgish Slovak Amharic French (France) Macedonian Slovenian Arabic (Modern Standard Arabic) Georgian Malay Somali Armenian German Malayalam Spanish (Latin America) Azerbaijani Greek Maltese Spanish (Mexico) Bangla Gujarati Maori Spanish (Spain) Bosnian Haitian Creole Marathi Swahili Bulgarian Hausa Mongolian Swedish Catalan Hebrew Nepali Tamil Chinese, Simplified Hindi Norwegian Telugu Chinese, Simplified (China) Hungarian Norwegian Bokmål Tetum Chinese, Traditional Icelandic Nyanja Thai Chinese, Traditional (Taiwan) Indonesian Pashto Tigrinya Croatian Irish Persian (Iran) Turkish Czech Italian Polish Ukrainian Danish Japanese Portuguese (Brazil) Urdu Dari (Afghanistan) Kannada Portuguese (Portugal) Uzbek Dutch Kazakh Punjabi Vietnamese English (UK) Khmer Romanian Welsh English (US) Korean (Standard South Korean) Russian Estonian Lao Samoan Filipino (Tagalog) Latvian Serbian Note: Many languages available for one-click translation also offer different degrees of formality. Articulate Localization defaults to Automatic, which determines the best formality level based on your content. However, you can adjust the formality of the translation based on your organization’s communication style. Tool Tip: Use our language lookup tool to see which target languages are supported for your source language and if the language pair supports glossary, formality, and right-to-left. Here’s how to use it: Launch the language lookup tool in a separate browser window. Select your source language from the Select a Source Language dropdown. A table displays all the supported target languages for the chosen source language with columns for glossary, formality, and right-to-left. A green checkmark in these columns means the corresponding target language supports it. What Gets Translated The following chart explains which parts of courses are translated and how: Part Behavior On-slide text, including slide notes and text variable values (Storyline 360 only) Automatically translated Block text (Rise 360 only) Automatically translated Closed captions (video, audio) Automatically translated Text-to-speech narration Automatically translated in Storyline 360. AI text-to-speech is automatically translated in Rise 360. Text labels in Rise 360 and player text labels in Storyline 360 Default text labels for each target language are automatically assigned. Custom text labels are not translated. However, in Rise 360, you can assign custom label sets to individual language versions after translation. Alternative text Automatically translated for customized alternative text but not default alt text generated by the app Question banks Questions drawn from question banks are translated together with the course. How to Access Localization Articulate 360 primary admins and 360 admins can start a free trial by clicking the Start a Trial button under the Localization section of the Manage Subscription page. To purchase directly, contact our sales team. During a trial, all creators are automatically given the ability to translate content in Rise 360 and Storyline 360 and start the localization workflow. Primary admins and 360 admins can remove an author’s translation access via the Localization section on the Manage Team page. Translation access settings are retained when purchasing from a trial. When Localization is purchased directly without a trial, creators aren’t given the ability to translate by default. A 360 admin must navigate to the Manage Team page to grant translation access to specific creators. Those creators must start any localization workflows. Once Articulate Localization is enabled, creators with translation access immediately see the Translate option when they click the more (...) icon of any content tile in the Rise 360 dashboard. If it’s not showing right away, simply refresh the page. For Storyline 360, creators with translation access see a Translate Course option when they navigate to File > Localization. They must use Storyline version 3.94.33593.0 or later. Here’s how to check the Storyline 360 version and how to update to the latest version of the app.17KViews28likes0CommentsStoryline 360: Adding Audio
In this user guide, we'll explore several ways to add audio to Storyline 360 courses. Choosing Default Playback and Recording Devices Importing Audio Files Recording Narration Converting Text to Speech Adding Background Audio Controlling Background Audio With Triggers Using the Background Audio Volume Variable Importing Slides from Other Content Sources Making Audio Accessible Create Sound Effects with AI Assistant Add a layer of realism to your audio content with AI-generated sound effects. Learn how to use AI Assistant to level up your course authoring game. Choosing Default Playback and Recording Devices Before you import or record narration, you'll want to choose your default playback and recording devices. Go to the Insert tab on the Storyline ribbon, click the Audio drop-down arrow, and choose Options. Select a speaker for your default playback device. Select a microphone for your default recording device and set your recording volume. Click OK to save your changes. Importing Audio Files First, do either of the following: In Slide View, go to the Insert tab on the ribbon, click the Audio drop-down arrow, and select Audio from File or Media Library. Or, simply drag an audio file from your computer and drop it on your course slide. In Form View, go to the Question tab on the ribbon, click the Audio drop-down arrow, and select Audio from File or Media Library. Browse to the audio file you want to insert and click Open. Storyline 360 supports these file formats: AAC AIF AIFF M4A MP3 OGG WAV WMA Tip: If you import an audio file without captions, AI Assistant prompts you to generate them automatically. Click Generate Captions to create captions for your audio. To generate captions automatically next time, check the box to Remember my choice for future imports. You can adjust this preference anytime from the Features tab on the Storyline Options window. Recording Narration First, do either of the following: In Slide View, go to the Insert tab on the ribbon, click the Audio drop-down arrow, and select Record Mic. In Form View, go to the Question tab on the ribbon, click the Audio drop-down arrow, and select Record Mic. The Record Microphone window opens. If you have a script you want to use, click the Narration Script button, which reveals the text from the Notes panel. (Learn more about adding slide notes.) When you're ready to begin recording, click the red Record button. When you've finished recording, click the Stop recording button. You can preview your recording using the Play/Pause and Rewind buttons. If you need to record your narration again, just click the Record button to start over. If you want to delete your narration altogether, click the Delete button. Tip: Generate captions for your audio recordings with AI Assistant to boost accessibility. If you change your mind about recording narration and would prefer to import audio instead, click the Import audio file button. Browse to the audio file you want to insert and click Open. If you want to edit the audio you just recorded, click the Edit audio button to launch the built-in audio editor. Learn more about editing audio. Click the Save button to add the newly recorded audio to your project. (Also, be sure to save your overall project file to retain the changes you just made.) Converting Text to Speech Speed up course development by converting text to speech right in Storyline 360. For example, use the text-to-speech feature to quickly narrate a course for stakeholder review or to localize narration in different languages. You can even choose the voice and language to make sure every word sounds right. In Slide View, go to the Insert tab on the Storyline ribbon, click the Audio drop-down arrow, and choose Text-to-Speech. When the Insert Text-to-Speech window appears, select a Language from the first drop-down list. This ensures that your words are spoken with the correct pronunciations. Then choose a Voice from the second drop-down list. You can hear what a voice sounds like by clicking the Preview Voice button next to the list. Type or paste your script into the text-entry field. Or, if you want to use your slide notes as your script, just click the Copy from Slide Notes button. Tip: You can convert up to 10,000 characters at a time. If your script is longer than that, break it into smaller chunks and generate more than one text-to-speech audio clip. Then place the audio clips back to back on the timeline so they play in sequential order. If you'd like to add closed captions to your text-to-speech narration, mark the Generate Closed Captions box in the upper right corner. Learn more about text-to-speech closed captions. Click Insert to complete the process. Storyline 360 will convert your text to narration, and it'll appear as an audio clip on the slide's timeline. The conversion process is fast, but lengthy scripts will take longer to convert. Learn more about working with text-to-speech narration. Adding Background Audio Set the right tone for your course with a background playlist that keeps learners engaged. Learners can toggle background audio on and off as they prefer. Here's how to add background audio to your course. Go to the Insert tab on the Storyline ribbon and click the Audio drop-down arrow. Then hover over Background Audio and choose Create Playlist. When the Background Playlist window appears, click the plus sign drop-down arrow, and select Audio from File or Media Library to upload your audio. Learn more about background audio. Controlling Background Audio With Triggers As of November 2023, you can control the background audio for each slide using triggers to play, pause, or stop the playlist. For example, you might want the audio to play when learners click a button. Here's how to create a background audio trigger. After you've added background audio, click the Create a new trigger icon in the Triggers panel, or go to the Insert tab on the ribbon and click Trigger. Select a media action (play, pause, or stop), then fill in the related parameters, such as the playlist and object. Choose when you want the action to happen. Optional: You can add conditions to your trigger so it only occurs in certain circumstances. Note: If you pause or stop the background audio and then jump to another slide, the background audio won't play on that slide. If you want the background audio to play on another slide, create a trigger that plays the background audio when that specific slide's timeline starts. Using the Background Audio Volume Variable As of November 2023, you can customize the background audio experience even further. Fine-tune the volume with this built-in percentage-based variable: Player.BackgroundAudioVolume : The volume of the background playlist in percentage Using the background audio volume variable is easy—it works like any other variable in Storyline 360. Learn more about working with variables. Importing Slides from Other Content Sources When you import slides into Storyline from Microsoft PowerPoint, Quizmaker, or other Storyline projects, audio resources from the external content are also imported and available for editing. You can also import Engage interactions, but their audio resources can't be edited in Storyline 360. Making Audio Accessible Audio accessibility helps make learning inclusive and understandable for everyone—especially for those who are deaf or hard of hearing, have cognitive disabilities, or don’t speak the course language fluently. The following tips can boost your audio accessibility: Enable playback speed control. Let learners explore content at their own pace with an adjustable playback speed. They should be able to slow down or speed up audio as needed. (1.4.2 Audio Control). Use closed captions. More learners can fully engage with and comprehend audio content when you provide closed captions. And in Storyline 360, you have options! You can import captions, create your own, or let AI Assistant generate them for you automatically. Position captions at the top or bottom of your slides and customize the foreground and background colors to maximize readability. (1.2.2 Captions [Prerecorded]). Provide text transcripts for audio content. Include spoken dialogue, speaker identification, and meaningful non-speech sounds so all learners can fully access and understand the audio. To display transcripts, you can use text boxes, layers, markers, or slide notes (1.2.1 Audio-only [Prerecorded]). Keep your language simple. Use plain language in your audio content and descriptions. Straightforward and clear language helps your audience easily read and understand the information. Reduce distractions. Enable the background audio toggle to give learners the option to mute any background tracks. This helps learners stay focused and lets assistive technologies navigate content more effectively. The “Lower background audio volume when slide audio plays” setting is enabled by default to support accessibility. (1.4.2 Audio Control) You Might Also Want to Explore: Editing Audio Using the Audio Tools6.9KViews0likes0Comments