user guide
817 TopicsRise 360: Facilitate Training with Reach 360
A full-featured learning platform and zero-friction LMS solution, Reach 360 is included in your Articulate 360 subscription. With Reach 360, you can distribute content to individuals and groups, deliver multi-language learning powered by Articulate Localization, analyze content and learner performance, and more. Getting started with publishing to Reach 360 is easy. Choose the step-by-step instructions below based on your permissions. Reach 360 admins can publish directly to Reach 360, while creators who aren't also Reach 360 admins can submit training for an admin to review and publish.. Publishing Procedure for Reach 360 Admins Publishing Procedure for Non-Admin Reach 360 Roles Publishing Procedure for Reach 360 Admins Open the content you want to publish from your Rise 360 dashboard. Then, click Publish in the upper right corner of the screen, and select Reach 360. The Submit to Reach 360 window displays. If the training was previously published, you'll also see the last date of publication. Set completion parameters. Learners can complete the training by viewing a specified percentage of the course or microlearning, passing a selected quiz lesson (in a course only, since microlearning doesn't support quizzes), or both. You can also choose No Requirement. Note: If you lower the passing score of a quiz after the course is published, learners have to retake the quiz in the republished course to pass with the lowered score, even if their prior score would be counted as passing with the new standard. Select Course Duration to show the estimated time learners will need to complete the training on the overview page. You can overwrite the default length of 30 minutes with your own value. Choose Completion Celebration if you want an animated, confetti-filled celebration to display once a learner meets the completion parameters. Select Enable Certificate to provide learners with a certificate of completion that they can download once they’ve finished. If needed, specify a due date or a set number of days a learner has to complete the training after enrollment. Training has no due date by default. Turn on library visibility. You can also select in which libraries the training appears. Assign topics, if any. Click Publish to finish the publishing process and return to the training. Note that if you haven't added content to every lesson in a course, you'll be reminded to do so before you can publish it. Once published, the training is live in all specified libraries. Publishing Procedure for Non-Admin Reach 360 Roles Open the content you want to publish from your Rise 360 dashboard. Then, click Publish in the upper right corner of the screen, and select Reach 360. The Submit to Reach 360 window displays. If the training was previously published, you'll also see the last date of publication. Set completion parameters. Learners can complete the training by viewing a specified percentage of the course or microlearning, passing a selected quiz lesson (in a course only, since microlearning doesn't support quizzes), or both. You can also choose No Requirement. Note: If you lower the passing score of a quiz after the course is published, learners have to retake the quiz in the republished course to pass with the lowered score, even if their prior score would be counted as passing with the new standard. Select Course Duration to show the estimated time learners will need to complete the training on the overview page. You can overwrite the default length of 30 minutes with your own value. Choose Completion Celebration if you want an animated, confetti-filled celebration to display once a learner meets the completion parameters. Select Enable Certificate to provide learners with a certificate of completion that they can download once they’ve finished. If needed, specify a due date or a set number of days a learner has to complete the training after enrollment. Training has no due date by default. Use the searchable drop-down menu to select a specific Reach 360 admin to notify of your submission. Want the training to be included in a specific library or added to a learning path? Leave a note for the admin. Click Submit to complete the submission process and return to the training. Note: If you haven't added content to every lesson in a course, you'll be reminded to do so before you can submit it. Once a Reach 360 admin reviews your submitted course and completes the publishing process, it’ll be available for learners.159Views0likes0CommentsRise 360: How to Use Code Block
Want to offer deeper, richer experiences to your learners? Create code-based projects directly in Rise 360 with code block. Develop interactive tools and demos with an in-app code editor, or upload your own completed projects. Not sure where to start? Check out this training for inspiration, or read on to try it yourself. Insert a Code Block Modify the Block Settings Accessibility and Known Issues Note: Code blocks can only use the resources available in the block itself, and what’s written affects only that block’s environment. Code written in HTML, CSS, and JavaScript works best for custom code blocks. Step 1: Insert a Code Block Open a Rise 360 course, then edit an existing lesson or create a new one. Select All Blocks from the blocks shortcut bar. Or, click the insert block icon (+) that appears when you mouse over a boundary between blocks. From the sidebar, choose the Code category. Select an option depending on how you've compiled your code project. Click Add code to enter and edit code directly. Changes you make are reflected in real time. Click Upload project to upload a ZIP file that meets the following criteria: Includes a core project file named index.html that contains the code for your project. It can't be named anything else. This file can't be in a folder and must be at the root level of your file Includes all assets for your project, including source files such as images Isn't larger than 5 GB When the block displays, click the action button or hover over the block to access the left-hand design toolbar. Then, click the Content icon. In the sidebar, add your code or upload your zipped project. In the Add code block, use the search/replace, copy, and delete icons to quickly make changes to your entire code block. In the Upload project block, use the delete icon to clear out the currently uploaded ZIP file. Your project will run immediately once added to Rise 360. Note: Code blocks included in training published for LMS or web export can't be previewed locally but will display as expected when uploaded to your training host. Completion Parameters To ensure learners complete a code block activity before proceeding, set completion parameters for your code block. With the following steps completed, continue blocks recognize when learners have completed the activity within the block. Either edit the content of an existing code block or add a new block. Enable the Set completion requirements toggle. Copy the code snippet that displays: window.parent.postMessage({ type: 'complete' }, '*'); Paste the code into the code window or into your existing project. For existing upload project blocks, you'll need to re-import your project after adding the completion code snippet. That's it! Now Rise 360 continue blocks will recognize when the code block activity has been completed. Note: Activating the completion toggle and including a completion-based continue block without including the code snippet in your project will block learners from continuing the training. Inspiration Gallery Both blocks have one-click access to our tutorial course with sample projects. Take a look and see what's possible, then build your own based on the provided code and assets! Just click the Need help getting started? button to check it out. Vibe Coding If you use a third-party LLM to generate code (also known as "vibe coding"), use the following as your prompt template to ensure enhanced compatibility with Rise 360. Replace the text in square brackets with your own content. Create an `index.html` file that can contain HTML, CSS, and JavaScript and doesn't include external web requests This `index.html` file will be used inside an `<iframe>` In the `index.html` file, create [describe your project], give it a transparent background Encode that once [describe completion parameters], the application should call `window.parent.postMessage({ type: 'complete' }, '*');` to let the parent window know that the interaction has been completed Step 2: Modify the Block Settings Modify how your content looks on the screen by hovering over an existing block to access the left-hand design toolbar. Click the Style icon to access block background options. The Format menu provides options for changing the block padding, content width, and max height of the block. Accessibility and Known Issues Accessibility Code block accessibility is determined by the accessibility of the HTML code it contains. Check out these tips for making your code block accessible: Write code that is aligned with WCAG 2.2 standards. Use semantic HTML whenever possible. It provides built-in accessibility and reduces the need for custom code. Use screen readers, keyboard navigation, and zoom features to test your course. Double-check that learners can follow updates and have enough time to respond or explore content. Use an accessibility checker plug-in such as axe DevTools provided by Deque or the Wave accessibility checker to verify your code. Looking for more accessibility design tips? Check out the following resources: Rise 360: How to Design an Accessible Course Accessibility Index Known Issues Currently, code blocks have the following known issues: Publishing your training to PDF doesn't produce a one-to-one reproduction of code block content. Articulate Localization isn't supported for code blocks at this time. Code blocks also can't be translated via manual XLIFF translation. To translate code blocks, you must manually insert language-specific code blocks after translation.14KViews18likes0CommentsRise 360: Create Custom Blocks
Custom block is currently in beta. Functionality may change over time. Based on feedback and feature stability, some options could be modified, and others removed. Articulate Localization isn't supported for custom blocks at this time. Need a unique block to meet your exact training needs? Custom blocks unlock fresh possibilities! Add text, objects, and media elements to a blank canvas, then drag and drop them to craft the perfect creation. Note: While custom block supports several accessibility features, some aspects are not yet fully accessible. Insert Blank or Prebuilt Templates Set up the Canvas Add Templates and Objects Manipulate Objects Format Objects Adjust Object Order and Accessibility Settings Add Interactivity (Coming Soon) Modify the Block Settings Using Keyboard Shortcuts Accessibility and Known Issues Feedback Step 1: Insert Blank or Prebuilt Templates Get started with a blank canvas or a prebuilt template. Open the block library in your training to begin. Start from Scratch Expand the Custom Block menu. Select +Blank to insert a blank canvas into your course. Click Create a Custom Block to begin. Start with a Template Expand the Custom Block menu. Choose a category, then select a template. Hover over the block and click the Content icon to personalize the template. You can also add templates to blank blocks. Follow the link for a full list of prebuilt templates. Step 2: Set Up the Canvas The canvas is where you add objects and create your custom block. Only objects placed on the canvas are visible to learners. Use the toolbar that displays to select the canvas to modify the color, border style, and overlay. You can also manually enter the canvas pixel width and height or automatically shrink the canvas to the included objects. Please note, custom blocks aren't responsive at this time. We recommend using a slightly taller canvas size so that your content remains legible on smaller screens and mobile devices. Step 3: Add Templates and Objects Once you're in the custom block editor, you can either manipulate objects in your selected template (more on that in the next section), insert a new template, or add objects. Use the search bar in the object category menu to quickly find what you need. Use the control in the lower-right corner to zoom in or out on the canvas. Templates On the left sidebar, click Templates, and then make a selection. On a blank canvas, click Use template. This inserts the canvas and all objects associated with the selected template On a populated canvas, you can also select Add to canvas. This keeps the current canvas and inserts the template objects over the existing objects. Selecting Use template on a populated canvas completely replaces the existing canvas and objects. Once inserted, the individual objects of a template can be manipulated and formatted just like any other object. You may have to ungroup or drill into objects to access all formatting options. Objects Add additional objects from the left sidebar. Text: Insert a text box with the selected text type as the default. This can be modified in the formatting toolbar. Add a hyperlink by selecting text. (Note: superscript and subscript formatting aren't available for custom block text.) Shapes and Lines: Insert a grey prebuilt shape or black prebuilt line on your canvas. For shapes: click within the shape to add text. Shape formatting options include color, corner rounding, border, shadow, and overlay. Line formatting options include color, line style, and shadow. Images: Insert an image generated with AI, an image from Content Library 360, or upload your own. Regardless of source, images have corner rounding, border, shadow, and overlay options. Crop and alt text tools are available by right-clicking on an image. Videos: Insert a video by dragging and dropping or selecting a video file to upload. If you'd like your video file to keep its specific file format and not undergo compression, you can opt out of optimization by selecting Preserve file quality. Note that this may decrease performance. Forward seeking can't be disabled for videos in custom layouts. Audio: Generate audio with AI Assistant, record your own audio, or upload an audio file with transcription to insert into your canvas. Click any of the icons to insert the object you want, then simply drag it to where you'd like it to be in the block. You can also select an object or group of objects and enter the X and Y positions in the Position toolbar menu. Step 4: Manipulate Objects You can work with objects in multiple ways. In addition to direct manipulation, right-click menu commands, formatting toolbar options, and keyboard shortcuts are available. The options available for individual objects are also easily accessible from the Objects sidebar. Change the Order The easiest way to change the order of an object on the canvas is to right-click the object and select an option from the Move menu. There are also several keyboard shortcuts for adjusting an object's placement. Align Horizontal and vertical alignment guides display as you move an object, multiple objects, or an object group. If you have other objects placed on the canvas already, you'll see vertical and horizontal alignment guides in relation to those objects as well. You can also select an object, multiple objects, or group and choose an option from the Position menu, or right-click and select an option from the Align menu. Resize You can quickly resize an object by hovering over the edge or corner and dragging in that direction. Hold the Shift key while resizing to maintain the object's aspect ratio. You can also enter the width and height values in the Position menu. Rotate Rotate objects by hovering over an object's corner. When the cursor changes to a curved arrow, click and move the cursor in the direction you want to rotate the object. You can also select an object or group and use the slider, or enter a value in the Position menu. Note that alignment guides don't appear when you’re moving rotated objects. Group Grouping is a handy way to move, resize, rotate, flip, or change other attributes of several objects all at once—as if they were a single object. To group objects, Shift+click or drag your cursor over two or more objects, then choose Group to group them. To ungroup objects, choose Ungroup. Lock Select an object or group of objects and click the lock icon in the toolbar that appears to lock their position. You can also right-click and select Lock. Duplicate Select an object or group of objects and click the duplicate icon in the toolbar that appears. You can also right-click and select Duplicate. The duplicated object or group appears slightly offset from the original and is automatically selected. Delete Select an object or group of objects and click the delete icon in the toolbar that appears. You can also press Delete or select the Delete option from the right-hand menu. Restore deleted items by pressing Ctrl+Z. Step 5: Format Objects Select an object on the canvas to access the formatting/action toolbar. Different objects have different toolbar options. The formatting toolbar for multi-selected and grouped objects reflects the available tools for the objects in the group. If a tool doesn't affect a particular object, modifying the value will have no effect on that object. Tools that are available for all objects or multiple object types will equally affect all relevant objects. For example, changing the opacity for a group overrides any individual object settings and, instead, sets the opacity for all group objects to the same value. All Objects Opacity Adjust an object's visibility. When multiple objects are selected, this value overrides any individual object's value. Position Align the object to the canvas using the available options. Rotate the object. Enter pixel values in the W and H fields to adjust the object size, using the lock icon to preserve aspect ratio. Use the X and Y fields to position objects on the canvas. Images Crop Use the drop-down menu to select an aspect ratio and crop the image accordingly. You can also use the freeform crop tool or enter specific values in the position menu. Reset to abandon changes. Lines Line Start/Line End Select from a variety of shapes to start and end the line. Line start and line end styles can be set independently. Shapes and Text Text Formatting These tools let you adjust the font type, size, and formatting, as well as the paragraph and line positioning. Shapes, Lines, and Images Change Shape Switch to a different shape. Color (Shapes only) Change the object's fill. Apply a color to the selected object using one of the following methods: Click the color you want in the Saturation and Value area. Drag the hue slider to change the dominant color of the spectrum. Use the eyedropper tool to match the color of anything visible on your screen. Just click the eyedropper, then click any color on your screen. (Chrome-based browsers only) Entering a custom color value in Hex. Choose a color from the theme color palette. Or select a color you've used in the current layout. Adjust the visibility of the color opacity with the Opacity bar under the Hue slider. Border/Stroke Change the object's border/stroke color, opacity, width, and type: solid, dashed, dotted, or no border (shapes only) Corner Rounding Use the slider or enter a specific value to change the degree of rounding for image and shape corners (does not apply to ovals). Drop Shadow Add a shadow to the selected object. Use the X and Y fields to control the position of the offset. The shadow is black by default, but you can change it in the Color menu. Opacity determines how visible the shadow is, and blur affects the sharpness of the shape. Overlay Add a color overlay to your object. The overlay is black by default, but you can change it in the Color menu. Adjust overlay opacity with the slider or enter a value. Step 6: Adjust Object Order and Accessibility Settings There are two ways to adjust the order of objects and object groups. One way affects the visual order while the other affects how accessibility tools like screen readers interact with objects in a custom block. Visual Order Select Objects in the sidebar to access controls for the canvas and all objects in your current custom block. In addition to using the combined formatting toolbar, you can easily drag and drop individual and grouped objects to adjust their visibility. You can also remove items from groups. Note that newly added objects appear at the top of this list. Focus Order Select Focus order to access a list of objects and groups in screen reader and keyboard navigation order. Items in this list can be adjusted independently of object order for accessibility purposes, but you can't remove items from groups here. Click Match visual order to reset the list to the same order as the objects list. Newly added objects appear at the bottom of this list. Add Alt Text In the focus order panel, use the Alternative text field to add alt text to any object, object group, or the canvas itself. If they don't have alt text, images, lines, and shapes without text are considered decorative and aren't announced. Step 7: Add Interactivity (Coming Soon) We're still exploring how to add interactivity to custom blocks. We'd love to hear your thoughts. Hover over Interactivity in the sidebar and click Share Feedback to let us know what interactive features would make your custom blocks even better. Step 8: Modify the Block Settings Hover over an existing block to access the left-hand design toolbar and modify the appearance of your block. Click the Style icon to access block background options. The Format menu provides options for changing the block padding and content width. Since custom blocks aren't responsive at this time, use the following values as the maximum widths for your canvas so that the block fits within the content width parameters: Large - 920px Medium - 760px Small: 520px We recommend using less padding around custom blocks for a better mobile experience. Using Keyboard Shortcuts The following keyboard shortcuts can be used on the custom block canvas. Mac/Windows Keys Function O Add circle (oval) item to canvas T Add paragraph item to canvas R Add rectangle item to canvas Cmd/Ctrl+] Bring forward ] Bring to front Delete Delete object Cmd/Ctrl+D Duplicate objects Shift+H Flip horizontally Shift+V Flip vertically Cmd/Ctrl+G Group objects Cmd/Ctrl+Shift+L Lock/Unlock Shift+Arrow Keys Move object 10px Cmd/Ctrl+Click Select object within a group Cmd/Ctrl+Y Redo Cmd/Ctrl+A Select all Cmd/Ctrl+[ Send backward [ Send to back Cmd/Ctrl+Z Undo Cmd/Ctrl+Shift+G Ungroup objects Cmd/Ctrl+0 Zoom custom block canvas to 100% Accessibility and Known Issues Accessibility We're still evaluating and improving the accessibility compliance of custom blocks at this time. In its current state, the custom block feature doesn't fully meet accessibility guidelines. Custom block templates and user-defined custom blocks don't reflow to fit different screens. This can make them hard to read on small screens or when zoomed in. Accessibility guidelines provide a reflow exception for presentation content like our custom blocks, but they can still be difficult for mobile users and people with low vision to use. To make sure your content works for everyone, test it on both a mobile device and a desktop browser zoomed to 400%, not just in preview mode. Even though it doesn't meet full compliance at this time, we encourage authors to use the accessibility tools provided to improve accessibility. Read on to learn about managing the focus order and other accessibility tips for custom blocks. Manage the Focus Order Authors have full control of how a screen reader navigates the content in custom blocks. Objects can be reordered separately from their visual stacking order to dictate the exact reading order for screen readers. Here are some guidelines to keep in mind: Shapes, lines, and images are decorative by default. They will not be announced by screen readers unless the author assigns an alternative text. Text will always be announced. This includes text inside shapes. Groups aren't announced by default, unless they’ve been given alternative text. Leaving the group without alternative text just means the group itself won't be announced as a separate item. Any meaningful object within the group (for example, text or images/shapes with alt text) will still be announced. Audio and video have predefined labels. Authors can add alternative text when additional context is helpful. But if the field is left blank, screen readers will announce the default, predefined labels as “video player” and “audio player” respectively. The custom block canvas follows the same principle as groups, audio, and video. Authors can optionally assign alternative text to the canvas or leave it blank, in which case the screen reader would move straight to the content. Accessibility Tips Ensure that all meaningful objects and groups are clearly named in the objects panel. This makes them easier to identify later and saves significant time when managing both the visual and focus order. Use correct heading levels in order with clear, descriptive titles. Keep objects organized in a logical order from the start. A well-structured objects panel makes it much easier to set the final focus order later on. Provide alternative text (alt text) for any object that's meaningful or helps convey structure. Because alt text can be added to any object in Custom Block, authors can strategically use it to communicate important visual information effectively, especially in visually rich layouts. Use the focus order panel to reorder objects independently of their order in the objects panel. Conduct manual testing with a screen reader to ensure the focus order is correct. Known Issues Articulate Localization isn't supported for custom blocks at this time. To translate custom block content, authors must use the manual translation process. Share Your Feedback We're excited about the creativity that custom block will unlock and need your help to ensure it meets the needs and expectations of all Articulate users. Your feedback will directly influence the development of custom block within Rise 360, so consider sharing your thoughts on the following topics: Uses: How are you using custom blocks? Share your creations! Bugs: Is anything not working as expected? Improvements: How could this feature be better? Insights: How does this feature benefit you and your learners? Click Beta next to Custom Blocks and select Share feedback to share your thoughts.16KViews48likes0CommentsRise 360: Manage Course Media
While text often forms the backbone of a Rise 360 course, adding multimedia can really make your training content shine. You can easily add images, audio, and video directly into many Rise blocks or in their own special blocks. Adding web content can enhance your training even more. Keep reading for tips on working with multimedia content. Images Audio Videos Web Content Images In addition to image blocks, many other Rise 360 blocks also support adding images. Depending on the lesson or block type you’re using, click the camera icon or the Add Images button. Sometimes it’s found in the main window; other times it’s accessible in the sidebar via the content menu. Generate images with AI Assistant, upload images from your computer, or search photos and illustrations from 14+ million assets in Content Library 360. Since Rise 360 compresses images with virtually no loss of quality, you can use high-quality images in your courses. Rise optimizes them for web distribution. Select Preserve file quality when uploading images to bypass optimization. File size limits still apply. After adding an image, use the action toolbar to remove or replace it, crop the image, or add alternative text for screen readers. Create Images from Scratch with AI Assistant Can’t find just the right image? If you have an AI Assistant subscription, you can turn your ideas into high-quality images. Learn how to use AI Assistant to level up your course authoring game. Audio The easiest way to add audio to your training is with a multimedia audio block. After inserting the block, add audio by clicking the Content icon to open the sidebar and then the Replace audio icon to the right of the audio playback bar (it looks like a microphone). You can also add audio to most text, statement, quote, and list blocks, as well as some interactive blocks. See this article for a list of audio-enabled block types. For supported blocks, open the content sidebar. In the Audio section for the relevant block element, click the Add/Replace audio icon. When the Course Media window displays, you can either generate AI audio, Record audio, or Upload an audio file. AI Audio If you have an AI Assistant subscription, you can use the AI audio tab to generate an audio file from a text transcript. More than 5,000 voices are available, with others added regularly. AI Assistant can also generate an audio transcript for you if you have existing audio. Learn more about text-to-speech with AI Assistant. Record Audio To get started with the Record audio tab, simply click the Record button. Note that there's no countdown, so you’ll want to be ready to record once you click the button! Once recording, you can pause and resume recording. Stopping the recording saves the current session. Click Record again to discard the current audio file. To have AI Assistant transcribe your recording, select the option before inserting your audio recording. Click Insert audio to add your recording to the current block. Upload If you have existing audio, add it via the Upload tab. Rise 360 supports playback of all major audio file formats, up to a maximum size of 5 GB per file. Rise 360 optimizes uploaded files for broadcasting without sacrificing sound quality, maintaining stereo tracks or creating two mono tracks if the original audio is mono. Audio Transcripts Where available, select Transcribe audio file option to manually enter a transcription of your audio file or have AI Assistant transcribe your audio for you. When using the auto-transcription feature, make sure you edit the transcription to ensure accuracy. To cancel the auto-transcription process, toggle Transcribe audio file. The transcription field isn't available for editing until your audio has been processed. When generating audio with AI Assistant, the script you use is included automatically as the audio transcript. When audio transcripts are available, learners can click the icon in the audio player and open the transcription in a sidebar. Delete Once audio is attached to your block, open the sidebar, hover over the audio playback tool, and click the Remove audio icon. Videos In addition to video blocks, several other blocks support video content. Where available, click the media folder icon and choose Upload media. Sometimes the icon is in the main window; sometimes it’s in the sidebar. For best results, we recommend using high-quality videos with a 16:9 aspect ratio. Rise 360 compresses videos so that they maintain high quality while offering smaller file sizes for web distribution. To bypass optimization, select Preserve file quality when uploading videos. The maximum file size for each file uploaded to Rise 360 is 5 GB. After adding a video, click Edit to remove or replace it. Tip: You can also import screencasts you create with Replay 360 and Peek 360. Web Content To add web content in blocks that support embedded media, click the media folder icon and choose Embed from web. Sometimes the icon is in the main window; sometimes it’s in the sidebar. Just paste the URL or embed code for the web content you want to use—for example, a YouTube video or an interactive graphic. You can even use parameters for embedded YouTube and Vimeo videos. Note: Videos in embedded web content don't pause when the learner switches to another tab or scrolls away from the content. To enable auto-pause, you must upload the video as a file, as detailed in the previous section. We use Embedly to embed rich media in Rise 360 courses. That means you can use videos, images, documents, and other media from more than 400 content providers, including YouTube, Vimeo, Instagram, and Scribd. See the complete list of supported content providers here. If an error occurs or your web content doesn’t display, see these articles for tips: Embedded Content Is Missing or Blank How to Fix Invalid Embed Code2.9KViews2likes0CommentsStoryline 360: Corner Radius Formatting
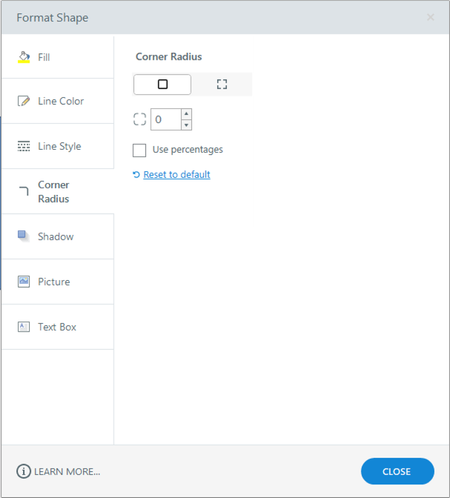
This user guide covers the corner radius options on the Format Shape/Format Picture window. These options control the appearance of rectangle shapes, captions, and buttons. (See this user guide for ways to access the formatting window.) Border/Corners Icon Select the Borders icon to modify all four corners with the same value or the Corners icon to modify each corner independently. Corner Value Enter the value(s) in pixels or select Use percentages to enter percent values. You can also use the arrows to adjust the value. To reset the corners to their default values, click Reset to default. Rounded rectangles default to percentage values. You can round all corners of a shape by dragging any of its sizing handles. You can also adjust one corner of a shape by pressing the Alt key on your keyboard and dragging the corner. When you change the corner radius in a shape’s normal state, those dimensions get applied to other states. However, when you change the corner radius in a shape’s state that isn’t the normal state, the new dimensions are only applied to that state.2KViews8likes0CommentsStoryline 360: Applying Merge Shapes
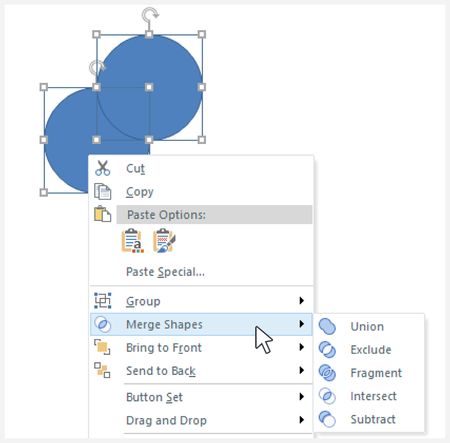
Merge shapes lets you combine basic shapes into custom, powerful designs. Select two or more shapes and apply one of five merge operations: Union Exclude Fragment Intersect Subtract Create Merged Shapes Getting started with merged shapes is easy. Insert and select two or more shapes. Right-click or choose Format in Drawing Tools. Select Merge Shapes. From the drop-down menu, choose the kind of merge operation you want: Union, Exclude, Fragment, Intersect, or Subtract. The resulting merged shape behaves like any other built-in shape and can be moved, scaled, rotated, used in triggers, etc. It can also be merged with other shapes, opening even more design possibilities for your courses.3.1KViews26likes0CommentsStoryline 360: Adding Math Equations
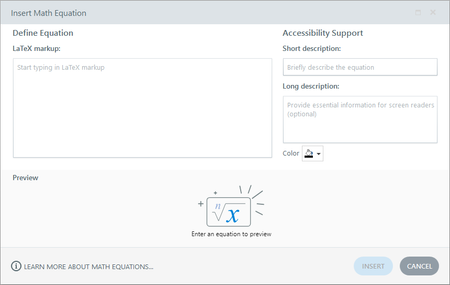
Create formulas using an intuitive LaTeX editor built right into Storyline 360 with these steps: Go to the Insert tab on the ribbon and click Equations. In the Insert Math Equation window, enter your formula in the LaTeX markup field. It will display as a graphic at the bottom of the window in real time. Enter descriptive alt text in the short and long description fields on the right. Use the Color selector to choose a color for the equation. Click Insert to add the equation to your slide. Note: Storyline 360 supports the MathJax TeX font. Edit Math Equations To update an equation, use any of the following methods to get started: On the slide stage, select the equation and click the pencil icon on the top right corner of its sizing handles. Right-click the equation and choose Edit Math Equation from the context menu. When you’re ready, click Replace to replace the existing equation with the modified one. Resize Math Equations The quickest way to resize a math equation is to drag any of its sizing handles. For more control over an equation’s exact size, go to the Size and Position window to enter your preferred values. Make Math Equations Accessible Math equations are rendered as scalable vector graphics (SVG), which means they’ll stay sharp when resized or zoomed in. You can further enhance math accessibility with these steps: Add short and long descriptions (alt text). Use a two-part text alternative for complex images to make them more accessible to all learners, including screen reader users. Short descriptions are meant to identify the image, while long descriptions represent essential information conveyed by the image. The alt text should spell out the name of each symbol in the equation. (1.1.1 Non-text Content) Meet color contrast guidelines. When using the color option, use a web-based contrast checker or download a contrast checker tool to test the contrast ratio of your math equation. (1.4.11 Non-text Contrast) Determine whether text within an image is necessary. Use text over images when conveying information. However, having text within a math equation SVG is acceptable if it gives learners essential context. (1.4.5 Images of Text)493Views0likes0CommentsArticulate Localization: Distribute Multi-Language Training With Reach 360
Accommodating global audiences in Reach 360 is easy when you use Articulate Localization! Simply publish your multi-language training to Reach 360, then enroll learners. That's it! Learners see the course in their preferred language (if available) and can select other languages without disrupting their training progress. To get started, add a published multi-language Rise 360 or Storyline 360 training to your training library as you would any other course. The available languages display on the course detail page, as shown below. The learner automatically sees the translated course based on their preferred language interface, if available. For example, here’s the learner interface in German: Current languages include: Brazilian Portuguese English (UK) Mexican Spanish Canadian French Finnish Norwegian Danish French Portuguese Dutch German Spanish English (US) Latin American Spanish Swedish Learners don't have to remain in the same language while taking training. They can select a different language from the drop-down menu at the top of the screen without resetting their current progress. Reach 360 seamlessly tracks learner progress across languages as it would a single training session. Question-level reporting also supports multiple languages. Even if a learner switches between languages for each question, all responses are included in the report. Admins, managers, and reporters can use the drop-down menu at the top of a learner's report to see all the languages in which answers were recorded.799Views0likes0CommentsArticulate Localization: Publish Multi-Language Storyline Projects
With Articulate Localization, you can effortlessly publish multiple language versions of a project in Storyline 360. For a fully integrated experience, publish your multi-language training to Reach 360 so learners automatically see content in their preferred language. If you’re publishing for LMS or web, you can choose between publishing a single package that contains selected language versions or separate packages per language version. How to Publish Follow the steps to publish a regular Storyline project, but note the following additional options when using Articulate Localization: Use the Language dropdown to choose whether to publish all or a subset of your course languages. Click the globe icon beside the Title to edit titles for other languages. Reach 360 If you’re publishing to Reach 360, all language versions are sent directly to your Reach account and packaged as a single training after you click Publish. Learn more about how multi-language training works in Reach 360. LMS and Web For LMS or web output, choose one of the following package types, then click Publish: Single package containing selected languages Separate packages per language Single Package Option The “Single package containing selected languages” option lets you upload one zip file to your LMS or one set of published files to your web server. When learners launch the course, they can choose their preferred language, as shown below. Separate Packages Option The “Separate packages per language” option creates a subfolder for each published language inside a main folder named after the project. You’ll need to upload or zip the content of each subfolder to your LMS or web server. Note for LMS output: Storyline 360 reports the language the learner chooses to the LMS. For both single and separate package output, the learner’s language code is reported in the following fields: AICC: cmi.learner_preference.language SCORM 1.2: cmi.student_preference.language SCORM 2004: cmi.learner_preference.language xAPI and cmi5: context.language If you need this information, check with your LMS admin to see if your LMS supports these fields. Cmi.student_preference.language, for example, is not a mandatory element in SCORM 1.2, so some LMSs might not support it. Video and Word If you’re publishing a video file or to Microsoft Word, Storyline creates one file for each selected language.2KViews3likes0Comments