storyline
16 TopicsSwitching between languages in the LMS
Hi everyone, how are you? I used the "Localization" feature in a course. After making the content available, when selecting a language I can't revert to the original language. What am I doing wrong? Choice of language After this, it is no longer possible to change the language. Thank you in advance.982Views0likes11CommentsWhat’s New in Articulate 360
Discover the latest Articulate 360 features Join us on July 28th at 11 a.m. ET [U.S.] for our What’s New in Articulate 360 webinar. See David Anderson, Director of Training, walk through all the latest features. You’ll learn how to: Let experienced learners test out of Rise courses on topics they’ve already mastered. Automatically update live Rise courses without re-uploading them to your LMS. Customize AI-generated images without leaving Storyline. Register Here741Views0likes3Comments[REDUNDANT] Storyline custom focus control
========================================================================= Update 18 March 2025 This functionality is now redundant. Please use the native focus trigger in Storyline 360 64 bit March 18, 2025 (Build 3.98.34222.0) ========================================================================= There have many been times, when using Storyline to develop content, it has not been possible to get the kind of screen reader focus control that I have needed. Using layers for this can only get you so far. I developed a JavaScript function that allows you to send the screen reader focus to the text field that you want, via any trigger. Adding the following JavaScript to your projects Slide Master will make it available throughout your module: // Check if function has been defined already if (typeof window.setFocus === "undefined") { // Get reference to the Storyline Player var $player = GetPlayer(); // Set the amount of time to delay before attempting to send focus to the target element (milliseconds) 1000 = 1 second. var $interval = 200; // window.setFocus = function ($target, $announce = false) { // Get the target element, based on the passed argument setTimeout(function () { var $div = document.querySelector('[data-acc-text^="' + $target + '"]'); var $id = "acc-" + $div.dataset.modelId $div = document.getElementById($id); if($announce) { $div.setAttribute("aria-atomic", "true"); $div.setAttribute("aria-live", "assertive"); } // Send focus to target, after defined $interval $div.focus(); }, $interval); } } Once the function is defined in your Slide Master, you can then call the function on the page using a JavaScript function, which can be triggered by any Storyline trigger such as timeline start, timeline end, button click etc. // The second argument will determine if the content should // be announced to assistive technology using aria-live=assertive // This will announce the text contents to the screen reader window.setFocus("Customer in the queue", true); // This will just send focus to the element. window.setFocus("Customer in the queue", false); The first argument, which is passed in the "" quotes, is the text contents of the text field you are targeting. You do not have to include all the text, just enough to ensure it is unique. For example, if you have two text fields: "Customer in the queue talking on their phone." "Customer in the shop staring into space." Passing the words "Customer in the" would not be specific enough, as there would be two text fields found. However, passing "Customer in the queue" would send the focus to the text field that contains the text "Customer in the queue talking on their phone." The second argument (true or false) determines if the target elements contents should be announced to the screen reader when it receives focus.1.1KViews1like11CommentsAccessibility - Screen Readers and TTS
Hi, I'm currently completing an apprenticeship in Digital Learning Design, and I'm working through some content on accessibility. Previously, all our storyline courses had text-to-speech added on, but the accessibility features such as alt text and focus orders weren't used. Since I've learnt more about screen readers through my apprenticeship, I've been following correct processes and designs for best practice with screen readers. However, as these read out the text on screen, I'm wondering if the text-to-speech I manually add onto all slides is still required? Part of me thinks it might be too much if both the audio on the course and the screen reader are reading the content out loud, but then we might have learners with dyslexia, for example, who might not require a screen reader but still prefer to have the text read aloud. How does everyone else navigate this? Do you use both or one or the other? Thank you!168Views0likes3CommentsPlayer Setup Recommendations for 508/WCAG 2.1 AA: Menu, Transcript, Navigation Buttons
Lately, I’ve been seeing an increased focus among organizations and government entities on ensuring Storyline courses meet WCAG 2.1 Level AA and Section 508 standards. While Storyline 360 offers several ways to create accessible content, I’m looking for general best practices for configuring the Storyline player so that it is straightforward for developers to implement while also providing a seamless experience for screen reader and keyboard users and meeting these requirements. I would love to hear your recommendations on the most effective way to set up the player, whether that means using the built-in player features or developing a custom navigation interface. Specifically: Transcripts & Glossaries: Do you recommend using the built-in player tabs, such as the Notes panel and Glossary tab, or is it better to build custom on-screen versions? If using the built-in player, does the Notes panel function sufficiently to meet accessibility requirements, or would you recommend a different approach for transcripts? If you do use the Notes panel, do you recommend placing it within the menu sidebar or at the top? The Menu: For menus that outline the course structure, do you recommend excluding it to reduce “tab fatigue” for screen reader users, or including it so learners can better track their progress? If a menu is included, do you prefer using the built-in Storyline menu or creating a custom one? If you use the built-in menu, is it best practice for the sidebar to start collapsed to keep the focus on the main content, or expanded for easier access? Also, when using the built-in player menu, do you recommend including subheadings? Navigation Buttons (Next/Prev): Do you recommend using the built-in Next/Previous buttons or adding custom on-screen buttons? While I know the built-in buttons now support accessibility shortcuts, many developers still seem to create their own Next/Previous buttons. I assume this is to provide a more intuitive end-of-slide experience. In any case, I would value your suggestions and would especially appreciate understanding the reasoning behind the recommended setup.345Views0likes2CommentsStoryline: Freeform radio group labels affected by timeline order and focus order
I think the behavior I describe below is a bug, but please let me know if this is intentional. Background Information Storyline now automatically publishes a group label for radio button sets. JAWS will read "group start ___" and "group end ___" around each radio button set. NVDA reads it once at the beginning of the radio button set, I believe. I think this behavior was updated in v3.111 (Feb 21 2026) since I can take a slide between v3.110 and v3.111 without doing anything to it and it won't add the group labels on publish to my slide in v3.110. I believe the reason this feature was added was to address WCAG 1.3.1 guidelines surrounding group labels for form field sets. (Rise already has group labels automatically added.) However, I don't see any mention of it in the Storyline 360 version history. Situation - potential bug For freeform questions, the "___" portion of the announcement (the group label name) depends on two things: Which textboxes are below the answer options in the timeline (this includes textboxes on the master slides - they are treated as "below" the answer options) Of those textboxes, which one comes first in the focus order (a textbox has to be in the focus order to be used for the group label) Storyline will use whichever textbox is below the answer options and first in the focus order as the group label. The layer position of the textbox in the timeline shouldn't have any effect on the group label, correct? Is there someplace we can actually set the group label without having to use the above mentioned rules as workarounds to get it to say specific things for the group label? Here's a Review 360 slide, and storyline file attached. group-labels | Review 360Solved538Views1like3CommentsAlways on top
I just set myself the challenge of having elements that are "always on top". I've worked on a handful of courses in the past, that had an irregular shaped header graphic (sometimes with drop shadow), where it would have been great to be able to set some elements in the Master Template to appears always on top of other elements within the module. For those courses, I had to create a slice of the header (the irregular shaped part) and paste on each slide, where the header appeared over another element on the slide. I have had some success, and of course it is a JavaScript implementation. This is very much an ALPHA release. Here's the implementation if interested in having a play with it or extending it. I'm sure there will be some elements, that I haven't played with, that may need some extra logic in the JS. For each element you would like to appear always on top, add the string "{AOT}" in the "Alternative text" field. If the element is decorative, you can just add "{AOT}". This will be taken care of during processing (removed, and set to aria-hidden=true). If the element is non-decorative, for example an exit button, you would just add "{AOT}Exit" to the alternative text. This would also be process, and "{AOT}" removed and "Exit" retained in the ALT text. Add the following script to the "timeline starts" on the SLIDE MASTER. This ensures that the script will process on every slide. const init = () => { // inititial value for z-index let z = 999; // get all elements with data-acc-text attribute starting with "{AOT}" const elements = document.querySelectorAll('[data-acc-text^="{AOT}"]'); // loop through each element elements.forEach(element => { // get the modelId and accText from the element's dataset const { modelId, accText } = element.dataset; // get the root element with the same modelId const rootElement = document.querySelector(`[data-model-id="${modelId}"]`); // set the z-index of the root element (incrementing by 1 each time) rootElement.style.zIndex = z++; // get the alternative text by removing "{AOT}" from accText and trimming the result const alt = String(accText).replace('{AOT}', '').trim(); // get the alt element with the id "acc-${modelId}" const altElement = document.getElementById(`acc-${modelId}`); // set the alternative text to the element's dataset element.dataset.accText = alt; // re-write the inner text of the alt element altElement.innerText = alt; // if the alternative text is empty (decorative), set the aria-hidden attribute to true and the z-index to -1 if (!alt) { altElement.setAttribute('aria-hidden', 'true'); altElement.style.zIndex = '-1'; } else { if (altElement.hasAttribute('aria-label')) altElement.setAttribute('aria-label', alt); } }); }; requestAnimationFrame(() => { init(); }); I've also including a very simple example file. This just demonstrates that the designated "Always on top" elements will appear over the image on the slide.905Views2likes4CommentsHow To Embed An ElevenLabs Conversational AI Widget Into SL360 Using JS!
Hi Heroes, It feels like something new and exciting is always around the corner in the world of generative AI technology, and this week ElevenLabs put themselves firmly in the driving seat of the agentic AI revolution with their new Conversational AI toolkit. If you haven't heard of this yet, check out this video which explains it all: https://www.youtube.com/watch?v=v-EYzZCLF48&ab_channel=ElevenLabs The interactive, animated widget that this toolkit provided is easy to embed anywhere, including directly within an Articulate Storyline 360 project slide! If you're interested in how to get started, I've written a blog post that includes all the steps, including an Execute JavaScript snippet you can use to effortlessly get your agent loaded into your activity: https://discoverelearninguk.com/how-to-set-up-elevenlabs-conversational-ai-widget-in-articulate-storyline-360/ I'm also currently experimenting with the API for the new Conversational toolkit to understand how I can implement it into my eLearning Magic Toolkit plugin for Storyline + WordPress, potentially opening the door for developing real-time voice activated automation all within a Storyline-built eLearning activity! Much more to come very soon. 🚀 --- My name's Chris Hodgson, an eLearning developer and software trainer based in the UK. I enjoy creating fun, unique, and engaging online experiences using Articulate software! Connect with me on LinkedIn - https://www.linkedin.com/in/chrishodgson44/2.9KViews6likes7CommentsExternal Accessibility Testing Tools for Non-Traditional Websites
Our team is using Storyline's built-in accessibility checker to enhance the accessibility of our courses. To further ensure our content is accessible, we're looking for recommendations on external programs that have proven effective for testing accessibility on non-traditional websites.411Views1like1CommentDynamic border radius experiment
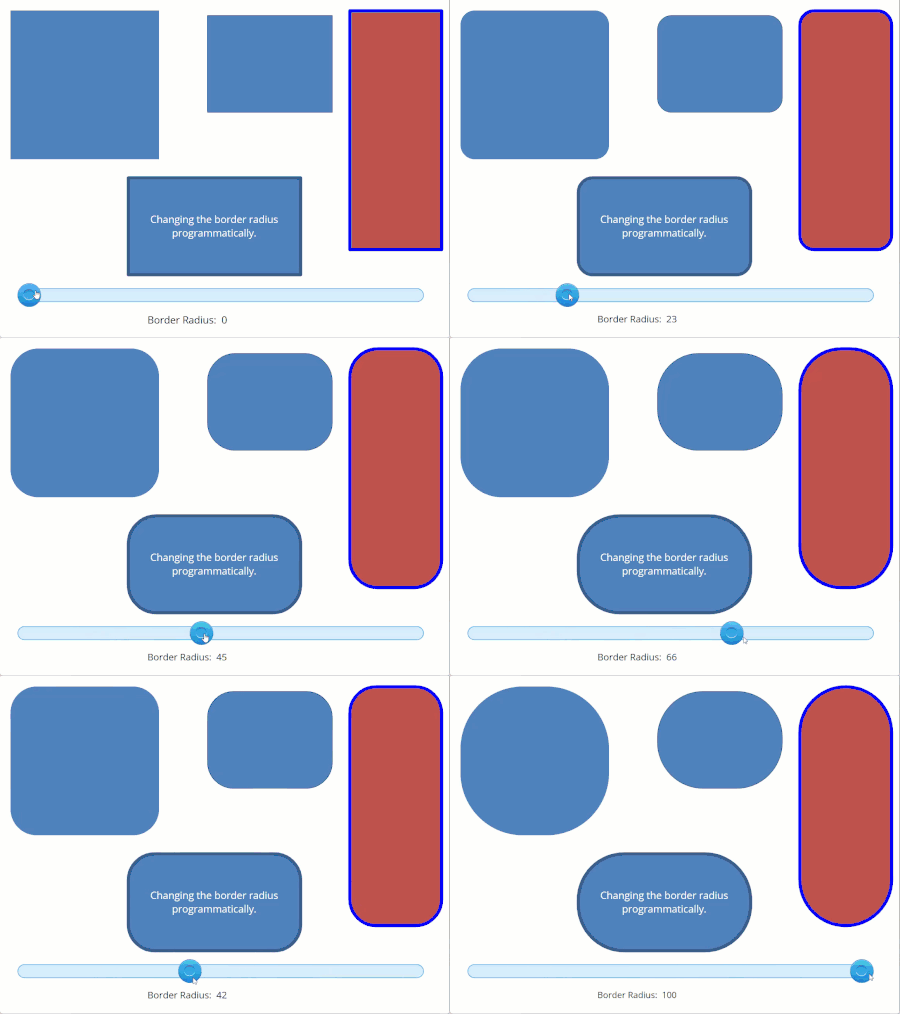
This was just a little experiment to see if I could manipulate the border radius of shapes on the slide numerically using JavaScript, and the answer is yes. Not sure of any use case, but I've always wanted to be able to control the border radius numerically in Storyline as border radius is not maintained when resizing shapes. I'm not sure if this could help as there is no easy way of targeting specific shapes in a slide without knowing their unique ID. It was a bit of fun anyway. If anybody would like to play or expand on this, go for it. What I've found so far, is it will only support solid or no outlines on shapes. When you start using other styles (dot, dash) an image is used by Storyline to achieve this. window.updateCornerRadius = function(targets, radius) { targets.forEach(function(target){ const path = document.querySelector(`[data-dv_ref="ref-${target}"] path`); if (!path) { console.error(`SVG target ${target} not found.`); return; } // Extract the bounding box of the current path const bbox = path.getBBox(); const x = bbox.x; const y = bbox.y; const width = bbox.width; const height = bbox.height; // Ensure radius doesn't exceed half the width or height radius = Math.min(radius, width / 2, height / 2); // Construct a new path data string with the updated corner radius const newPathData = ` M ${x + radius},${y} H ${x + width - radius} A ${radius},${radius} 0 0 1 ${x + width},${y + radius} V ${y + height - radius} A ${radius},${radius} 0 0 1 ${x + width - radius},${y + height} H ${x + radius} A ${radius},${radius} 0 0 1 ${x},${y + height - radius} V ${y + radius} A ${radius},${radius} 0 0 1 ${x + radius},${y} Z `; // Update the path's "d" attribute path.setAttribute("d", newPathData); }); } An example of this being called. I'm using a variable, borderRadius, change trigger. const borderRadius = getVar("borderRadius"); window.updateCornerRadius(['12','15','18','21'], borderRadius);552Views2likes2Comments