Forum Discussion
Build an Accessible Drag and Drop Interaction in Storyline
If you've ever needed to build an accessible course in Storyline, you may know that the built in drag and drop interactions are not accessible (see the VPAT).
However, with some extra work it is possible to create your own drag and drop interaction in Storyline that is fully accessible.
The issue with drag and drop interactions and accessibility is that people who access the computer using only a keyboard or assistive input device, and no mouse, cannot click-and-drag. So, the interaction must have another option, that works through the use of keyboard inputs (typically, the tab and enter keys). In Storyline triggers, anything that is done "on click" can be mimicked by a keyboard or other input device. To build a keyboard-accessible drag and drop requires building a second set of triggers that function using click-based rather than drag-based interactions.
Here is how to build your own keyboard accessible drag and drop interaction in Storyline.
Please note that you may include other elements that are not fully accessible. Take a look at the WCAG Guidelines to evaluate other aspects of your course creation
This interaction relies on a user-selected submit button. This button needs to be on the slide, as the triggers used are not compatible with the built-in submit button in the Storyline player.
Note: It will be easiest to create all layers, elements, and states before creating the triggers.
LAYERS NEEDED
Base Layer – Most of the triggers will be on the base layer.
Correct – A feedback layer for when the user submits the interaction, when all items have been moved to the correct drop location.
Incorrect – A feedback layer for when the user submits the interaction, when the interaction is incomplete or some items have been moved to the wrong location on the screen.
BASE LAYER
Elements Needed
Drag items – one or more
Drop targets – one or more
Submit button – one
Drag Item States
Normal - The built in state. This does not need to be modified.
Selected - Create a “Selected” state. Make sure to edit the selected state to include a visual indicator that the item is selected. An easy way to do this is to add a “glow” shape effect in a color contrasting the object.
Drop Correct - Create the “Drop Correct” state. You may want to visually signal that the drop was completed. One way to do this is to darken or desaturate the object in the “drop correct” state.
Drop Incorrect - Create the “Drop Incorrect” state. Make this state visually identical to the Drop Correct state.
Triggers
Submit Button
1. Show layer Correct when user clicks
If Drag item 1 state equals Drop correct
And Drag item 2 state equals Drop correct
… (Continue through the rest of the drag items)
2. Show layer Incorrect when user clicks
If Drag item 1 state does not equal Drop correct
Or Drag item 2 state does not equal Drop correct
… (Continue through the rest of the drag items)
Drag Items
For each drag item:
1. Change the item’s state to Drop Correct when it is dropped on the right drop target
Change state of Drag Item 1 to Drop Correct when user drops Drag Item 1 on Drop Target 1
2. “Deselect” all other drag items when this drag item is selected (Change other drag items’ states to Normal, if they are currently selected)
Change state of Drag Item 2 to Normal when user clicks Drag Item 1
If Drag Item 2 state is equal to Selected
Change state of Drag Item 3 to Normal when user clicks Drag Item 1
If Drag Item 3 state is equal to Selected
… (add this trigger for all other drag items on screen)
3. Change the item’s state to Drop Incorrect when it is dropped the wrong drop target(s)
Change state of Drag Item 1 to Drop Incorrect when user drops Drag Item 1 on either Drop Target 2 or Drop Target 3 … (include all incorrect drop targets in the list)
Drop Targets
For each drop target:
1. Move the selected Drag Item along a motion path to the Drop Target when the user selects the drop target. NOTE: The move triggers MUST be before the state change triggers in the list
Move Drag Item 1 on Motion Path* when the user clicks Drop Target 1
If Drag Item 1 state is equal to Selected
* For the motion path, create a line motion path with start and end points in the center of the drop target. This will move the object to the correct location without showing movement on screen. Make sure to go into the path options and select “locked” for origin. This will ensure that no matter where on the slide the object starts from, it will move to the correct position with the trigger. Name the motion path something descriptive so you can identify it in the trigger list (ex: Drag 1 to Drop 1 Path).
NOTE: When you create a motion path, Storyline automatically adds a trigger to the object to follow the motion path when the slide timeline starts. Make sure to go in and remove all of these triggers.
… Make this trigger for all drag items on the slide.
2. Change the state of the corresponding Drag Item to Drop Correct, if the Drag Item is selected
Change State of Drag Item 1 to Drop Correct when the user clicks Drop Item 1 if Drag Item 1 state is equal to Selected
3. Change state of the selected drag item to Drop Incorrect for all drag items that do not match with this drop target
Change State of Drag Item 2 to Drop Incorrect when the user clicks Drop Item 1 if Drag Item 2 state is equal to Selected
… Make this trigger for all remaining drag objects on the slide.
CORRECT LAYER
Elements
Text box(es)
Continue button
Triggers
Continue button
Jump to next slide
INCORRECT LAYER
Elements
Text box(es)
Try Again button
Triggers
Try Again button
Jump to slide (current slide) – this restarts the interaction on the slide base layer
NOTE: Make sure the slide is set to “Reset to initial state” for the “when revisiting” selection in the slide properties.
And there you have it! It looks like a lot, but once you've done it a time or two you can get the hang of it.
Below is an example .story file of this interaction. It uses the same names as the instructions above so you can see how this all looks in a project.
99 Replies
- ChristinaMyersCommunity Member
I can see how the programming works, but how do you get the exercise scored on the results slide as part of a 5-question learning check? Or is this to be used as an ungraded activity only?
- KarenWicks-029aCommunity Member
Hi,
I've used these instructions to adapt a drag and drop quiz question on my course. Took ages😄
My question is... How can I get the submission to pass to a results slide?
thanks
Karen
Hello KarenWicks-029a,
Thanks for reaching out!
You can use a "Submit interaction" trigger to submit the question slide and move the learner to the next slide in the course.
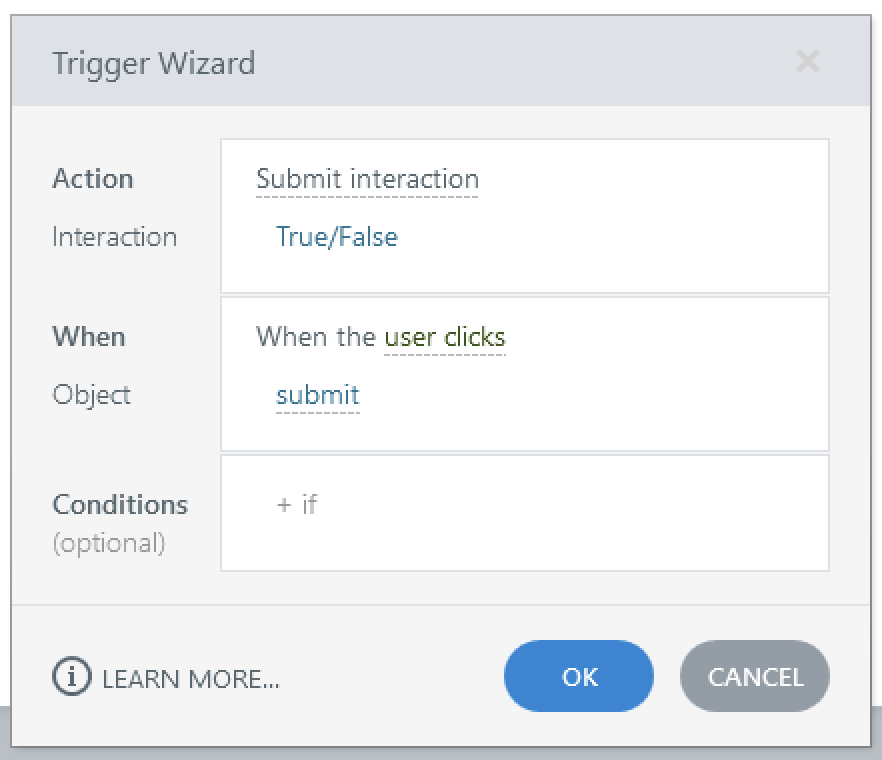
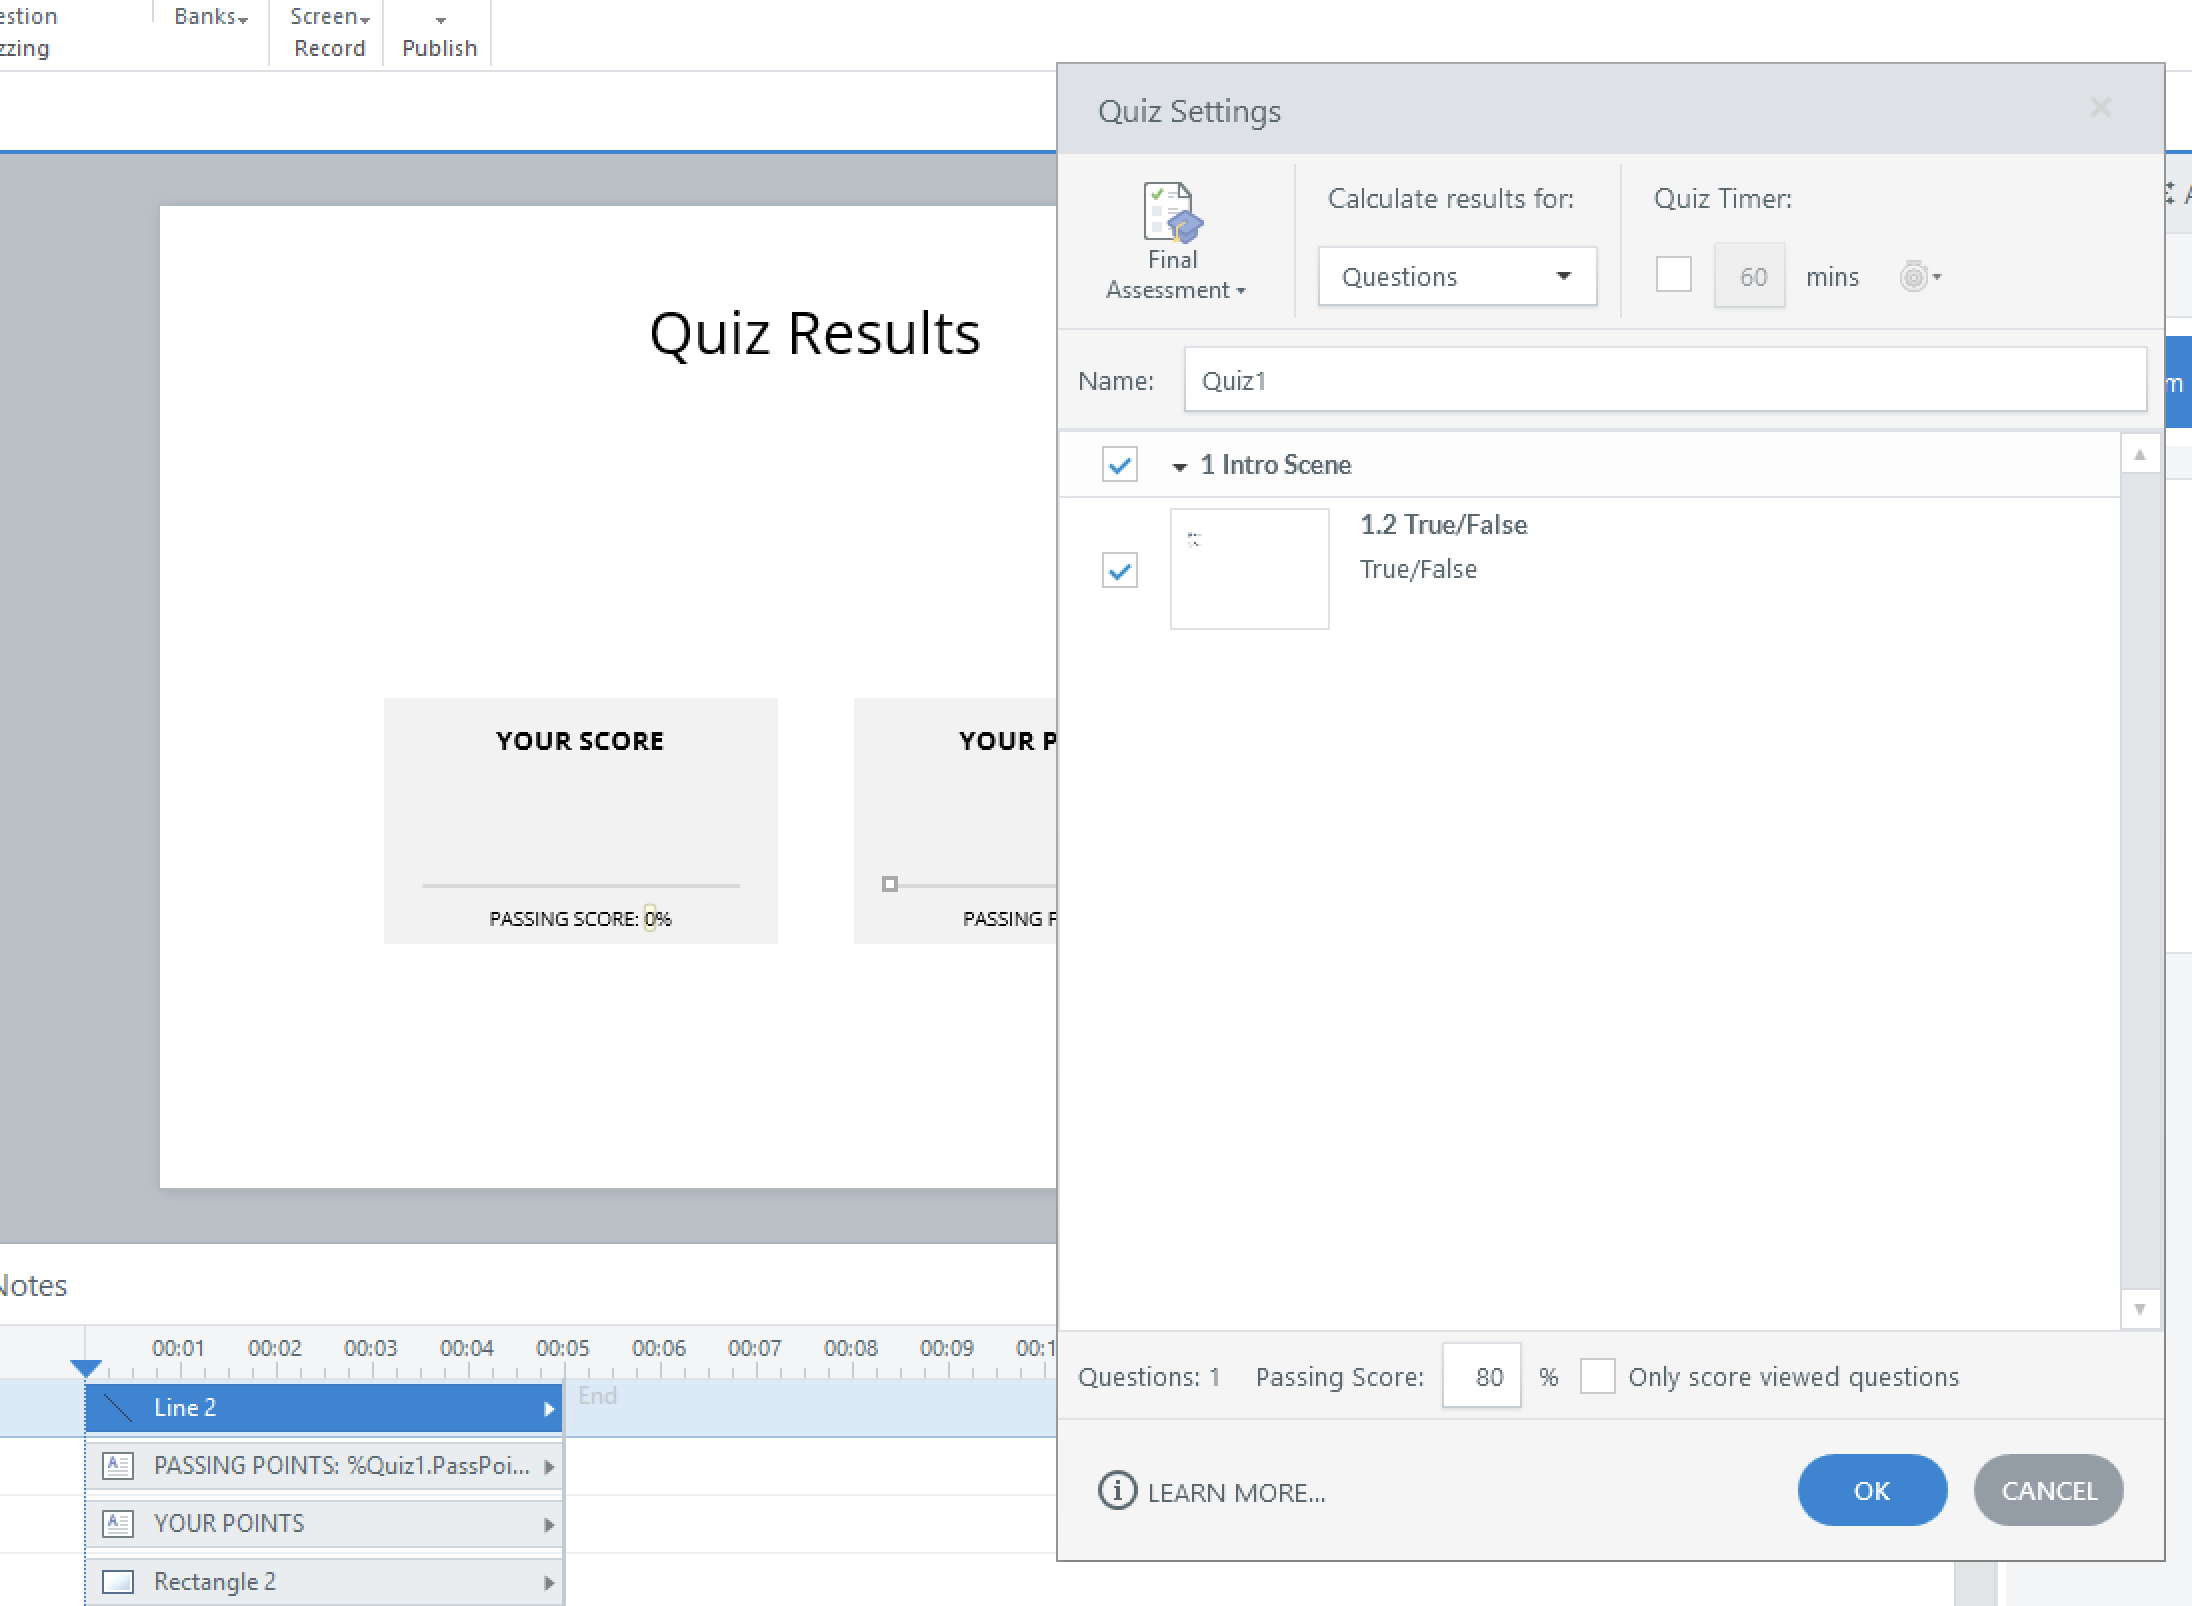
You'll need to ensure that the question is part of the Quiz settings in the results slide for the interaction to count towards the total score.
Feel free to share a copy of your project file here or in private by opening a support case if you need any help with setting up the submit trigger.
- KarenWicks-029aCommunity Member
Good morning JoseTansengco
I think I'll need some help with the submit trigger.
I've attached the project file.
I've included additional, regular quiz questions (with obvious correct answers 🙂).
The correct answers on the drag & drop are -
Green Box
- Fix your work laptop
- Can't login to the network
- Grant system access
Red Box
- Fix a personal laptop
- Fix your broadband at home
I also tried some other variables and triggers on the result slide, but they didn't work, so I replaced the results slide with a new one without using the variables for uploading. So, you'll see a few disabled triggers in there too. I don't think they'll interfere with anything to help though.
Thank you for helping.
Karen
- NedimCommunity Member
You can't pass a custom variable like TotalScore directly to a result slide unless the slide is converted into a quiz interaction that can be tracked in the quiz settings. Only graded or free-form question slides can contribute to the built-in quiz score (Results.ScorePoints). Even in those cases, the built-in score variable can’t be modified directly. For example, you can’t add TotalScore to Results.ScorePoints. What you can do is assign a point value (e.g., 5 points) to the correct answer in Form View, assuming all elements (such as drag items) are correctly placed on their corresponding targets. That value will then be counted toward the quiz score. If the interaction is incorrect, zero points will be awarded. So while you can't feed a custom score into the result slide, you can design your interaction to award points through the quiz slide setup itself.
In the attached modified version of your file, I converted the custom drag-and-drop slide into a Text Entry interaction. If all drag items are correctly placed on their corresponding targets and the associated variables are set to true, the Text Entry field is automatically populated with the correct value. This causes the interaction to be marked as correct and awards 5 points. If any of the conditions are not met, the value is set to an incorrect value, and the interaction is marked incorrect. In both cases, either 5 or 0 points will be counted toward the Results.ScorePoints variable. The example includes both a standard drag-and-drop interaction and an accessible version that uses motion paths for keyboard navigation and screen reader compatibility. I'm sure it can be further refined, but perfecting it would require more time and testing.