instructional design
1197 TopicsPeer Pod Coming Soon: “New to Instructional Design” — Who’s Joining Us?
We’re kicking off a brand-new Peer Pod for anyone who’s new to instructional design and you’re invited! 🎉 Peer Pods are 4-week learning groups where community members explore a topic together through weekly prompts, curated resources, and shared discussion. Whether you’re a few days or several months into your role, this is your chance to connect with peers, reflect on key topics, and build confidence together. Here’s what we’ll explore: ✨ What to focus on as you get started 📦 Intro to Articulate 360 + course design best practices 🤝 Tips for working with SMEs 💻 Best practices for incorporating AI By the end, you’ll walk away with a stronger foundation and a group of peers cheering you on. 🗓 Start Date: Monday, January 12, 2026 Participants will be added to the private Peer Pod group about a week before we begin. 👉 Want to join? Fill out the registration form. 💬 Your turn: What Peer Pod topics do you want to see next? If you could join a focused 4-week learning group, what topic would you choose? Drop your ideas below so we can build pods around what you want most. 🙌1.5KViews14likes35CommentsHow I Built This: I Developed an Award-Winning Ethics Course
Why I Built This: When I first learned about branching scenarios, something clicked for me that I hadn’t seen other eLearning developers execute: visually compelling, philosophically rich thought experiments. I studied Moral Philosophy in my undergrad and became obsessed with ethical dilemmas. Naturally, I decided to build an ethics course about technology. Think The Trolley Problem, only I wanted to pose questions about the growing reliance on AI and its implications by employing Instructional Design strategies. An opportunity came up through my Master’s program to attend DevLearn and compete in DemoFest, so it was time to start building my concept. I designed and developed a course in Storyline called The Agency Algorithm that confronts learners with issues regarding three main topics: algorithmic warfare (The Armory), AI assisted resource allocation (The Triage Garden), and surveillance (The Mask Archive). The Experience & Design Intent: A quick walkthrough of the multi-room experience. The Agency Algorithm is a multi-room interactive learning experience that blends instructional design, game-like mechanics, and philosophical inquiry. It immerses learners in ethically complex scenarios by leveraging branching logic, and integrating experiential aesthetics with conceptual depth. My primary goal with this project was to encourage critical reflection on the role of technology on human agency and autonomous choice. The concept itself was pretty clear to me, but I wanted to push the limits of Storyline visually, so I acquired a number of 3D assets from Adobe Stock, some of which I further modified in Adobe Dimension. I wanted the visuals to anchor the learner in a unique environment that did not feel reminiscent of traditional eLearning, and rather create space to explore and feel like a participant in something unfolding. There aren’t often black and white answers to ethical questions, and branching scenarios are an excellent way to illustrate this while offering learners a safe place to experiment and think through various outcomes based on their decision making. Visual Worldbuilding/Making It Not Feel Like eLearning: Initially, I intended to hand draw assets myself to really hone in on the human vs AI dynamic, but quickly realized the time I’d have to accomplish this was dwindling. While I drafted a few loose concepts in my journal, I ultimately decided to stick with digital assets. While I landed on 3D assets largely due to time constraints, the outcome is reminiscent of an old experimental video game or some sort of immersive idea gallery. As an artist, I often approach my work from a minimalist lens so this project was a fun way to really add some artistry that corporate training often doesn’t have room for. Variables, Multi-state objects, Cue points, and other mechanics: I relied heavily on multi-state objects to create hover states, “tip” cards, text labels, and more, for example in the circuits with definition reveals. I enjoyed building the “loading” effect in the Mask Archive, although it was a bit clunky and took a lot of trial and error! I learned a lot along the way and used a cue point on an orb with a glow effect beneath the mask and used triggers to cause the effect to work. The course overall has a few hundred triggers (slide, object, and variable triggers) and somewhere around 40 variables (mostly T/F variables). What I learned: I think it is important that we don’t hand-hold learners through every learning experience. I want users to think through complex challenges and autonomously choose and feel like a true agent in the process of acquiring knowledge. A lot of eLearning makes it too easy for the learner and we lose engagement when we undermine the intelligence of our audience. I learned SO much about how to leverage Storyline in new ways. I am still a relatively new user to the tool, so this project allowed me to freely explore and be guided by curiosity. Link to my portfolio: https://www.abigailvettese.com/1.2KViews12likes7CommentsWelcome to Week 1 of the E-Learning Heroes Passport Challenge!
🌍 Welcome to the Passport Challenge Hub! Your one-stop spot for all things E-Learning Heroes Passport Challenge. Each week, we’ll share a new update celebrating badge earners, Globetrotter progress, and community highlights. Check out the Passport Challenge post to learn how to join, earn badges, and see all the rewards you can unlock! ✈️ Getting Started Here’s how to start filling your passport this week: Post a new discussion or comment on a post that caught your eye. Jump into the Welcome Center and greet a new member. Like a few posts that inspired you. 💡 Weekly Pro Tip You can earn two badges in one! Complete the Weekly Challenge to earn your Challenger stamp, then post your project (with details!) in the Share Examples Hub to unlock your Showcase stamp. 💬 Join the Conversation How are you hoping to grow, learn, or stretch your skills during the Passport Challenge? Drop your goals in the comments — we’d love to cheer you on!473Views11likes6CommentsTeaser: Storyline "Chat To Animation"
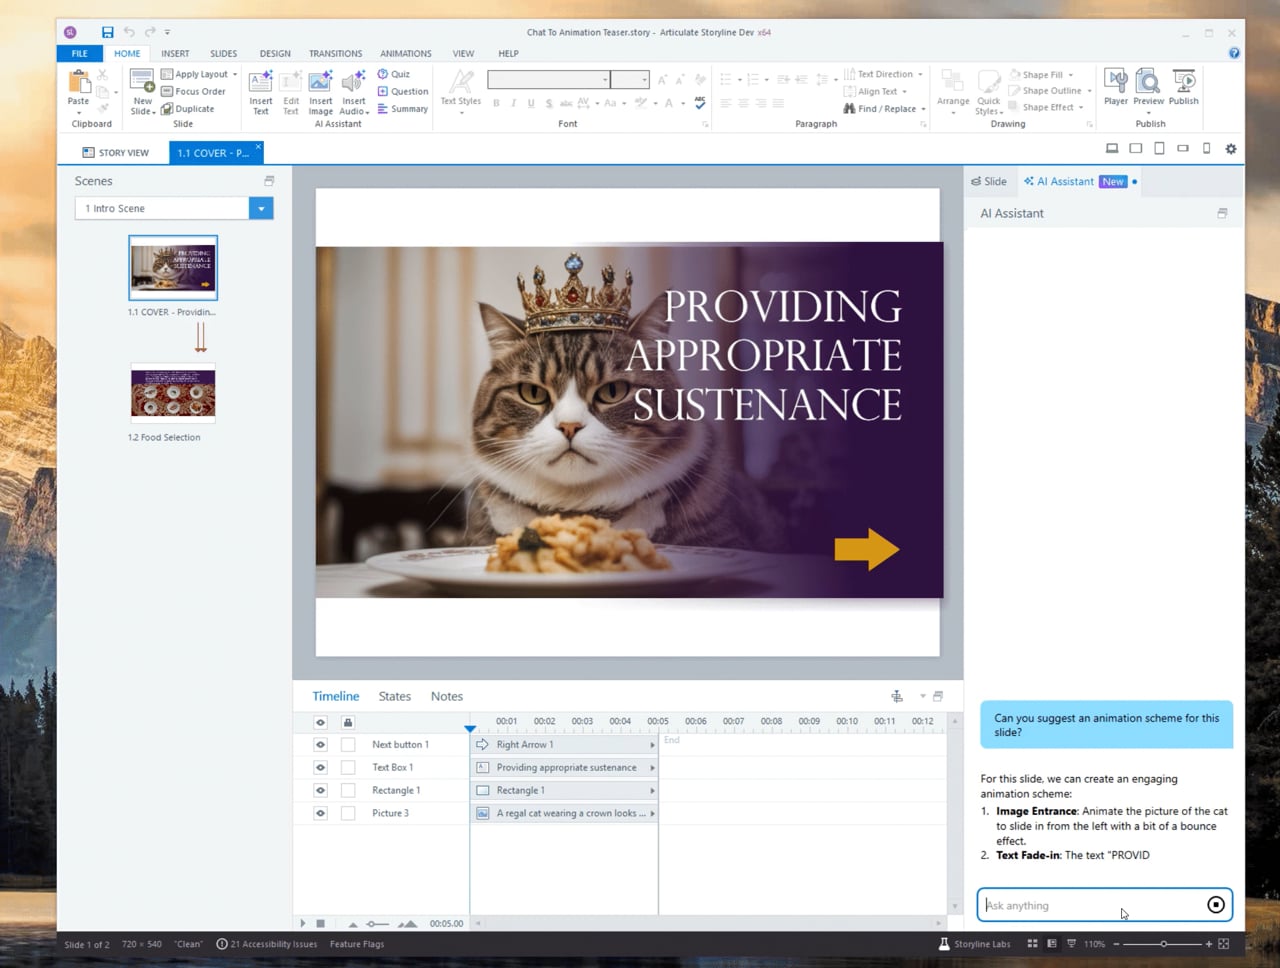
🚀 Big things are coming to Storyline 360. Last month at the Articuland Summit in Boston, our COO Brian Gil gave a sneak peek at something our team’s been quietly working on: AI-powered animations inside Storyline. We've been calling this feature "chat to animation" internally. The idea is simple but powerful: talk to Storyline's AI Assistant about how you want your slide to animate, and it helps bring your vision to life. The attached video shows a little preview of this feature in a fun "Feline Overlord" themed Storyline course. 🐱👇 On the first slide, I entered this prompt into the AI Assistant chat: “Can you suggest an animation scheme for this slide?” It broke down the suggested animation effects for each object, then asked if I want to create a trigger for them. After responding, "yes", the AI Assistant wrote the JavaScript code to create the animations and automatically associated it with the "When timeline starts" event. It also surfaced a "Preview" button that jumps into Storyline's preview mode so I could see the animation in action. Notice that the AI Assistant window stays visible during preview. This means I can refine the animation while previewing to home in on the exact look and feel I want. In this case, I wanted to delay the slight "pulse" of the yellow next arrow to begin after the image and text animations completed, so I entered: “Great! Can you delay the animation on the next arrow a bit so that it starts after the other objects have animated in?” The AI revised the JavaScript in the trigger and immediately replayed the slide again so I could see the change and tweak further if needed. That ability to preview, refine, and replay instantly is what makes this experience feel so magical. If you'd like to see the published course in action, you can find it on Review 360: Chat To Animation Teaser | Review 360 This feature should land in private beta soon, and we'd love to get your feedback. If you want to help shape how this evolves, email beta@articulate.com to get started!635Views11likes3CommentsPassport Challenge: Badge Updates, Highlights & Upcoming Events
Great news, travelers! ✈️ All badges earned so far (except Voyager — those will be added at the end) should now appear on your profiles. If anything looks off, just let me know, and I’ll get it sorted. Remember, the Passport Challenge runs through January 5th, so there’s still plenty of time to level up and earn those badges! 🎉 This Week’s Highlights A huge shout-out to our badge earners so far! Tier 1 Members who’ve earned 3+ badges: JudyNollet Nedim Silverfire Seb_Daubert elizabeth ThierryEMMANUEL JHauglie HillaSchlegel jveedubs SandyMyers LeeMillardButlr Kate_Golomshtok KayleneWance ClaireBogue-155 Stephanie BarryHollembeak SMcNicol FelixFranke DanThornton ChelseaYoung-6f samxuan Caitlin_B jeremykelley78 Emily02 BorgCube RonPrice JodiSansone larryvanwave-ff HoneyTurner JenniferThom012 BenjiLukas Mb06 hannahrad22 DaisyWoods-2947 RamonTalavera-0 CydWalker_mwh RehanTT JulieBaker-ad32 RhondaRolf-1090 TamaraCraft-62f RomanieRoach-e9 SyedAmjad-Ali Tier 2 Members who’ve earned 5+ badges: Emmanuel_Kegler Lori_Morgan GolfPrincess AbigailVettese PaSchl Jonathan_Hill Michelle_Brooks MrugeshJani Marie-Pierre701 DanBoylandUK Ekaterina_V MeeraLynn-UK VickyAttridge 🌟 Most Badges Earned (so far!) Emmanuel_Kegler is leading the way with 7 badges — just one more to reach Globetrotter status! 🎁 Prize Reminder Tier 2 = Entry into our Articulate swag drawing Tier 3 (Globetrotter) = A chance to win our Grand Prize: a Fujifilm Instant Film Camera! 🚀 Keep the Momentum Going Here are a few ways to earn more badges this week: Weekly Challenge: Share Your 2025 E-Learning Challenge Highlights Upcoming Webinars: Overview of AI Assistant in Rise - Dec 16 Edit AI Images Using Free Windows Tools - Dec 16 Quick Tips & Tricks: Episode 120 - Dec 18 Join the Conversation - Jump into these recent discussions and share your insights: How does your organization support different ways of thinking and working? by smous Help with multiple packages that make up one course by RachelDavis-7dd Welcome Center: Say hi to a new member! Share Examples Hub: Post a project — and remember, sharing your challenge submissions is a great way to earn badges and contribute to the community! 💡 Weekly Pro Tip: Check out the latest Made by Members featuring portfolio examples. Participating in the Passport Challenge is a great way to sharpen your portfolio and showcase your skills! 💬 Join the Conversation What’s one badge you haven’t earned yet but plan to tackle this week?378Views10likes3CommentsDesigning Immersive Phone Conversations in Storyline
Ever have two characters talk in a training module, but it still feels flat; even with speech bubbles, audio, and triggers? This (FREE) Storyline phone conversation template changes that. Whether you're designing for sales, compliance, healthcare, or support, it creates real, layered convos that feel like you're eavesdropping on a call. Animated phone effects Realistic voiceover dialogue Transparent APNG waveforms (way better than GIFs!) Custom triggers for pick-up/end call Clean, modern layout with animated text Watch how it works: https://www.youtube.com/watch?v=kMpUcYJRNnE Preview the demo: https://www.redesignedminds.com/Discuss/story.html Download it free: https://drive.google.com/file/d/19AvmE7q3PAUbXoNKIViQtPNqCwUoFDQW/view?usp=sharing If your training includes a conversation, this is how you bring it to life.1.3KViews10likes14CommentsBehind the Scenes: Storyline’s Move to Modern .NET
We just wrapped a project that’s been hanging over Storyline for a long time: Moving from .NET Framework 4.8 to modern .NET (now .NET 10). This one goes deeper than it might sound. Back when Storyline was first built, choosing .NET Framework was the obvious call. This was 2010-ish. Windows dominated our space, and the .NET ecosystem gave us a lot of what we needed to move fast and build a really capable tool. That decision worked. For a long time. It also shaped some of the realities of the product today. Questions about platform support come up a lot, and early architectural choices like this are a big part of that story. They helped us move fast early on, but they also made certain paths more complex later. Fast forward to now… Microsoft has effectively stopped evolving .NET Framework and put their energy into modern .NET. Meanwhile, we were still running on a foundation that wasn’t keeping pace with where things were going. So we made the call to move. This wasn’t a simple upgrade. We relied on parts of .NET Framework that don’t exist anymore. AppDomains. Binary serialization. A handful of “seemed like a great idea at the time” features that modern .NET intentionally left behind. We had to rethink and rebuild some pretty fundamental parts of the product. So what did all of this actually get us? We’re now on a modern, actively supported runtime. It’s easier for us to keep improving performance, adopt new capabilities, and evolve the platform without constantly working around legacy constraints. We also retired some very old pieces of the system along the way, which… felt pretty great 😅 And then there's performance. Microsoft has invested heavily at performance improvements in modern .NET, and we're seeing that surface in Storyline. We ran benchmarks across 18 Storyline projects, measuring open, save, and publish times. Every single project got faster with improvements ranging from 0.4% to nearly 30%. The larger the project, the larger the improvement. In the animated gif below, I put .NET Framework (left) head-to-head with modern .NET publishing the same course. Neither project was pre-published to warm the cache, and I even gave .NET Framework a slight head start by clicking Publish there first. The gif is sped up for easier viewing, but the result is real: modern .NET finishes publishing well before .NET Framework. Big credit to the team that pulled this off. This was deep, risky work in some of the most critical parts of the product. Curious to hear from folks here: If you're on the latest Storyline 360, have you noticed any performance improvements when opening, saving, or publishing your projects?Solved576Views9likes7CommentsHow are you approaching learning creation in your organization beyond “traditional” L&D use cases?
Hey ELH community 👋, We know that learning creation doesn’t live solely within L&D or instructional design teams. In large organizations especially, managers, training, enablement teams, and other departments are increasingly creating their own learning to meet team and business needs. We’re curious how that’s playing out in your organization. If you’re in L&D, what’s holding you back from bringing on more teams create courses in Articulate? Are there particular challenges—technical, process-related, or cultural—that make it harder to open things up? And if you have scaled and democratized course creation with Articulate beyond L&D, what’s helped it work well? We’d love to learn from your experiences; what’s working, what’s not, and what would make it easier. ~ The Articulate Research Team588Views9likes5CommentsAI Voices
Just my two cents, AI Voices were good because we didn't need to go back to our live voice to get something redone, or if we wanted to update 1 slide or add something to a presentation. Now we are seeing voices being removed so the advantage of the AI voices is reduced. I see 2 posts this morning and it's not even lunch time from people that need to make updates to 1 or 2 slides, change a word, or add something and the voice is gone. Maybe we need to look at AI again.Solved1.5KViews9likes17Comments