other
585 TopicsViewing Articulate 360 Content in SharePoint Online
Enabling Custom Scripts in SharePoint Online Custom scripts are now disabled in SharePoint Online for security reasons by default. As a result, Articulate content with the story.html file renamed to story.aspx in the published output that previously worked with SharePoint Online might not work anymore. If you don't need to track learners' progress or results, check out these free or low-cost options for web hosting. If you need to use SharePoint Online, your SharePoint admin may be able to resolve this issue by following the steps below. (Note that we don't provide support for either workaround.) As of July 10, 2024, SharePoint users will find that they are required to reenable the Custom Scripts feature every 24 hours, reverting the Custom Scripts setting to its default and disabled state. Please see Microsoft’s article on Custom Script settings for more information. Enabling Custom Script via the SharePoint Admin Center If you don't need instant access, follow these steps. Go to the SharePoint admin center and sign in with your credentials. In the sidebar to the left of the page, click Settings. (If you're using the Modern admin center, click the classic settings page hyperlink at the bottom of the Settings page.) Scroll to the Custom Script section, then select the options to Allow users to run custom script on personal sites and Allow users to run custom script on self-service created sites. Click OK to save your changes. Note that this change may take up to 24 hours to appear. Enabling Custom Script in SharePoint Online via PowerShell For instant access, follow these steps. Open Windows PowerShell with admin privileges, then run Install-Module -Name PnP.PowerShell Connect-PnPOnline -Url <url> -PnPManagementShell (replace <url> with your SharePoint URL, which will then generate a code for you to insert in your SharePoint admin center.) Run these commands in PowerShell: (replace the URL after -Url in the first command with the link to your static site collection, such as https://companyabc.sharepoint.com/sites/StaticSite). (If you need help creating a SharePoint site, refer to this article from Microsoft.) Connect-PnPOnline -Url https://yourorg.sharepoint.com/sites/StaticSite $site = Get-PnPSite Set-PnPSite -Identity $site.URL -NoScriptSite $false Your SharePoint site is almost ready to host HTML files! We just need to prepare the Articulate published output for upload. Here's how. In SharePoint, choose where you will locate this project. You can create a new folder or use the Documents location created by default with all SharePoint sites. Rename all the files with a .html extension in your unzipped published output folder to .aspx (keep the same file name). To do this, right-click the file, choose Rename, and then replace .html with .aspx. (Most projects only need to rename the analytics-frame.html and story.html files. Finally, upload the published output to your SharePoint site, then click story.aspx to launch your Articulate course. This change should take effect immediately.10KViews0likes89CommentsXLF Version 2.1.
I have subscribed to the Advance version of DeepL as a translating tool. DeepL requires an XLF 2.1. version for translation but Rise 360 only export in version 1.2. Has anyone been able to solve the problem when exporting for translation? Can Articulate update Rise export XLF files for translation to a 2.1. version? ThanksSolved4.8KViews9likes88CommentsCustomizable 3D Model Viewer in Storyline 360 Using Three.js
TLDR A 3D model viewer (GLB/GLTF and OBJ fiel formats) for Storyline 360 using Three.js. See the links below. Please check in the comments for additional updates. Updated (2025-03-08): Minor adjustments to model reloads and resource disposal. Use new project file. Demo: 3D Model Viewer https://360.articulate.com/review/content/87acc80c-2820-4182-b99b-db9e7fd60852/review Demo: 3D Model Display Customizer https://360.articulate.com/review/content/d740f374-c2ac-4ae0-92bc-255b7d35ee1a/review Introduction In my ongoing efforts to better my skills, I’ve been learning more about Three.js, a 3D animation and visualization library for the web. At its simplest, Three displays 3D models in a web browser. This is something that many Storyline users have expressed interest in but alas, it is not directly supported. Storyline actually does incorporate Three.js as its viewer for 360-degree images but otherwise does not include it as a part of its projects. This Project Since displaying graphics with Three is actually fairly easy, it seems like this is something that would have already been done. Since I couldn’t find much regarding integrating Three with Storyline however, I decided to use this as a test bed for my learning experience. As a disclaimer, I am not a programmer, so my code may be inelegant and inefficient in areas. I also know very little about 3D modeling. My design decisions were based upon what I found interesting or potentially useful and may overlook standard practices or some key features that one might expect. Feel free to comment. The Model Viewer I broke this project into two parts. Both are created within Storyline modules. One is a model viewer template that you can use to display two varieties of 3D model files (GL/GLTF and OBJ models). It accommodates a configuration option (list of variables in a trigger) which allows you to customize many aspects of how the model is displayed on your slide. You can include multiple models, each with their own configuration, and switch between them. The size of the model viewer matches the container object on your slide, so it can be sized to your needs. The template module is pretty simple, with a viewer container, some JavaScript, and a handful of triggers and variables. I’ve included the project file for the viewer. You should either be able to adapt it directly or incorporate its parts into your own projects. The Display Customizer The second part is another, more complicated Storyline module. This component can be used to customize how your model is visualized. I linked much of the viewer’s functionality to a collection of Storyline controls, spread across multiple slide layers. Once you have your model setup and adjusted to your liking, you can export a block of JavaScript that represents all of the settings used in the viewer’s configuration options. You will copy and paste this into one of your viewer’s project triggers. Combined with your model files, this enables the 3D viewer to reproduce what you designed for display on your slide. Of course, you can also manually edit the configuration options if you desire, but for anything more than minor edits, this is far easier. Due to its complexity (4000+ lines of script and several hundred variables and triggers), I have not shared the project file. I will, however, leave an active link to the published module that you can use to set up your models. The Details (for anyone who cares) Inspiration for this project came from the following sources: https://threejs.org/docs/ https://threejs-journey.com/ https://github.com/donmccurdy/three-gltf-viewer https://community.articulate.com/discussions/discuss/drag-and-drop-objects-into-storyline/994181 https://github.com/Sphinxxxx/vanilla-picker Model Viewer The viewer module consists of A web object containing your model files and some JavaScript A viewer rectangle on your slide with its accessibility text set to “glb” A few variables A few triggers, including a main JavaScript routine and some configuration options The Web Object We will use a web object to include your model files and the Three.js base code into your project. While Storyline can load a version of Three when needed, it is older and lacks many of the additional resources we need. The script in the web is a custom bundle of the current Three components we need in this project, along the js-beautify library. The functions and classes are made available as global variables under window. Using a static version ensures that everything works together even if Three issues updates that break interactions. You also will include copies of your model resources. The configuration script specifies the base model files for the viewer. Additional files are typically referenced from within the base files. It is easiest if you create a folder for each model, and place all of the related files inside that folder, inside the web object folder. The viewer supports GLB, GLTF, and OBJ models. GLB models are typically one file with everything embedded. GLTF models often have additional texture files associated with it. Preserve any file structure that came with your model (i.e., If your textures are in their own folder, leave them there. If they are at the same level as the model file, leave them there. Also don’t change any of their names. You can rename the GLTF or GLB files and their containing folder, but they must match what is listed in the configuration script. OBJ models usually require several files. Include them all unless you know they are not needed. Final renders and reference images are not normally needed. As with GLB and GLTF, OBJ model files can be renamed but must match the configuration script. There is also an MTL file that should use the same name as the OBJ file (this allows the script to find this file). Don’t rename the texture files unless you know they need to be changed. Note: If you download models from places like CG Trader, Turbo Squid, or Sketchfab then sometimes the textures are separate from the models, or the filenames don’t match what is specified within the GLTF or MTL files. You may have to manually locate and/or rename the texture files. Sometimes you might need to edit the texture specs inside MTL files as well. If you make your own models, then I’ll assume you have what you need. You can also include optional environmental textures, which can provide lighting information and visual backgrounds within the viewer. These are supported as EXR, HDR, JPEG, PNG, and GIF files. If you include these, create a folder inside your main model folder called myEnvMaps and put the required environmental texture files inside this folder. Finally, add an empty text file to the web object folder and rename it to index.html. Once the web object folder is ready, add it to your project in scene 2. Note: Anytime you change the contents of the web object folder, you need to follow ALL of the steps below. Delete the existing web object Insert the new web object (browser to the folder, set to open in new window) Move web object to bottom of timeline list Publish the single slide in scene 2. Click the Load Now button to open the web object page Copy the portion of the URL text matching story_content/WebObjects/[random characters]/ Make sure to include the trailing “/” Paste this value into the dataFolder variable The Viewer Rectangle Create a rectangle. Fill and outline don’t matter, as it will be removed when published. Right-click on the shape’s timeline entry, select accessibility, and edit the text to read glb. You can change this value in the tagViewerContainer variable. This rectangle can be any size or shape and placed wherever on the slide. Variables and Triggers Make sure all of the variables listed in the viewer template project are included in your project. There is one trigger on the slide master. It loads the JavaScript for Three (from the web object). On the base slide, there is one trigger for the main JavaScript viewer routine. For each model you wish to display, there is one additional JavaScript trigger that sets the configuration options. You can generate new text for these triggers using the display customization module. Display Customizer The viewer has many options. Most are built into the Three objects used to display the model. A few are specific to this viewer implementation. You can manually edit the configuration trigger for each model if desired, changing values to fine tune your viewer. For large scale changes or initial setup, you might want to use the display customizer module (linked above). Loading Models The interface consists of a viewport on the left and various controls on the right. To load a model, you can drag and drop one or more files or a folder onto the viewport (or drop new files later to change models). The viewer will try to find and load the model and all of it associated textures and environment files. Dropping the files is convenient as an interface, but it requires extra processing to access the files. Since some of the model files can be large, it might take several seconds before everything gets loaded. Also keep in mind that all of the processing is done in the browser on your computer. If your machine is not very robust, then processing times may be longer. If in doubt, open and watch the browser’s inspector panel console to see if there are errors related to loading the files; especially when trying to load new models. Sometimes you don’t have all the files you need or they’re in the wrong folder. You will see what files the viewer is looking for, and if they are found. If unexpected problems occur, try reloading the browser window. Feel free to comment here if you discover recurrent error conditions. Base settings The base settings panel provides the main interface. You can see and control key aspects of lighting, as well as environmental, animation, and shadow conditions. You can also adjust the viewport aspect ratio in case you need something that is not square. Lighting Unless you set up an environment to provide illumination, you will need some lights to see your model. There are four types of lighting available. Ambient is equivalent to overhead sunlight. The other three types offer up to four light sources each. The controls show the colors. The corners control specific features (see the Help button for details). Right click on each square to get additional options. Each light type has its own options. There is a color picker to set your desired color. Making changes will be immediately visible in the viewport. If you can’t see a change, you may need to adjust the intensity or the positioning of the light. There is an option for a helper, which is a visual representation of the light shape and position. Turn this on to help you set up the lights. Syncing Lights Since the viewer offers the ability to orbit the camera around your model, lighting usually remains static in relation to your model (i.e., the model and lights appear to rotate together in the viewer). A custom feature in this implementation is the ability to sync your lights to the camera so they also move around your model, creating interesting effects. This can be enabled for each individual light, in two different sync styles. Lights may be made relative to the camera position, so they appear to remain in one place in 3D space. They may also be synced in the direction of the camera, at a fixed distance. This is similar to having a flashlight trained on your model as you view it. You can also specify whether each light will generate shadows. This can add realism to your displays. Shadows require significant processing, so use them sparingly to prevent laggy performance. Other Settings Other settings, including rotation direction and speed, environment controls, intensities, and animations are available. Animations seem to work with GLB/GLTF models. OBJ models do not support animation directly. Try out the various controls on your model to see the effects. Export Settings When you have set up your model as desired, you can use the Loader Settings button to export a copy of the current settings snapshot. These include the model filenames and camera positions (like a snapshot). Make sure things are in the position that you want them to start before you click the button. You will see a long list of settings that can be highlighted and copied. This will get pasted into the options trigger in the Model Viewer module. See the triggers attached to the example buttons in the demo file. You can also load and save copies of settings as session data in your browser. This could be useful if you have commonly used settings you want to reuse, or if you want to pick up where you left off on the previous day. Note, these are local to your machine and browser. They will not be available elsewhere. You can also Apply the loaded or the default settings to the current model if desired. The Defaults when Drop Loading checkbox indicates if newly dropped model files will use the current settings or the default start-up settings, in case you prefer one over the other. Technical Notes (thanks for reading this far) Loading Files The Model Viewer uses physical model files included with your published project. This increases your project size but improves the loading speed of the models on the slide. The Display Customizer uses a file drop mechanism to make it easier to switch between random models. This works by parsing through the files or folders dropped and converting them into URL blobs. The blobs act like internal web addresses pointing to each of your files. Large files, especially environment textures or complex models, may take a bit to fully process and load (the Burger model for example). When you utilize the Model viewer for your final product, performance should be better since you only need a single set of files, and they are included locally. You could potentially modify the Viewer script to allow for loading from external URLs rather than local files, but I have not done that yet. Environments Environment textures are 360-degree images, similar to what you use in Storyline. The format can be EXR, HDR, JPEG, PNG, or GIF. This only supports equirectangular, 2:1 images. EXR and HDR files tend to be very large, so keep that in mind. When using an environment Three infers lighting information from the selected image, making external lights unnecessary. If you want to use additional lights, you will need to lower the Environment Intensity setting so the lights don’t get washed out. The environment does not need to be visible to have an effect. If you want it visualized, then the image will replace the background color. Since the focus is really on your model, it is normal for the environment background to be somewhat blurred. Using low resolution images as textures will make this much more pronounced. If you wanted to have crisp images in the background, I believe you would need to modify the script to project the image onto a sphere instead, as you would when displaying 360-degree images (maybe I’ll add this later). OBJ Models My understanding is limited, but environments don’t project properly (or at all) onto imported OBJ models. You can display them, but they provide no lighting effects. Supposedly you can apply the environment textures to the meshes within the model, but I couldn’t get that to work. My approach, awkward but I like the outcome, is to replace all of the meshes in the loaded OBJ model with new meshes, apply the existing settings, and make some adjustments to shine and gloss settings on the fly. This results in a final model that responds to your environment lighting. I found that the test models I downloaded all seemed to come out super glossy. I added a few simple steps to calculate relative gloss levels between the model components and applied an overall adjustment to set it to a reasonable level. I was happy with the test results. Your mileage may vary. If your OBJ models don’t come out as you expected, you may need to adjust the MTL file to fine tune the output. I’ve also found that many OBJ model files (the MTL in particular) contain erroneous paths or incorrect textures assigned to material properties. If your model looks all white, black, grey or some odd color, check the MTL file (it’s plain text) and verify the data. Fix any broken paths, check to see if textures are supposed to be in their own directory, and make sure the correct textures are assigned. Particularly the lines starting with “map_”. These assign the texture images to material properties. Look at the actual texture images, the MTL file, and the Wavefront reference linked below. Play around with different settings to see if you can get it to look like it’s supposed to. See this link for more information: https://en.wikipedia.org/wiki/Wavefront_.obj_file. Lastly, the OBJ models don’t support animations like GLB/GLTF models. Even if your source says the model is animated, that may only apply to other model formats. You may be able to convert another animated version to a GLB format online, or by using Blender. Performance Remember that JavaScript runs on the user’s machine. Everything that Three and this viewer script does happens locally. Don’t overburden your model viewer with an abundance of processing requirements if you don’t think the end users’ machine can handle it. Light syncing and shadow display require extra processing. If you use them, do so sparingly to make an impactful point. Not every light needs a shadow to look realistic. Also, only include the files that are really needed in the final product. Extra environment textures just take up room and slow down website loading times. Excessively high-resolution images do the same and may not be needed. Downloaded models may include extraneous files unrelated to display needs. If you’re not sure they are needed, try removing them and see if everything still works. Only include those that are required. Customization There is a Storyline variable in the project called viewer. This holds a reference to the model viewer. Many of the settings seen in the Display Customizer can be accessed and modified using this variable. If you desire, you could add your own script that loads this viewer object and allows you to directly change settings. Things like turning lights on or off, changing colors, changing positions, starting or stopping rotation or animation, and moving the camera are all easily modifiable, giving you extra control on how your model behaves. You will need to reference the configuration settings script, the main viewer JavaScript trigger, and the Three documentation website (linked above) to understand the possibilities. Limitations There are a lot of moving parts in this project (quite literally with the 3D models). The Display Customizer module is quite complicated, and building something like this inside Storyline is not recommended for the faint of heart. It required 4 weeks, on and off, from concept to this beta version. There are undoubtedly logic errors and code conflicts that I have not discovered yet. This project is provided as is, with no guarantees. If you experience an issue, post a comment. I will look into it eventually and fix it if I can. I may post updates if I fix bugs or add any features. The models included as examples were all available for free from the CG Trader, Turbo Squid, or Sketchfab websites. You can download others or use your own. I could not get FBX models to work properly and lost interest in them. THREE seems to work best with GLB/GLTF models. I like the OBJ models as well since they are easy to manually examine and modify. Additional FIles Web object used in project file (holds Three.js and the example models. https://paedagogus.org/3DModelViewer/Web_Object.zip Additional sample models to experiment with. https://paedagogus.org/3DModelViewer/Other_Sample_Models.zip3.7KViews9likes11CommentsPrompt for "full body character shots" for the AI Image generator
Greetings, Simple question, hopefully, how can I tell the AI image generator to "give me a full body shot" of a character I'm listing traits for? I'm running into this issue and it drives me crazy: everytime I want Storyline to generate a character, of any kind, with various prompts, using the AI image generator, it cannot or heavily struggles to get me 4 "full body shots". I'm always asking for the portrait format, not square or landscape. In photography, a full body shot is "from head to toe, completely framing the subject". Right now, unless I'm adding "walking" to my prompts, I'm getting Italian shots (head to pelvis), portraits and close-ups. If I write "standing", "full body shot" and whatnot, it doesn't generate complete characters. Please note for traits, be eyes, hair, eyes, skin color, outfits and such, Articulate's AI is... pretty spot on. It's not perfect and there are mishaps, but design-wise, it gets the job done. However, if I ask for a character, I do expect a full body shot unless I'm asking specific framing prompts. I currently have the Dec. 17th 2025 version of Storyline (3.107.35974.0), if that can tell you how the AI was fine-tuned by now. I know there's a new update today, but... right now I'm using the December version, since I needed to update Storyline right away a few days ago and I can wait for later versions. Thanks in advance and have a nice day :)3.6KViews0likes2CommentsChanging Data Centre from US to EU
Dear Community/Support Team, I need adivce. My subscription is expiring in a few weeks, and I would like to renew it. However, I need to change my data center from the US to the EU (we are based in the EU, yet for some reason, our account is allocated to the US data center) as I’m experiencing issues sharing files with external partners. Could you please clarify the process for making this change? I was informed that one option is to let the account expire and start a new one, but I’m concerned about what will happen to my Rise files and other content. I’d really appreciate your guidance on the best way to proceed. Thank you in advance for your help.2.7KViews1like43CommentsArticulate Sign in "Couldn't Open Port"
Launched my Storyline 360 desktop app and was prompted to sign in. Typically clicking 'sign-in' launches a browser window where I sign in and then have access on the desktop as well. Today I received the attached message in the application when I clicked sign-in. "Couldn't Open Port" "Unable to open a port for authentication responses." Steps taken: Closed out and relaunched desktop application Restarted entire computer and relaunched Went directly to Articulate360 website to sign in Got into website, but did not connect me to the desktop app. Peers in my organization are not experiencing the same issue. Thoughts? Thanks!2.1KViews0likes13CommentsSimplified Approach to Adding Transparent Videos to Storyline
Demo: https://360.articulate.com/review/content/6534ea7f-0df5-4a02-813b-70811843fbf0/review Updated: Added an option for overall video transparency. Allows for see-through videos. For example, if you wanted to project them against a surface, like a wall, or overlay them onto a graphic background. Disclaimer Some time ago, Matt Kurtin published some instructions on adding webM videos to storyline to support transparent videos. Other discussions have also addressed this issue, utilizing web objects to contain transparent videos inside Storyline. I typically used web object for my projects, but recently developed an approach very similar to Matt's to make handling transparent videos more flexible. See: https://www.innovativelg.com/resources/enabling-videos-with-transparent-backgrounds-in-articulate-storyline/ I had not actually read his article before making this. I do want to acknowledge his work though. My approach expands upon the concept somewhat. Transparency on the web Videos with transparent videos are popular online. They are great for overlaying action onto otherwise static backgrounds. Support for transparent video formats is limited by your browser, however. A widely supported, but quite old format is webM. This uses the V9 codec, and it supports an alpha channel, which provides the transparency option. It is supported by the primary Windows browsers (Chrome, Firefox, Edge, etc.). These browsers on a Mac also support webM. The Safari browser on a Mac does not support webM, however. It supports an HEVC format that can be packaged as an MP4. Incidentally, the codec is tied to Mac hardware, so you cannot generate transparent video in this format unless you have Mac hardware (unfortunately for Windows users). To fully support both platforms, you need to offer both formats. Storyline and Transparency Storyline currently does not directly support video transparency. Import options are limited and any inserted videos are converted to a uniform format during publication. Even if you are able to insert a video that includes an alpha channel, it will be lost when published. The Web Object Approach My traditional approach to inserting transparent videos into Storyline has been to load them into web objects and display them as if they were their own webpages. This way, I could use any format you wanted. I would place the video files and an index.html containing the webpage structure into the web object. Controlling these from Storyline could be difficult but was doable. The biggest problem with web objects, however, is that they don’t render during the design phase, and properly sizing what they contained could be a hassle, requiring a lot of trial and error. Overall, using web objects was fairly straightforward, but cumbersome. An Alternative Approach Here, I offer another approach to inserting transparent videos into Storyline. This method still uses web objects to convey the video files into the Storyline project but is more friendly on the design side. Technically, you could also modify this solution to accommodate using the URLs of web-hosted videos and eliminate the web objects all together. I’ll leave that to you to play with. For this method, we insert a video (any video clip will do, since we’re not really using it) into our slide in one of the usual manners. I use the default Storyline settings of Show Video in Slide, Play Automatically, and Show No Controls. We will then simply replace the video source specified by Storyline with one of our own, using our transparent video and some JavaScript. Since this is done in real-time, after the project is published, Storyline does not prevent us from utilizing our transparent video formats. As long as we have access to the video files, we can use them instead. I mentioned that any video can be inserted to start. You should use a video with the same dimensions as your desired video, so the proportions are correct. You could also just resize the video placeholder to the appropriate dimensions. You can use a version of your actual video if you want. I just create a very short clip from my video, maybe the first few frames, and insert that. That way it remains small. It’s just a placeholder after all. Benefits The benefit of this approach is that the video is now easy to reposition and resize on your slide, without having to hassle with modifying and possibly re-inserting your web object each time. Any changes to the video’ size and position will be reflected in the transparent video that is swapped in to replace it. You also still have control over the video player through Storyline, without having to take extra steps. Making it Work Add a Poster: On the design side, in Storyline we can specify the image displayed by the inserted video placeholder. You just right click the video and click on Set Poster Frame. Create an image (for example, a single frame of your video) that is saved as a transparent .png file. Make the image the same dimensions as your video. This way, the displayed video placeholder will accurately represent your video. Accessibility Tag: You will need to edit the Accessibility tag for the video in SL (right click on the video in the timeline). Make the tag the same as the actual filename of your transparent video, without the extension. For example, for “Petals.webm”, just use Petals as the tag (no quotes). If you include both a .webm and an .mp4 version of your video file, make sure the base filename is the same. Create Transparent Videos: You need to have transparent videos ready. You can make your own or convert some green screen videos that can be downloaded from the web or through the Storyline media library. You will need a way to key out the green screen and then convert the video formats to webM (from Chrome, etc.) or HEVC MP4 (for Safari). If you have Adobe products, then After Effects and Premiere would work. You can also use the free version of Davinci Resolve to remove green screen in videos. Search for “3D Keyer Davinci Resolve” on YouTube for help. Save in ProRes format with the include alpha channel option checked. Output will be a .MOV file. These are very large, which is why it’s best to convert them into HEVC MP4s with a smaller size for web use, if you are supporting Safari. If you have access to a Mac, you might be able to use something like Rotato Converter to create both WEBM and HEVC MP4 formats. For shorter clips, you could use a free online converter (for example, https://www.aconvert.com/video/mov-to-webm/). This will convert the transparent MOV file into a webM file. You can also adjust the bitrate. Adobe Premiere can export webM with alpha using a plugin (https://www.fnord.com/). This is what I use to create webM files, make short placeholder clips, and extract a single frame to use as the poster image. Create the Web Object: The transparent video files should have the same base name, one that matches the accessibility tag you assign to the Storyline video. These go into the web object folder, along with an empty index.html file. This folder gets inserted into your Storyline project (say in a separate scene). See this discussion for more details on getting and setting the woFolder name inside Storyline. Notes on accessing files inside a web object: See the last section of this article Set the vidParameters Variable: This passes the details to the JavaScript that swaps the video on your slide. It specifies the identifying tag and other features such as autoplay, muting, and time indexes. It uses a string of text with commas separating each field. The script and this variable set up the initial swap of video when your slide loads and can also control your video further while your slide is visible, if you desire. See slide #1 in the demo to see how this works. The tag name is required, all the other fields are optional. Trigger the Script: Trigger the JavaScript to create the initial swap. For control later, place a “C” in the second field, and model the variable string as shown on Slide #1. Slide #2 shows a very simple example, with the minimum elements needed to make the video swap work. The buttons shown on the slide are optional. It should work on Chrome, Firefox, etc. browsers (I did not include the transparent Safari file). You can find the clip in Storyline by searching for “petals green” under insert video. Slide #1 should work on Safari as well, although I did not have a Mac handy to check. The clip was from another project. I’ve attached a sample .story file and the web object folder used in the demo. The script is commented. Feel free to modify it as you see fit. Still can't attach the zip file. https://paedagogus.org/VidSwapRsc/woFolder+Project.zip1.9KViews4likes4CommentsEmbed Youtube Video - Error 153
Hello, Has something changed in Storyline?! I'm trying to embed a YouTube video using "iframe". I'm copying the embed code from YouTube, but it says 'Watch video on Youtube - Erro 153...'. I used: <iframe width="560" height="315" src="https://www.youtube.com/embed/dqaN76shzJE?si=F_NwSZruLu5BJAU6" title="YouTube video player" frameborder="0" allow="accelerometer; autoplay; clipboard-write; encrypted-media; gyroscope; picture-in-picture; web-share" referrerpolicy="strict-origin-when-cross-origin" allowfullscreen></iframe> Any/all help would be appreciated. Thanks1.8KViews0likes10CommentsBrief flash between slide layers
Hello, I was wondering if anyone knows what I could do to resolve this issue. I keep seeing all the items briefly flash at the beginning of every slide layer. I am not sure why this is. I've made sure these items do not have animations. I've made sure all transitions are "none." The slide properties that are currently checked are "hide other slide layers," "hide objects on base layer," and "prevent the user from clicking on other layer." The flashing is disruptive to the flow of the course because it makes it look like a slide header is reappearing over and over again when in fact, it is not. Could someone please give advice? Thank you!Solved1.6KViews0likes40CommentsENTRIES ARE NOW CLOSED: Where in the World Is Articuland? 🌍🕵️♀️
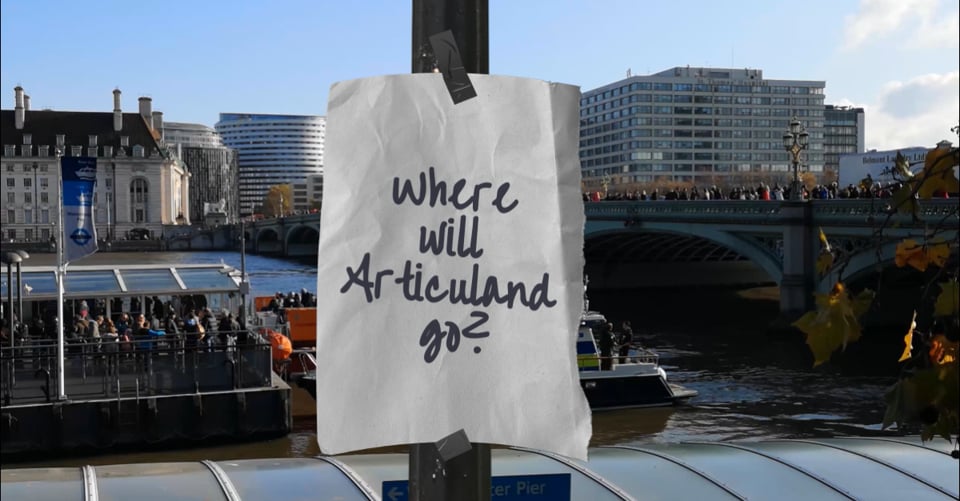
Articuland is going international in 2026, and we’re taking the experience to three cities around the world. Before we reveal where we’re headed, let’s play a game. 🕵️♀️ Your challenge: Can you correctly identify the cities based on a few clues? Below, you’ll find the three stops on our global Articuland tour. Each stop comes with three hints. 💬 Drop where you think Articuland is coming in the comments. 🎁 What’s in it for you? The first 10 people to correctly identify a city will receive a 20% off code for an Articuland ticket to the location of their choosing. Everyone who correctly identifies at least one city will be entered into a random drawing to win one Articuland ticket to the location of their choosing. ⏰ Important dates Submissions close: March 23 at 12 pm ET Cities + winners revealed: March 24 👉 One entry per person. Ticket prize covers admission only (no airfare or hotel). Official Rules apply. Ready to put your detective skills to the test? Let’s see what you’ve got 🧠🌍 🕵️♀️ Stop One Rain is always a possibility A city of iconic bridges and neighborhoods Home to a famous underground 🕵️♂️ Stop Two A strong connection to bold, recognizable art and architecture A city where design shows up everywhere Sun, sea, and streets built for wandering 🕵️♀️ Stop Three A city where you hear many languages in one day A skyline often used in movies and TV Known for neighborhoods with their own personalities Think you’ve cracked it? 👀 Tag a friend, compare cities, and see who gets it right before the big reveal. And if you’re already thinking ahead, tickets for our U.S. Articuland events are on sale now, with global event registration opening soon. More details coming your way on March 24! Until then… happy geography lesson 🌍💛1.3KViews1like24Comments