3 Ways to Boost E-Learning Accessibility with Closed Captions

For many organizations, an important aspect of e-learning development is to make course modules more accessible to comply with Section 508 or WCAG 2.0 guidelines. One key way to boost the accessibility of your project is to add closed captioning so people with hearing difficulties can still get all of the information offered in your course.
In this post, I’ve included three ways to add closed captions to your project as well as the pros and cons of each method. And I’ve included a published example and the source file to help you visualize each method. Take a moment to explore this example and then I’ll walk you through each approach to adding closed captioning.
Use Markers
The markers in Articulate Storyline 2 are quite versatile and are the simplest way to add your audio text to the screen. Here’s what you need to do:
Go to the Insert tab and then the Markers area:

Select your icon (I like the speech bubble):

Then click on the slide where you want to place the marker and add your audio text to the label:

Depending on where you place your marker on the slide, you may need to adjust the size and position of the label.
Pros: A quick and easy way to add the audio text to each screen.
Cons: All the text is displayed at the same time, which means learners must read through all of the text while simultaneously keeping up with what’s happening on the screen. If you keep the label small, learners will need to use the scroll bar to move through the text—which is fine if your learners use the mouse but order to meet the accessibility requirements, learners must be able to navigate through the course using the keyboard (tab key, enter key and arrow keys). So learners who navigate only with the keyboard won’t be able to read all of the text in the label because the scroll bars can’t be moved using keyboard commands. Additionally, if there’s a lot of audio, the large label size could obstruct the screen and cause learners to miss essential on-screen information beneath it.
Use the Notes Panel
This is another fairly simple method to use, but you will have to go through a few steps to set everything up. Here’s what you need to do:
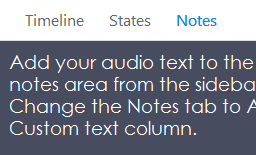
In slide view, go to the Notes area and add your audio text to each slide:
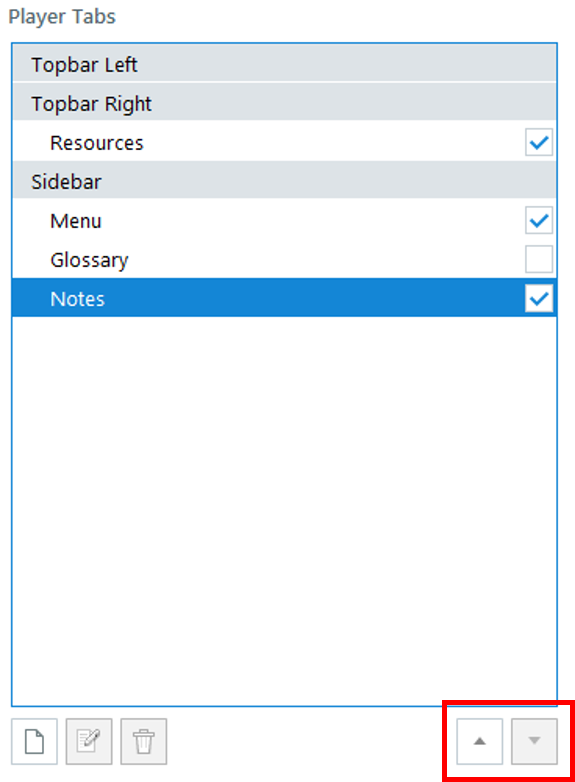
Then go to Player settings from the Home tab:

In the Player Tabs area, check the box next to Notes (you can also use the arrows to move the notes from the Sidebar to the Topbar):
Anything in the Notes area will now be visible. However, it’s a good idea to change the name to something meaningful for learners. In this example, you’ll want to make sure they know this is where they can access the audio transcript, so you could change it to “Audio.”
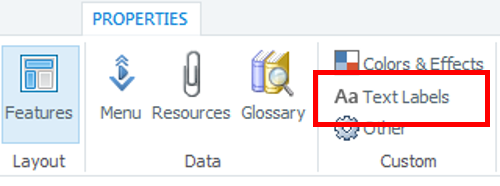
While still in the Player settings, go to the Text Labels area:
Then scroll down to number 42, the Notes Tab:
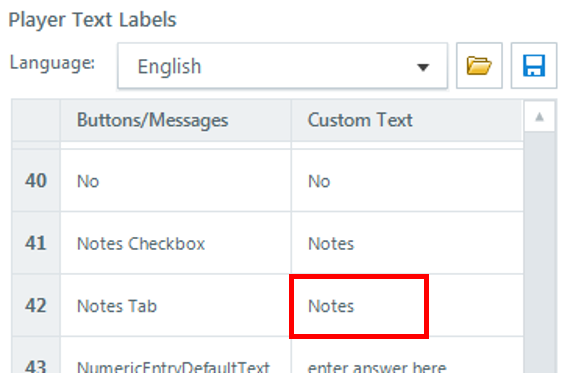
You can rename the Custom Text (Notes) by double-clicking on the word and changing it to something the user can easily identify—for example, Audio:
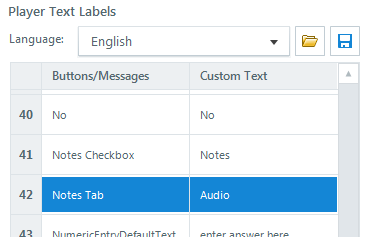
Then select Update Preview to see the change, followed by OK to save the changes.
Pros: Fairly easy to set up. You have some flexibility on what you call the tab and where you display it.
Cons: All the text is displayed at the same time, and if there’s a lot of text, a scroll bar appears. Similar to with markers, this doesn’t work for learners who use only the keyboard to navigate the course.
Use Variables
Though this is the most complex of the three methods, in my opinion it produces the best result because the captions are dynamic and are displayed in sync with the audio rather than all at once.
Before you begin, check out this handy post Tom Kuhlmann wrote about doing this with video clips. I’ve used a similar method here, but I’ve included a true/false variable to allow the user to turn the captioning on and a text variable to display my audio text.
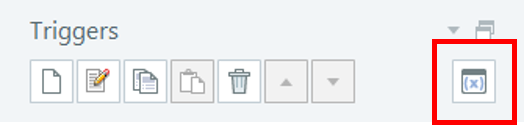
The first thing is to add the variables to the project by going to the Manage Project Variables area near the Triggers panel (it’s the little x in brackets to the right of the trigger buttons):
Then, when the project variables window opens, add the variables by clicking on the blue plus symbol in the bottom left. I’ve used a text variable called “Caption,” which will display my audio text, and a true/false variable, “CaptionOn,” which will determine whether my text is visible:

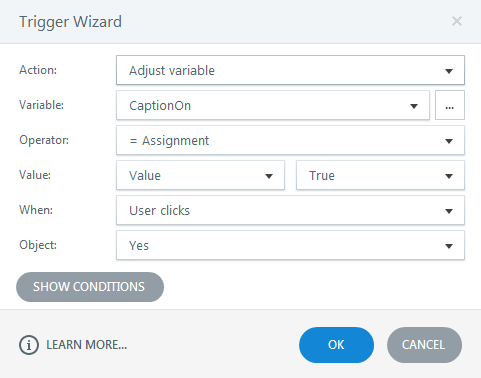
On a slide I added two buttons—“Yes” and “No”—asked learners whether they’d like to use closed captions for the module. I also added the following trigger to this slide to make the captions visible if the user selects “Yes”:
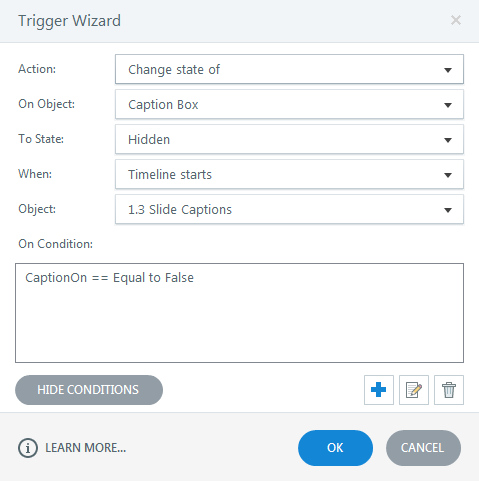
On the next slide I added a black rectangle with a reference to my text variable:

This rectangle has a Change of State trigger on it, which means the rectangle will be hidden if learners select “No” on the previous slide (and visible if they select “Yes”):
Next, I took my audio script and broke it into small chunks. I used Cue Points to mark the start of each piece of text I wanted to display. Then I added triggers like this for each chunk:
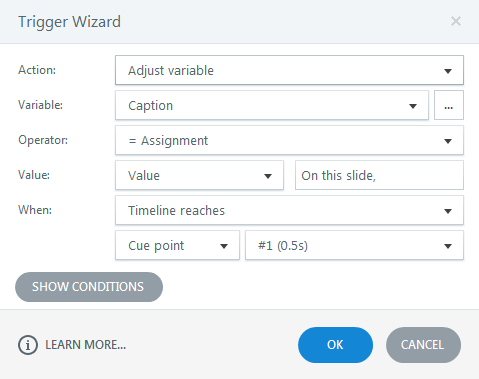
For each trigger, the value becomes the piece of text you want to display within the rectangle.
Pros: Users can turn captions on or off. Creates a dynamic closed-captioning effect.
Cons: Takes longer to create.
There you have it! Three awesome ways to add an audio transcript to your Storyline 2 project. If you have other ways to add audio text to your project, please let me know in the comments below.
26 Comments
Hi Matt, I'm curious if you have encountered this problem. I'm using Storyline 1 and set up all my captions using the variables method you mentioned. This worked great until I had feedback they were sometimes out of sync. I discovered that if I let people use the video tools (that you could turn on when inserting a video) the video would pause but the timeline and the captions would keep playing. To avoid this I started using the video tools on the player but found that people could still click on the actual video which again paused the video but not the timeline and captions. I eventually had to go with building captions in Camtasia and importing the output as a webobject, which has had it's own set of issues but worked out better as a whole. Have you had this problem and did yo... Expand
Hey Kat, Videos can be tricky as the captions are synced to the timeline and what Preston and Tim suggest would be a workaround. Another option could be this: Insert your video to play automatically (and have no controls) and sync your captions to cue points. Then place a hotspot over your video (hotspot 1). Now add a layer (I'll call it Stop) and set the properties to 'Pause timeline on the base layer' Add another hotspot (hotspot 2) that covers your video along with two triggers - Hide this layer when user clicks hotspot 2 and Play media when user clicks hotspot 2. On the base layer add two triggers - Show layer Stop when the timeline starts and also show layer Stop when user clicks the hotspot 1. The reason I'd have the layer showing initially is that the user will be i... Expand