Distributing an Audio File Across Multiple Slides
Articulate Presenter ’13 typically works with audio on a slide-by-slide basis, meaning each slide contains the audio files used on that slide. But sometimes all the narration for your course ends up in a single audio file, or you want to move an audio file from one slide to multiple destinations, or you simply need to change the timing of your transitions. In these types of scenarios, you can use Presenter’s built-in audio editor to quickly and easily parse your audio and manage your transitions.
Here’s a quick video that shows you how:
Here are the steps for the video tutorial:
Step 1: Import the audio file
If you haven’t already done so, import your audio file into the first slide that should have narration.
Step 2: Split the narration across multiple slides
Once you’ve imported your narration into one slide, you’re ready to distribute it across the other slides.
-
Go to the Articulate tab on the PowerPoint ribbon and click Audio Editor.

-
From within the audio editor, select the thumbnail in the left navigation pane for the slide where you imported the audio file.

-
If you already know where you want to split the audio file, click in the timeline to place the playead (red vertical line) at the location where you want the next slide to begin.
If you’re not sure where the next slide should begin, you can simply use the Play button to listen to your narration, and the playhead will begin to move across the waveform. When the narration reaches the point where the next slide should begin, click the Pause button.
-
With the playhead located at the point where you want the next slide to begin, click Set Next Slide on the ribbon. The slide marker (gray vertical line) for the next slide will move back to the point on the waveform where the playhead is paused, effectively splitting the audio file between slides.

- Repeat steps 3 and 4 until you've finished splitting the audio across the appropriate number of slides.
- Click Save & Close.


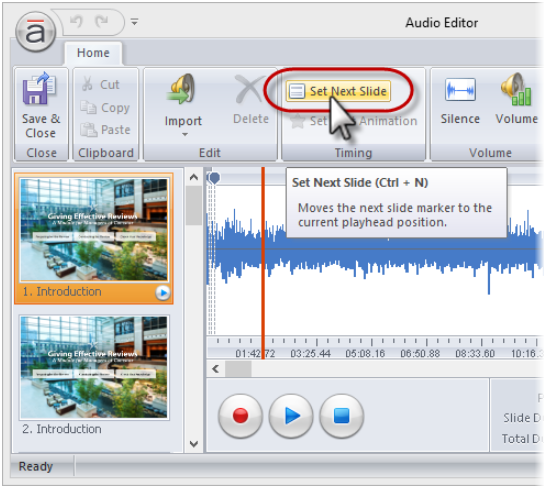
NOTE: You can also click the Set Next Slide button or use the keyboard shortcut (CTRL+N) without pausing the playback.
Using the Audio Editor to Fine-Tune Audio and Transitions
It's also super easy to tweak slide and animation timings in the audio editor. You can adjust slide and animation markers by dragging them left or right along the waveform.

Slide markers (gray vertical lines) indicate where slides begin. Animation markers (blue vertical lines) indicate where “on click” animations occur.
Post written by Mike Taylor
If you want to try this yourself but don’t have Studio ’13, no problem. Just sign up for a fully functional, free 30-day trial. And don’t forget to post your questions and comments in the forums! We’re here to help. For more e-learning tips, examples, and downloads, follow us on Twitter.
9 Comments