PowerPoint Template Tips: Placeholder Graphics

How to Ensure Consistent Placement of Objects
One of my favorite features in PowerPoint is the ability to make predefined layouts for text, pictures, and media to guide course production. PowerPoint calls them placeholders, and there’s no better tool or method for ensuring consistent layouts in your course designs. We’ll start with text placeholders for heading and paragraph text and then look at picture placeholders for managing images.
Step One:
In the example below, this slide design uses a common TLIR layout (text on the left and image on the right) for most of the slides. Two types of objects benefit from placeholders: (1) the text (heading and paragraph) needs placeholders to ensure the font size, color, and placement are retained; and (2) the computer graphic needs an image placeholder so the screenshot is always inserted in the correct place.
So, jump into your slide master by going up to View > Slide Master.

Step Two:
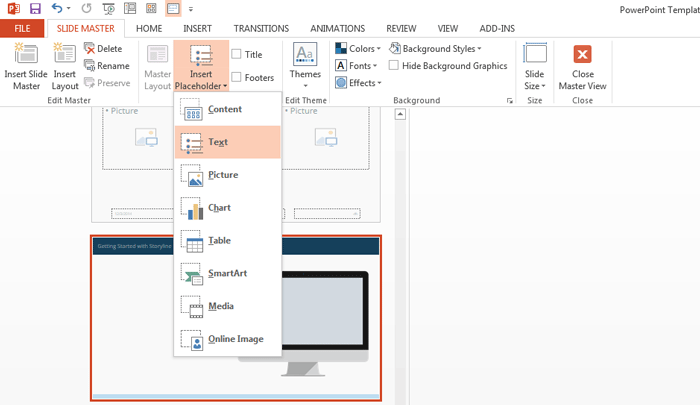
Once you’re in Slide Master view, you can create the placeholders for just about any kind of slide object. For this example, we’ll add two text placeholders (one for the heading text and one for the paragraph text) and one picture placeholder.
Let’s start by adding the text placeholders, beginning with the heading text. In the Slide Master view, click Insert Placeholder > Text to bring up a placeholder textbox, then click-drag in your slide to create the text placeholder.
To streamline your text placeholder, you will want to get rid of the bulleted text and sublevel text that comes with the default text placeholder. But that’s an easy fix. Click the text placeholder box and go up to Home > Paragraph and click the Bullets icon to remove the bullet formatting. Since this is your heading placeholder, you don’t really need five levels of text in the placeholder. Select all the text in the placeholder and type “Slide h2 title goes here” to customize the placeholder message. Finally, customize the text placeholder by changing the font style, color, and size for the heading font. Repeat the same steps to add the paragraph text placeholder.

Step Three:
We want the image placeholder to fit over the monitor, so go to Slide Master > Insert Placeholder > Picture and drag a rectangle selection around the inside of the monitor. Don’t worry about perfect alignment; you can always resize the placeholder. Bonus tip: If you press and hold the Ctrl key and scroll your mouse wheel up, you can zoom in on your currently selected object. Once you’re finished resizing your picture placeholder, click Close Master view to return to normal slide view.

Step Four:
You now have a custom slide template that can be duplicated and modified for other layouts. To try out your slide layout, right-click the slide thumbnail in the Slide Navigation Pane and select the layout you just created. In the text placeholders, type in some text for your heading and paragraph text. Next, try out your picture placeholder by clicking the picture icon. You can edit your picture by right-clicking the image and selecting Crop from the menu.

Whether you’re building custom templates or just trying to help your SMEs or clients maintain consistency, there’s no better way than PowerPoint’s placeholders.
Looking for more PowerPoint Tutorials?

Essential PowerPoint Skills for E-Learning Designers
Ready to move beyond PowerPoint for your online training? See what all the buzz is about and sign up for a free trial of Rise.com, the all-in-one system that makes online training easy to create, enjoyable to take, and simple to manage. Have questions? Please leave them in the comments.
4 Comments