Why and How to Use Hyperlinks in PowerPoint

Hyperlinks are to online content what a doorway is to a room: they give you a visual prompt that says “there’s more to see here, come on in!” For online content, those visual prompts can take the form of underlined text (usually a different color than the rest of the surrounding text), images, buttons, or other features. When a user mouses over or clicks on these hyperlinks, they’re shown related content. To revisit my doorway metaphor, hyperlinks beckon your audience to take a self-guided tour, instead of making them wait for you to act as their guide.
It’s that nudge to interact with content that makes hyperlinks such an important part of e-learning. With hyperlinks, you can easily make your content more engaging and inviting to learners. Instead of squishing all the relevant text onto a single screen, you can use hyperlinks to add important content to new slides. That means folks can click on a button, a picture, or text, for instance, to be taken directly to the additional information they need.
If you’re building your course in PowerPoint, you can use hyperlinks to jump to:
- Other slides in your presentation file
- A web page or another file
- A new presentation
- A new email message
Linking to other slides in your presentation means you can use PowerPoint to create simple branched scenarios, like this Workplace Scenario, and other interactive experiences, like this tabs interaction. With the ability to link to other files or web pages, you can also use hyperlinks to enrich a user’s experience by referencing source material or jobs aids and other supporting documentation. There are oodles of creative possibilities!
Best of all, hyperlinks are quick and easy to set up in PowerPoint. Let’s take a closer look at what’s involved in creating a hyperlink, as well as some pro tips and considerations for using hyperlinks in your PowerPoint projects.
Creating a Hyperlink
Step 1: Start by opening up your PowerPoint presentation and navigating to the slide where you want to add a link.
You can add hyperlinks to almost any object on your slide, including a text box (or text placeholder), a shape, a SmartArt object, or an image. You can’t add hyperlinks to things like video or embedded charts and graphs, but you can place a shape with a 100% transparency fill color over the tops of such objects and assign the hyperlink to that shape instead. For more details on this trick, check out this article from Tom Kuhlmann.
Step 2: With the object selected, you can either hit CTRL+K or right-click your mouse and navigate to Link...
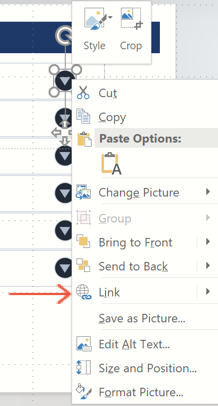
Or, if you prefer to navigate using menus, you can click on the Insert menu and select Link.

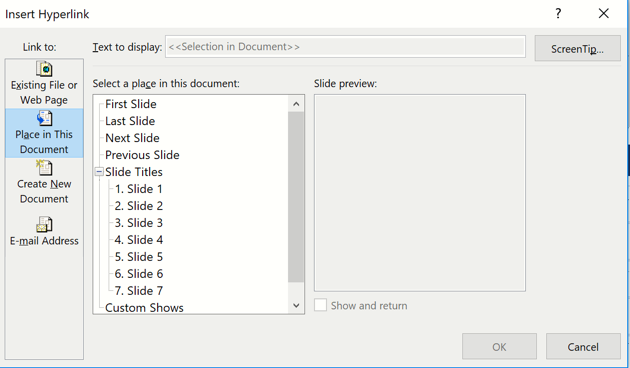
Step 3: From the Insert Hyperlink dialog, choose from one of the following options.
- Existing File or Web Page: links to a file, like an Excel spreadsheet, or to a web page.
- Place in This Document: links to another slide in your presentation.
- Create New Document: triggers the creation of a new document in the folder as the current presentation file.
- E-mail Address: triggers a new email.
Step 4: Now it’s time to add the link using one of the following options:
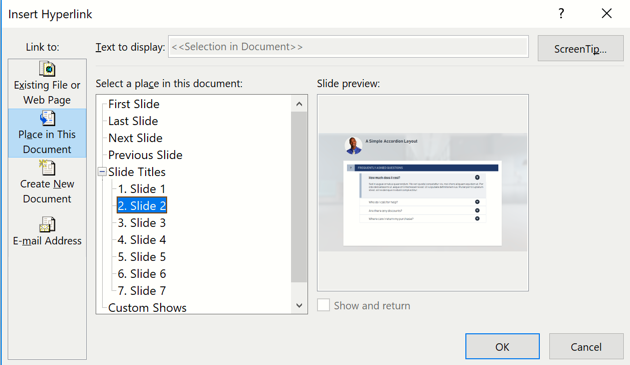
- If you’d like to link to another slide in your presentation—say, to create a simple branched scenario—you’ll select the target slide from the list of slides on the left of the Insert Hyperlink pop-up. PowerPoint also gives you a slide preview to the right of the selection pane so you can clearly see which slide you’re choosing.
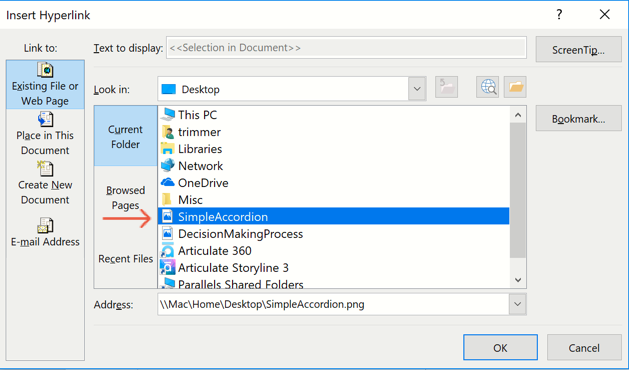
- If you’re linking to another file, you’ll want to navigate to the file’s location on your computer.
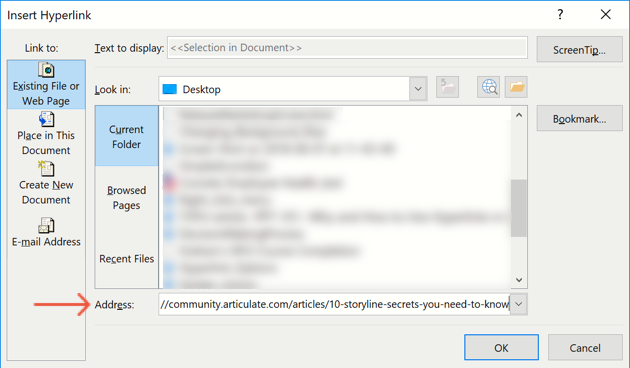
- If you’d like to link to a web page, enter the URL for the website in the address box.
- If you’re trying to create a link that triggers the opening of a new email, select E-mail Address from the “Link to” options and enter an email address. You can also enter a subject line for the email if you’d like, but it’s optional.

Step 5: Click OK to apply the hyperlink to the selected object.
And that’s all there is to it! You’ve just added a hyperlink to your PowerPoint project.
Pro Tips
As you can see, hyperlinking is pretty easy and quite powerful, but there are a few things to keep in mind when adding them to your PowerPoint projects. Let’s walk through a few of them.
Hyperlinks will only work in Slide Show view in PowerPoint.
Done adding hyperlinks to your presentation? Not so fast! Take a moment to click Slide Show under the View menu and give your hyperlinks a quick click to make sure they’re pointing to the correct destination.
Also, if you’re importing a PowerPoint presentation with hyperlinks into an e-learning authoring tool like Articulate Studio 360 or Articulate Storyline 360, keep in mind that your hyperlinks won’t necessarily work in Preview and may not work at all, depending on how your LMS functions. It’s always a good idea to publish your finished project and upload it to your web server or LMS for testing. Testing your project in the environment your audience will ultimately access it from is the best way to know what works and what doesn't.
The target of your hyperlink must be accessible.
Hyperlinking to a web page or to another presentation? Placing linked documents into a network directory (i.e., not saved locally on your hard drive in the same folder as your presentation)—or linking to a web page—will require a solid internet connection to work properly.
Also, make sure you don’t rename, move, or delete any linked files in your presentation. Doing so will cause any links in your presentation to break.
You can control the color of hyperlinks.
If you’ve selected the text inside a text box and applied a hyperlink to it, you may have noticed that this resulted in the text being underlined and a different color. If you don’t like that color you can easily change it in PowerPoint.
|
Before
|
After
|
Hyperlink color is located in your project’s color scheme. You can access and change the color scheme by clicking on the Design menu, selecting Colors, and then Customize Colors. Here’s a quick GIF to show you exactly where to find this option.
You can easily add hyperlinks to master slides.
When you’re working with the same slide layout throughout your presentation, it makes more sense to add any hyperlinked objects to the master slide, rather than copying and pasting that link to every slide in your project. Not only does this save you a lot of work, it makes it easier to maintain in the event that you need to update the link later.
For more on working with master slides in PowerPoint, don’t miss Slide Master View: A Big E-Learning Time Saver.
More Reading
Interested in building more PowerPoint skills or adding more interactivity to your e-learning presentations? Check out all the great how-to resources and help in the E-Learning Heroes community. Here’s a small sampling of the many helpful articles available on this topic:
- Affordance: What Does It Mean for E-Learning? by Nicole Legault
- Building Interactive Scenarios in PowerPoint by Tom Kuhlmann
- Presenter 360: Adding Interactivity with Hyperlinks and Branching
- Presenter 360: Adding Videos & Web Objects
- 5 Essential Rapid E-Learning Tips by Tom Kuhlmann
For additional valuable pointers on using PowerPoint for e-learning, check out Dr. Jane Bozarth’s book, Better Than Bullet Points: Creating Engaging E-Learning with PowerPoint.
Ready to move beyond PowerPoint for your online training? See what all the buzz is about and sign up for a free trial of Rise.com, the all-in-one system that makes online training easy to create, enjoyable to take, and simple to manage. Have questions? Please leave them in the comments.
1 Comment