How to Quickly Remove the Background from an Image Using PowerPoint
Every once in awhile, I like to dig through my archives and look at projects from the early years of my e-learning career. Here’s a slide from a course I created about 12 years ago:

Notice anything odd about it? Yeah, it’s not the most innovative layout or color scheme. But what really jumps out at me is how weird it looks having that real estate agent floating in a white rectangle on an otherwise blue background.
So I couldn’t resist; I decided to fire up PowerPoint and give this slide a little visual design makeover. Now let’s compare my original version, above, to the one I created today, below.

That’s better, right? All it took was a little creativity and some PowerPoint magic!
What exactly did I do and how did I do it? For starters, I removed the white background on the real estate agent’s image to blend her into the overall composition of my slide. In the new version, she’s grounded (not floating), and she gives the slide some depth and dimension against the blurred background. She also looks purposeful, not just decorative.
But the best part about removing backgrounds from images is how easy it is to do in PowerPoint. Let’s walk through the process, step by step:
1. Open up PowerPoint.
2. Insert the image you want to edit by clicking the Insert tab, selecting Pictures, and then browsing to the location of the saved image on your computer. Click to select the image, and then click on the Insert button to drop it onto your slide.

3. Click on the newly inserted image to select it. You should see a Picture Tools, Format tab appear on your ribbon.

4. Under Picture Tools, on the Format tab, click Remove Background.
5. Once you’ve completed Step 4, you’ll notice that the background of your image will change to a pink color and the foreground area will look the same. The hot pink provides some contrast, making it easier for you to see the parts of the image that PowerPoint perceives as being the background.

The Remove Background feature is pretty smart. In many cases you’ll end up with the result you wanted without any additional work; in other cases, you’ll need to do some more fine-tuning (see Step 6). For those times when you need to do a little more fine-tuning, that high-contrast pink will be helpful for selecting the precise areas of your image that you want to keep and remove.
6. If you need to do some fine-tuning, under Picture Tools, on the Background Removal tab, do one or both of the following:
- If PowerPoint removed areas you wanted to keep, click Mark Areas to Keep and use the drawing pencil to mark the areas on the picture that you want to keep. Simply click and drag your mouse to draw a green line over the area of your image that you want to keep. When you release your mouse button, PowerPoint will remove the pink color from the specified areas you want to keep.
- If PowerPoint didn’t remove enough of the background, click Mark Areas to Remove and use the drawing pencil to mark those areas by clicking and dragging a green line over the area you want to remove. When you release your mouse button, PowerPoint will add the pink color to the areas you identified for removal.
7. When you’re satisfied with how your image looks, click Keep Changes to save these changes to your image.
Or, if you don’t like how it looks, just click Discard All Changes in the Close group to reset the image and start again.
Following is a little animated gif I made to show you how steps 5-7 look in action. Check it out! 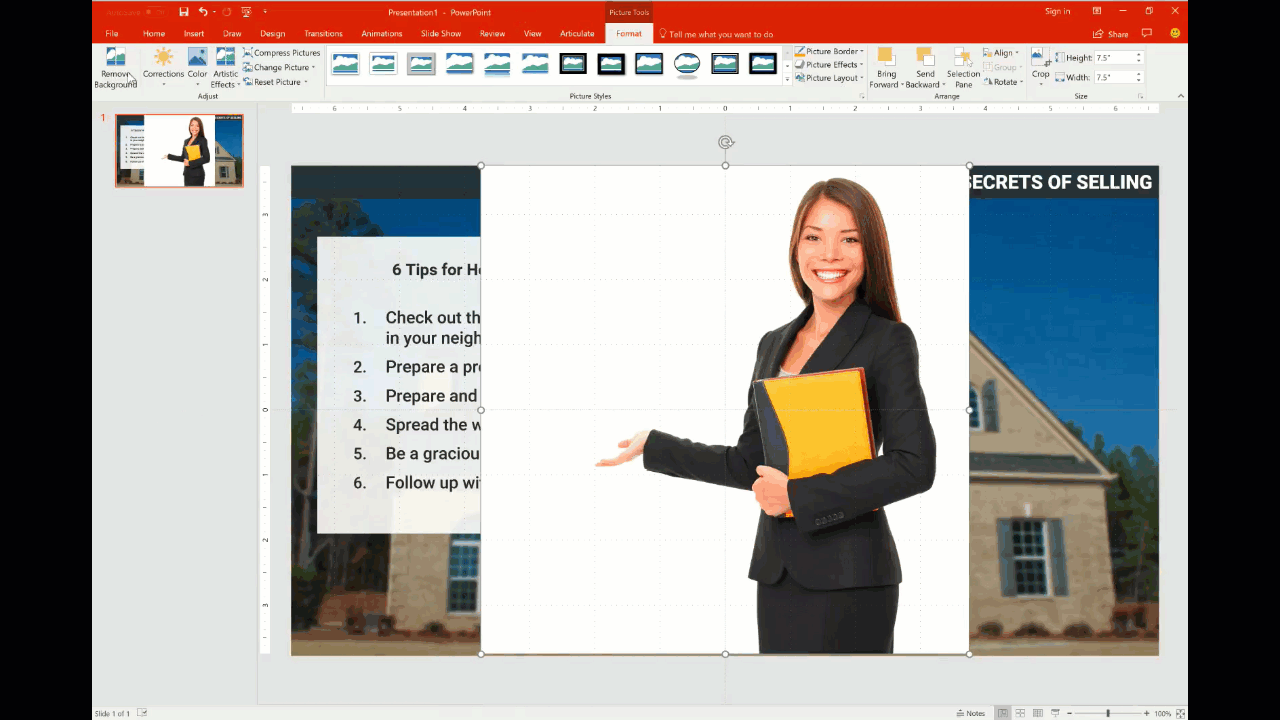
Pro tips: The Remove Background feature works best on images with a lot of contrast between the foreground colors and background colors (e.g., a dark subject on a white or light-colored background).
Keep in mind that any changes you make to images in PowerPoint only affect the copy of the image you inserted; they won’t change the original image file. I find it’s best to right-click on the newly edited image and select Save As Picture and then rename it to save it as a new file.
Also, you can’t use the Remove Background feature on Adobe Illustrator Graphics (AI), Windows Metafile Format (WMF), and Vector Drawing File (DRW). But you can remove the background from Scalable Vector Graphic (SVG) files. Check out Tom Kuhlmann's step-by-step walk-through of how that's done in PowerPoint.
More Learning
Looking for more handy PowerPoint tips? Look no further than E-Learning Heroes! We’ve got loads of free articles, tutorials, and templates to help you build your PowerPoint skills. Here are just a few you might appreciate:
- Don’t miss these PowerPoint Essentials from David Anderson
- Create your own illustrations in PowerPoint (even if you can’t draw) with this easy-to-follow how-to from Allison LaMotte.
- Save time with these 5 PowerPoint tips from Tom Kuhlmann
What do you want to learn about PowerPoint? Share your questions with us in a comment and we’ll consider tackling them in a future article.
Subscribe to our newsletter to get the latest e-learning inspiration and insights directly in your inbox. You can also find us on LinkedIn and Twitter. And if you have questions, please share them in the comments.
18 Comments
Hi Jeffrey. Thanks for your feedback. And yes, that white edge you're referring to is often something that can't be helped. For instance, I find when the subject has dark, straight hair, the lighting used for the photograph will reflect off the subject's hair or the light background will reflect off the subject's hair creating a kind of halo effect. Sometimes you can make that work if your subject and your background are lit from the same angle, but generally I find you need to get a little creative. A few things I've done that have helped include washing out the background so the white edge blends in a bit more and is less stark, and blurring the edges of my subject by 1 pixel to blow out edge just a little. In the end, characters with no background (transparent .pngs) are ideal, whic... Expand