4 Pro Tips for Working with Sliders

When you’re looking to up your e-learning game and give learners more control over how they interact with information, sliders are a fantastic option. Sliders are an interactive element you can add to your Articulate Storyline projects, and you’ll find that e-learning pros use them for all sorts of things, including:
- Illustrating cause-and-effect relationships, like in this safe lifting example
- Controlling objects on the screen like images or characters, as in this space-themed download
- Capturing and manipulating data and numeric values, like in this self-assessment for paramedics
If it seems like you can use sliders for a lot of different things, you’re right! So let’s plant some seeds of creativity by walking through a few slider basics. Along the way I’ll share some handy pro tips to make working with sliders even easier.
Adding Sliders
First things first! Adding a slider to your project is easy. You’ll find sliders on the Insert tab in Storyline 3/360, grouped with dials and buttons and other interactive objects. 
Once you’ve selected Slider, you’ll see three slider styles to choose from:

Regardless of the style you pick, the process of customizing and working with sliders is all the same.
With your slider inserted and selected, you’ll find that a Slider Tools menu becomes available with two tabs: Design and Format.

The Design tab contains options for customizing the function of your slider. The Format tab has options for customizing the look and feel of your slider. Let’s focus on some of the options under the Format tab first. Later we’ll dive into the options on the Design tab.
Customizing the Look and Feel of Sliders
One of my favorite things about sliders is how flexible they are. You can easily blend them into your project by changing the appearance of your slider using the options under Slider Tools > Format tab.
Sliders are composed of two basic parts: the track and the thumb. To interact with the slider, learners drag the thumb along the track.

As I mentioned, you can integrate sliders into the look and feel of your project (or make them stand out from the background if you prefer) by customizing the size, color, and effects of both the track and thumb. You can even swap out the built-in thumb and track for images of your own—opening up a load of creative possibilities! Let’s walk through some of the ways you can format and customize your sliders.
Resizing & Rotating
The track and thumb can be resized individually or together.
To resize the whole slider (both the track and thumb), drag a corner sizing handle.

To change the length of the track, drag the left or right sizing handle.

To change the thickness of the track, drag the left yellow handle up or down.

To resize only the slider thumb, drag the top yellow handle up or down.

Wishing your slider could be vertical? No problem! Although sliders are added to your Storyline project in a horizontal orientation, you can easily change that to any orientation you’d like by grabbing the rotation handle on the top of the slider, or by accessing the Rotate drop-down on the ribbon.

Recoloring
Changing the color fill for the track and thumb is also easy. Just select the slider and go to the Format tab, located under Slider Tools. Change the color of the track fill by selecting Track Fill.

Pro tip: Coordinate your slider colors with the objects or images on your slide by using the eyedropper tool to select specific colors. This is a super-simple way to make your slider look and feel customized and fully integrated with the other objects on your slide!

Changing the Thumb
A lot of folks like to use their own images in place of the default thumb and track options available in Storyline. This can come in handy when you’re trying to give your project a cohesive look and feel that really blends the slider into your slide. You can see an example of how cool an integrated slider can be in this recent e-learning challenge on drug safety and awareness.
To change a thumb to an image, simply select the slider, go to the Format tab under Slider Tools and select Thumb Fill and then Picture.

Similarly, to change a track to an image, simply select the slider, go to the Format tab under Slider Tools and select Track Fill and then Picture.
Pro tip: If you’re trying to use a picture for the track fill and struggling to get the right look, you might find it’s easier to make the track translucent or transparent and then just place it over the image on your slide.
You can control the transparency of the color fill by selecting Gradient from the Track Fill options and then selecting More Gradients. From there, just drag the transparency slider (or enter a value) to adjust transparency from 0 (no transparency) to 100 (totally transparent).
Setting Up Slider Properties
Now that you’ve seen how to add a slider and a few ways to customize the look and feel of sliders, let’s get into the nitty-gritty of how to work with them. That means we’re going to dig into the options available under Slider Tools > Design tab.

Controlling Slider Behavior
When you add a slider to a project, Storyline automatically creates a variable associated with that slider and labels it Slider1. You’ll find this slider variable under the Slider Properties group on the Design tab.

This slider variable is a number variable that Storyline automatically creates. Storyline creates a new number variable for each slider in your course. If you want to change the number variable that’s controlled by the slider, simply use the Variable drop-down to select another number variable in your course.
If you want to change the name assigned to your slider (e.g., Slider1, Slider2, etc.) to something more intuitive or easily recognizable, just right-click on the slider and select Rename. Enter a new name and click OK. You can also change the name of your slider on the timeline. To do that, just double-click on the slider in the timeline to open it for editing. Enter the new name for your slider and press Enter. I find that taking the time to rename my sliders makes it a whole lot quicker and easier to select the correct slider when I’m assigning triggers—especially when I’m working with multiple sliders in my project.

When a slider is added to your project, by default, it’s inserted as an object with a starting value of 0 and an ending value of 10. This means there are 11 “steps” as you drag the slider from left to right. Let’s take a closer look at how you can control the number of steps and the value for each step, as well as other slider properties on the Design tab.
|
Update |
Storyline gives you the ability to control when the slider variable is updated. You can update the variable as the learner is dragging the slider (which is the default setting) or only after the learner releases it. |
|
Start |
This is the starting value for your slider. In other words, this is the value assigned to the step where the thumb initially appears on the track (also see initial, below). By default this value is set to 0, but the starting value can be any value up to two decimal places. The minimum value is -9999 and the maximum value is 9999. For most projects this value can be left at 0, but for some projects it makes more sense for this value to match what your learners are seeing on the screen. For instance, if you’re using a slider to create an interactive thermometer that scales from 32°F to 100°F, you’d probably want that starting value to be 32 to avoid confusion. |
|
Initial |
This is the initial position for the slider thumb on the track. Again, Storyline defaults to 0 (left), but you can designate any value of up to two decimal places. For instance, if you wanted the thumb to initially appear in the middle of the slider, assuming a total slider value of 10, you’d set the initial value |
|
End |
This is the ending value for your slider. It defaults to 10, but again you can make it any value of up to two decimal places. The minimum value is -9999 and the maximum value is 9999. Much like the starting value, for certain interactions it might make sense to change this value to reflect what your learners are seeing on the screen. |
|
Step |
This is the incremental value for the slider thumb as it moves to each step along the track. By default, Storyline sets this to 1, but it can be given any value of up to two decimal places. Folks often add more steps to their slider when they’re trying to use it to fluidly change the state of an object, like in this example. |
Triggering Actions
So you’ve got your slider looking good and set up the way you want—now what? Well, sliders are a tool for interaction, so you'll probably want your slider to do something when the learner uses it! That’s where triggers come into the picture. You’ll need to add triggers that execute when the slider moves or the variable changes.
Let’s say you want to show a series of layers to progressively reveal an image as the learner drags the slider, like in this water treatment process example. Here’s what the layer trigger on the triggers panel looks like for this project:
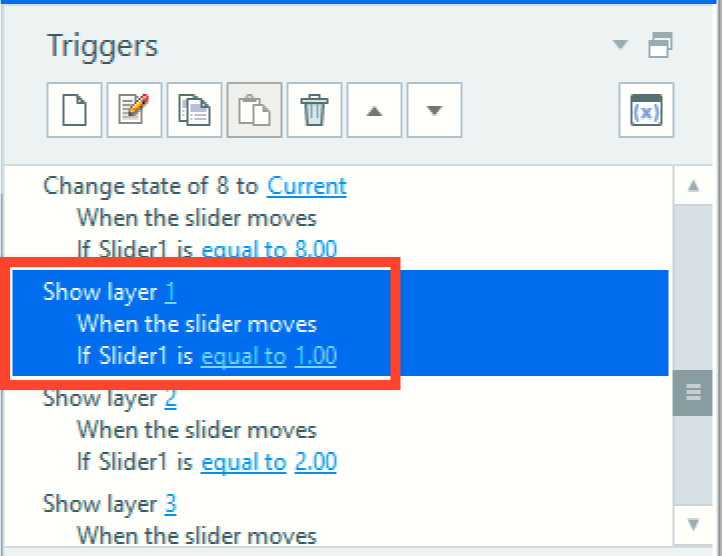
Of course, this is just an example of one type of action you can trigger with sliders. There are tons more! To learn more about triggers, check out this handy user guide.
Pro tip: One common use of sliders is to capture the slider value and display it in a textbox or a shape. This can be a really cool way for learners to rate themselves. For instance, you could ask them to drag the slider to reflect their comfort level in performing a new task they've just learned, like in this example below.

Building something like the above interaction is easily done by adding a variable reference to a textbox or shape. A variable reference is simply text that reflects the variable name surrounded by the % sign. So typing %slider1% into any textbox or shape will display the value of slider1 when previewed/published. Likewise, typing %slider2% will display the value of slider2 … and so on. The really cool thing is that this reference can be automatically updated to show the value as your learner moves the thumb along the track (assuming you've left the update setting in its default). You can see an example of this idea in the gif below.
 More Tips and Resources
By now you’re probably seeing all the interactive potential of adding sliders to your projects. This article touched on a lot of information and tips, but there’s much more to learn. Here are a few more bonus tips and resources to check out.
- Not quite sure how you’d use a slider in your course? No worries! Our community is super-generous about showing their work. Check out some of their creative ideas for using sliders in this recent e-learning challenge and in this round-up of slider interactions.
- Love the idea of capturing slider value to display to learners, but want to limit their input or prevent them from changing their selection? Check out this discussion for a brilliant tip from our very own Superhero Wendy Farmer. So clever!
- One cool idea for using sliders is to create an interactive bar graph that changes as the learner drags the slider. Here’s a gif to illustrate the idea:

This effect is super-cool, right? The trick to making this work is to add lots of states to your bars and lots of steps to your slider. These incremental changes give the slider and the bars that nice, fluid movement. To see what’s under the hood of this slider interaction, grab this free bar chart download.
- As I mentioned above, inserting a slider automatically adds a slider number variable to your project. Obviously, renaming the slider variable to something more relevant is a big win for a lot of reasons, but particularly when you’re troubleshooting your project. There are even more helpful troubleshooting tips for all sorts of Storyline interactions in this must-read article, Troubleshooting Advanced Interactions by Nicole Legault.
- Are you just looking for a general guide on sliders? We’ve got you covered there too. Check out our Storyline 360 User Guide.
What are your tricks for working with sliders? Share your tips, ideas, and questions below or strike up a conversation with your fellow e-learning pros in our Building Better Courses forum.
Did you find this article helpful? If so, don’t forget to follow us on Twitter and come back to E-Learning Heroes regularly for more helpful advice on everything related to e-learning.
22 Comments