Here’s How to Format Your Storyline Project Background

Adding a background to your Articulate Storyline project is a super-easy, and really effective, way to make your slides more visually engaging. It’s a basic task most of us do every time we create a new project; however, many people are not doing it the most optimal way. If you’re inserting your image or a colored shape onto your slide, and resizing it so it fits just right, you might be interested to know there’s a more effective way to format backgrounds. There’s actually lots to know about backgrounds, maybe more than you thought, so let’s go over some tips and best practices for formatting backgrounds in Storyline.
Base Layer vs. Slide Layer Background
First, it’s important to understand that a background can be applied not only to the slide’s base layer, but to every individual slide layer created.

It’s also important to understand that layouts for base layers are controlled on the slide master, and layouts for slide layers are controlled on the feedback master.
Background Types
Let’s take a look at the different types of backgrounds you can add in Storyline. When you open the Format Background properties, you’ll notice two options: Fill and Picture.

The Fill dropdown, which refers to “filling” the background of a layer, offers several options:
Solid: This option gives you the ability to select a solid color to fill the entire background of the layer and to adjust the transparency of the background fill color.

You might ask yourself: Why would I adjust the transparency of the background color? The answer is: you likely won’t use the feature on a base layer, but it can come in handy if you’re working on a slide layer and want to be able to see through the background to the base layer.
Gradient: If you don’t want to go with a solid background color, you can choose a gradient, which allows you to blend various colors. Storyline has tons of options for adjusting your gradient to make it look just right.
You can choose from preset gradient options, you can adjust the type or direction of the gradient, and you can add or remove the number of “stops” (colors) that appear in your gradient, as well as where the stops merge.

Texture or picture: This option gives you a few choices.
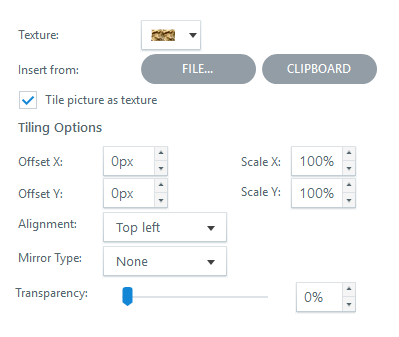
The texture dropdown menu includes stones, grass, wood, and many other choices.

As an alternative to a texture, you can insert a photo of your own to display as the background. Either upload a photo from your files, or use the last photo on your clipboard.
With either option, you have the ability to set the texture or the picture to tile (repeat the picture or texture within the background) or stretch (fill the background).
Pattern: When you select this option you’ll be able to choose from a wide variety of background patterns; you can also edit the colors of the pattern.

Those are your options for setting the background fill. But there are a few more important options available in the Format Background window:
Hide background graphics: This is useful when you have a background on a slide master layout. It will keep the background fill intact but will hide any other additional graphics (shapes, textboxes, characters, etc.) that appear on that slide master layout.
Reset background: This button will reset the background of either the base layer or a slide layer to the default background of the master layout in question.
Apply to all: If you are on the base layer when you click this option, this will apply your current background to all base layers in your project, including those in the slide master. If you are editing a slide layer, when you click this option, this will apply your current background to all slide layers in your project, including those in the feedback master.
Formatting a Background
As usual in Storyline, there is more than one way to edit the background. Note: The method you use should depend on whether you’re using the background only once or many times in your project. For a background used once:
Right-click menu: A quick and easy way to format your background is to right-click on your slide and select “Format Background.”

From there, you’ll be able to select from the options previously described to fill the background with either a color (fill or gradient), a picture, a texture, or a pattern.
Design tab on the ribbon: Another way to format the background of your slide is to navigate to the design tab on the ribbon. On that tab, you’ll notice a “Background Styles” area.

There you will have the option, also available in the Format Background window, to “Hide Background Graphics.”
You can also click on the Background Styles dropdown to choose from a predetermined style and color scheme for the background (solid and gradient color options), or you can click the Format Background button to launch the Format Background window.

For a background used multiple times:
Use the slide master: If you’re going to apply the same background to multiple base layers, it’s best to create a slide master layout and simply apply that layout to the base layers in question.
To create a new slide master layout, navigate to the View tab on the ribbon and click Slide Master. There, you’ll notice some slides displayed in the panel on the left. Right-click inside that panel and select “Insert Layout” from the menu.

Now that you have a new slide master layout, give it a descriptive name by right-clicking on it and choosing the “Rename Layout” option from the menu. Then, format your background of the slide master layout. There are two ways to do this inside the slide master:
- Right-click on a slide and choose Format Background
- Click the Background Styles dropdown menu on the ribbon and select “Format Background”
Once you’ve styled your slide master, click the Close Master View button on the ribbon. To see the new layout you created, you can right-click on any slide’s base layer in your project and select “Layout.” This way, you can quickly and easily apply the same background to multiple base layers in your project without repeating steps.
Additionally, if you need to update or change the background, you can do it once on the master instead of having to do it for each individual slide that uses that background. The slide master is a huge timesaver. And remember: the slide master only controls the backgrounds for the base layer of a slide. If you want to create a background that you can use more than once for multiple slide layers, follow these same steps, but in the feedback master.
As you can see, there’s more to formatting a background than just inserting an image or shape onto a slide. There are ways of working with backgrounds that can save you development time and effort, such as working with the slide and feedback masters. It’s also important to understand the difference between the slide layer vs. the base layer background, which can be a bit confusing at first.
Do you have any other tips or tricks about working with backgrounds in Storyline that you think are worth sharing? Did I forget to mention something important? If so, please leave a comment below, I love to hear your feedback.
Want to try something you learned here, but don’t have Articulate software? Download a free 30-day trial, and come back to E-Learning Heroes regularly for more helpful advice on everything related to e-learning.
1 Comment