How I Built This “Decorate a Tree” Interaction with Storyline 2
The holiday season is fast approaching, and here at Articulate we’ve been getting into the spirit of things by creating fun, holiday-themed content for the community. Check out this interaction that lets you decorate your own tree in three simple steps: hang ornaments where you please, select some tinsel, and place a tree-topper to add that finishing touch. Voila! In just seconds, you’ve created a beautiful tree! Click on the image below to try it yourself.

I inevitably am asked “How did you build this?”, so I thought I’d go ahead and answer that for you here. Here are the steps that went into creating this activity in Articulate Storyline 2:
Built Out My Drag-and-Drop Using Freeform Quiz
In my three-step interaction, the first move is to drag the ornaments to their spot on the tree and the second is to select a type of tinsel. I would have preferred to start by having users select the tinsel and THEN place the ornaments on the tree, but you can only add a freeform interaction to a base slide (not a slide layer), and I really wanted to have the whole interaction on one slide. So in order to use the drag-and-drop on this multilayer interaction, the ornaments had to be added first.
I added a graphic of a dark green tree, which I created by grouping together shapes, and then right-clicked on it and selected “Save as” to save it as an image. I also created the ornaments, which are the “Drag Items” in my drag-and-drop interaction, by grouping together shapes. Then, I added a hotspot over my tree that serves as my “Drop target.” Last, I converted the slide to a freeform drag-and-drop interaction so you can place ornaments wherever you’d like.

Added Layers for Step 2 and Step 3
Once you’ve got your ornaments in place, you move on to a new layer to select a color for the tinsel in the tree. I achieved this effect by using a simple number variable. Selecting each color adjusts the value of the variable to a different number, so clicking on the red rectangle sets the value of the variable to 1, clicking the gold shape sets the value to 2, etc. The states of the tinsel change according to the value of the variable. If the variable is set to 1, the red state is displayed. If the variable is set at 2, the gold state is displayed.

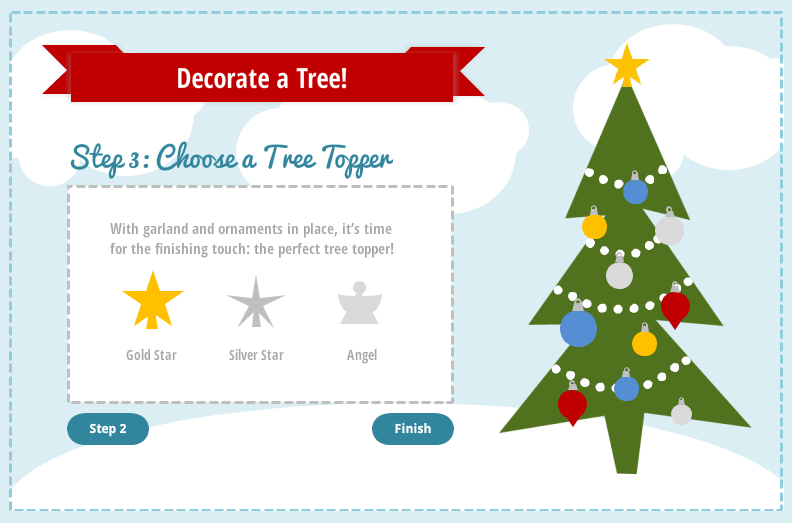
When you’re ready to select a tree-topper, Step 3, you go to yet another new layer. The tree-topper effect was created using “Hidden” states. I put all three options on top of the tree and set their states to “Hidden.” Then, when you click on a tree-topper, Storyline changes the state of the corresponding graphic to “Normal.” It’s all done using states and triggers. And there you have it! You’ve got a nicely decorated tree that includes ornaments, tinsel, and a topper.
Added an Intro and a Wrap-Up
I like my projects to be nicely presented, without an abrupt start or finish. To that end, I created an intro layer and a wrap-up layer for my interaction. The intro layer is triggered to show right away when you start the course. I created the snowfall effect using the new Storyline 2 motion paths. I also added a sound effect, to make it more fun and give it some oomph.

And there you have it! That’s the general outline of how I created this “Decorate a Tree” holiday-themed interaction.
Do you like this demo? Are you interested in looking at the .story file to find out more about the details that went into this creation? Well, luckily for you, it's also available as a free download. Have you ever created your own holiday-themed interaction or course? We’ve love to see what you’ve got, so share your comments below.
Want to try something you learned here, but don't have Articulate software? Download a free trial, and come back to E-learning Heroes regularly for more helpful advice on everything related to e-learning. If you have any comments, please share them below.
17 Comments