Hit Your E-Learning Out of the Park with This Scoreboard Results Slide
 Users often ask us if it is possible to obtain question-by-question results at the end of quizzes in Articulate Storyline. While there is no automated way to do that, you can do it fairly quickly using variables. Let’s walk through the process together.
1. Create Questions
Before you create your scoreboard, you should create all of your quiz questions as you normally would.

2. Insert Results Slide
Once you’ve got all your questions set up, go ahead and insert your results slide.

3. Add Objects with Correct and Incorrect States to Results Slide
The next step is to set up the layout of your results slide. In this example, I inserted a rectangle for each question.

For each rectangle, I created two custom states: correct and incorrect. I decided to simply write the words correct and incorrect in green and red, but keep in mind that you can personalize these however you’d like.
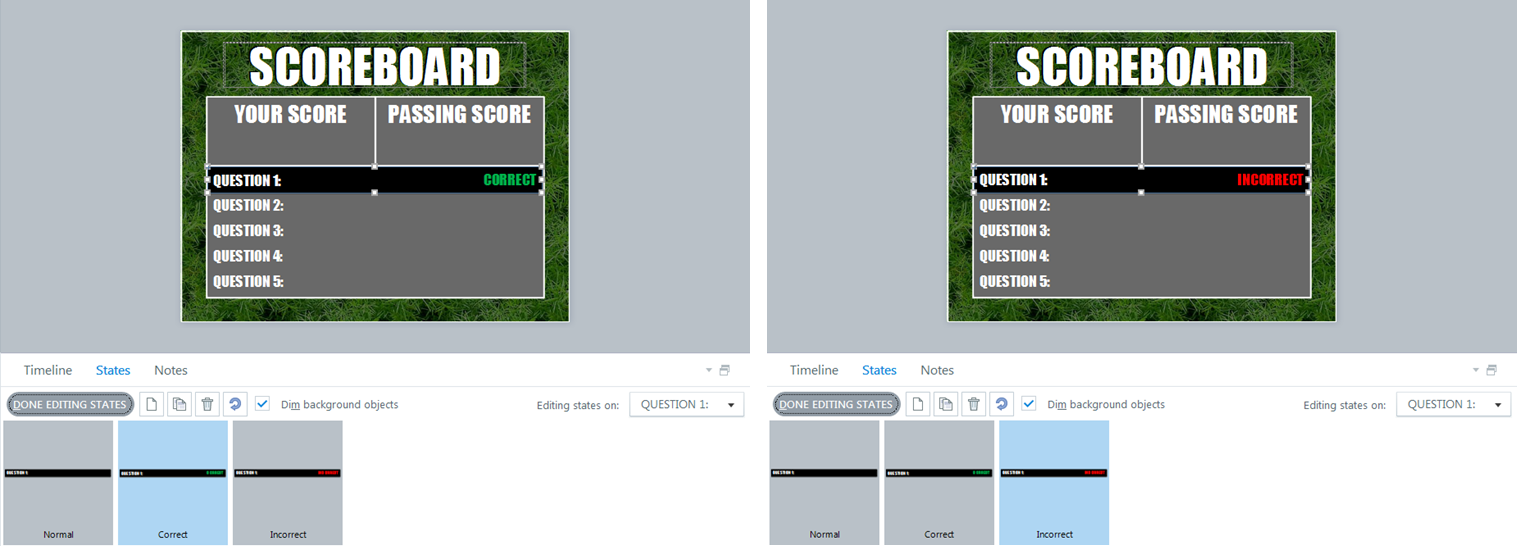
The last step is to set the default state of each of the rectangles to “Correct.” This will allow you to minimize the number of variables you need to make the scoreboard work correctly, since you’ll only need to change the state when the answer is incorrect.

When you’re done, it should look something like this:

Pro tip: If you go through all these steps for one rectangle before creating the others, then you can just copy and paste that rectangle to create the others and all you will have to do is change the question number and you’re all set!
4. Create Variables
Once you have your questions and results slides set up, the next step is to create a variable for each question. To do so, open up the variable management window by clicking on the X icon.

Then just click on the plus sign to add a new variable.

When the pop-up window opens, the first thing you’ll do is name your variable. When you’re naming your variables, make sure to choose relevant names so you can easily tell which variable does what. For example, I’ve named mine “Q1Incorrect” because it is the variable that will come into play when question 1 is incorrect.
Next, select the type of variable you’d like to insert; in this case, a true/false variable. Finally, select the default value: true or false. It doesn’t really matter which one you choose, just make a note of it so that you choose the opposite one later, when you insert the trigger.

Pro tip: Once you’ve created your first variable, you can then just copy and paste it to create the others.

Make sure to update the names after you copy the variable so that you know which one does what.

In a matter of seconds, you’ve created all your variables!

5. Add Triggers to Incorrect Layers
Now that your variables are ready to go, it’s time to set up the triggers. What we want to do is change the value of the variable when the learner gets an incorrect answer. To do so, we’ll insert an “adjust variable” trigger to the incorrect layer of each question.

Pro tip: You can copy and paste this trigger from one slide layer to another; just make sure to update the variable that is being adjusted by selecting the correct one in the drop-down list.
6. Add Triggers to Success/Failure Layers of Results Slide
The last step is to add triggers to the success and failure layers of your results slide to change the state of the objects you created in the beginning to Incorrect when applicable.
Let’s start with the failure layer. Click on the layer, select the object linked to Question 1 (in this case Q1), and add a new trigger by clicking on the new trigger icon. Then select “Change state of” and choose the state you want to change it to (incorrect) and when you want that to happen (when the timeline starts).
Then select “Show Conditions” and click on the plus sign to add a condition. Select the variable in question (in this case Q1Incorrect) and select “Equal to,” “Value,” or “False” (assuming the default value was true; if you selected a default value of “False,” you’ll want to select “True” here).

You can then copy and paste this trigger, switching out the object and variable for each question.

Once you’ve created a trigger for each question on the fail layer, copy and paste all the triggers onto the success layer. You should have one trigger for each question on each layer, as shown below.

And there you have it! Your scoreboard is all ready. When the learner clicks through it should look like this if they get questions 2 and 4 incorrect:

Want to learn more about results slides in Storyline? Check out these great resources:
Or get inspired by the stunning results slides created by community members for E-Learning Challenge #14.
Don’t forget to follow us on Twitter and visit E-Learning Heroes regularly for more helpful advice on everything related to e-learning.